Welcome to DroneKit-Python’s documentation!
DroneKit-Python 2.x helps you create powerful apps for UAVs. These apps run on a UAV’s Companion Computer, and augment the autopilot by performing tasks that are both computationally intensive and require a low-latency link (e.g. computer vision).
This documentation provides everything you need to get started with DroneKit-Python, including an overview of the API, quick start, guide material, a number of demos and examples, and API Reference.
Tip
DroneKit-Python version 1.5 has now been superseded (see these links for legacy documentation and examples).
If you’re migrating from DroneKit-Python version 1.x, check out our comprehensive Migration Guide.
Contents:
Introducing DroneKit-Python
This section provides an overview of DroneKit-Python’s functionality, licensing, and supported companion computers.
After reading, you will understand what the kit offers and the opportunities it provides. You will also know where to go if you have further questions for suggestions for improvement.
About DroneKit
DroneKit-Python allows developers to create apps that run on an onboard companion computer and communicate with the ArduPilot flight controller using a low-latency link. Onboard apps can significantly enhance the autopilot, adding greater intelligence to vehicle behaviour, and performing tasks that are computationally intensive or time-sensitive (for example, computer vision, path planning, or 3D modelling). DroneKit-Python can also be used for ground station apps, communicating with vehicles over a higher latency RF-link.
The API communicates with vehicles over MAVLink. It provides programmatic access to a connected vehicle’s telemetry, state and parameter information, and enables both mission management and direct control over vehicle movement and operations.
Open source community
DroneKit-Python is an open source and community-driven project.
You can find all the source code on Github here and check out our permissive Apache v2 Licence. If you want to join the community, then see our contributing section for lots of ideas on how you can help.
Compatibility
DroneKit-Python is compatible with vehicles that communicate using the MAVLink protocol (including most vehicles made by 3DR and other members of the DroneCode foundation). It runs on Linux, Mac OS X, or Windows.
Note
DroneKit-Python is validated against, and hence most compatible with, the ArduPilot UAV Platform. Vehicles running other autopilots may be be less compatible due to differences in adhererence/interpretation of the MAVLink specification. Please report any autopilot-specific issues on Github here.
API features
The API provides classes and methods to:
- Connect to a vehicle (or multiple vehicles) from a script
- Get and set vehicle state/telemetry and parameter information.
- Receive asynchronous notification of state changes.
- Guide a UAV to specified position (GUIDED mode).
- Send arbitrary custom messages to control UAV movement and other hardware (GUIDED mode).
- Create and manage waypoint missions (AUTO mode).
- Override RC channel settings.
A complete API reference is available here.
Technical support
This documentation is a great place to get started with developing DroneKit Python APIs.
If you run into problems, the best place to ask questions is the DroneKit-Python Forum. If your problem turns out to be a bug, then it should be posted on Github.
Release Notes
This page contains the release notes for DroneKit-Python minor and major releases.
Note
DroneKit-Python marks releases using the major.minor.patch release numbering convention, where patch is used to denote only bug fixes, minor is used for releases with new features, and major indicates the release contains significant API changes.
Latest release
Changelog
Version 2.9.1 (2017-04-21)
Improvements
- home locatin notifications
- notify ci status to gitter
- basic python 3 support
- isolated logger function so implementers can override
- rename windows installer
Cleanup
- removed legacy cloud integrations
Bug Fixes
- fix missing ** operator for pymavlink compatibility
Version 2.9.0 (2016-08-29)
Bug Fixes
- MAVConnection stops threads on exit and close
- PX4 Pro flight modes are now properly supported
- go to test now uses correct
global_relative_framealt
Improvements
- Updated pymavlink dependency to v2 from v1 hoping we don’t fall behind again.
Version 2.8.0 (2016-07-15)
Bug Fixes
- Makes sure we are listening to
HOME_LOCATIONmessage, befor we would only set home location if received by waypoints.
Version 2.5.0 (2016-05-04)
Improvements
- Catch and display message and attribute errors, then continue
- Improved takeoff example docs
- Deploy docs on successful merge into master (from CircleCI)
- Drone delivery example, explain port to connect
- MicroCGS example now uses SITL
- Make running examples possible on Vagrant
Bug Fixes
- Mav type for rover was incorrect
_is_mode_availablecan now handle unrecognized mode codes- Fix broken links on companion computer page
- Fix infinite loop on channel test
Version 2.4.0 (2016-02-29)
Bug Fixes
- Use monotonic clock for all of the internal timeouts and time measurements
- Docs fixes
Version 2.3.0 (2016-02-26)
New Features
- PX4 compatibility improvements
Updated Features
- Documentation fixes
- PIP repository improvements
- Mode-setting API improvements
- ardupilot-solo compatibility fixes
Version 2.2.0 (2016-02-19)
Bug Fixes
- Splits outbound messages into its own thread.
- Remove of capabilities request on HEARTBEAT listener
- Check if mode_mapping has items before iteration
Version 2.1.0 (2016-02-16)
New Features
- Gimbal control attribute
- Autopilot version attribute
- Autopilot capabilities attribute
- Best Practice guide documentation.
- Performance test example (restructured and docs added)
Updated Features:
Many documentation fixes:
- Restructured documentation with Develop (Concepts) and Guide (HowTo) sections
- Docs separated out “Connection Strings” section.
- Improved test and contribution sections.
- Updated examples and documentation to use DroneKit-Sitl for simulation (“zero setup examples”)
- Debugging docs updated with additional libraries.
- Flight Replay example fetches data from TLOG rather than droneshare
- Drone Delivery example now uses strart location for home address.
- Disabled web tests (not currently supported/used)
- Updated copyright range to include changes in 2016
Bug Fixes
- Numerous minor docs fixes.
- Harmonise nosetest options across each of the integration platforms
- Fix incorrect property marker for airspeed attribute
Version 2.0.0 (2015-11-23)
New Features:
- Renamed library and package from DroneAPI to DroneKit on pip
- DroneKit Python is now a standalone library and no longer requires use of MAVProxy
- Connect multiple vehicles in one script by creating separate vehicle instances
- Removed NumPy, ProtoBuf as dependencies
- Add MAVLink message listeners using
add_message_listenermethods - Added
on_attributeandon_messagefunction decorator shorthands - Added
mount_status,system_status,ekf_ok,is_armable,heading - Made settable
groundspeed,airspeed - Moved
dronekit.libentries to root packagedronekit - Added
parameters.setandparameters.getfor fine-tuned parameter access parametersnow observable and iterable (#442)- Added
last_heartbeatattribute, updated every event loop with time since last heartbeat (#451) - Await attributes through
wait_readymethod andconnectmethod parameter - Adds subclassable Vehicle class, used by
vehicle_classparameter inconnect
Updated Features:
- local_connect renamed to connect(), accepting a connection path, link configuration, and timeout settings
- Removed
.set_mavrx_callback. Usevehicle.on_message('*', obj)methods - Renamed
add_attribute_observermethods toadd_attribute_listener, etc. (#420) - Renamed
wait_initandwait_validtowait_ready - Split
home_locationis a separate attribute fromcommandswaypoint array - Moved RC channels into
.channelsobject (#427) - Split location information into
local_frame,global_frame, andglobal_relative_frame(and removedis_relative) (#445) - Renamed
flushtocommands.upload, as it only impacts waypoints (#276) commands.gotoandcommands.takeoffrenamed tosimple_gotoandsimple_takeoff
All releases
For information about all past releases, please see this link on Github.
Working with releases
The following PyPI commands are useful for working with different version of DroneKit Python:
pip install dronekit # Install the latest version
pip install dronekit --upgrade # Update to the latest version
pip show dronekit # Find out what release you have installed
pip install dronekit==2.0.0rc1 # Get a sepcific old release (in this case 2.0.0rc1)
See Release History on the package ranking page for a list of all releases available on PyPI.
Migrating to DKPY 2.0
DroneKit-Python 2.0 has undergone a significant architectural evolution when compared to version 1.x (the library changed from a MAVProxy extension to a standalone Python module). The API itself remains similar, with the most important difference being that you now need to specify the vehicle target address inside the script.
The sections below outline the main migration areas.
Note
DroneKit-Python version 1.5 has now been superseded (see these links for legacy documentation and examples).
Installation
DKPY 2.0 is now installed from pip on all platforms - see Installing DroneKit for more information.
Installation is generally simpler than on DK 1.x because there are far fewer dependencies (both MAVProxy and numpy are no longer needed).
Note
- The DroneKit-Python Windows installer cannot be used for DKPY2.x (and is no longer needed).
- One implication of the reduced dependencies is that it should now be easier to use other Python distributions (like ActivePython - although this has not been verified!)
Launching scripts
DroneKit-Python 2.0 apps are run from an ordinary Python command prompt. For example:
some_python_script.py # or `python some_python_script.py`
Note
This contrasts with DKPY 1.x scripts, which were run from within MAVProxy using the command:
api start some_python_script.py
Code changes
This section outlines the changes you will need to make to your DroneKit-Python scripts.
Connecting to a vehicle
You must specify the target vehicle address in your script (in DKPY 1.x this was done when you launched MAVProxy).
The code fragment below shows how you import the connect() method and use it to return a
connected Vehicle object. The address string passed to connect() takes the same
values as were passed to MAVProxy when setting up a connection in DKPY 1.x (in this case, a SITL instance running on the same computer).
from dronekit import connect
# Connect to the Vehicle (in this case a UDP endpoint)
vehicle = connect('127.0.0.1:14550', wait_ready=True)
Note
The wait_ready=True parameter ensures that connect() won’t return until
Vehicle.parameters and most other default attributes have been
populated with values from the vehicle. Check out Vehicle.wait_ready() for more
information (this method is used by the connect() implementation).
connect() also has arguments for setting the baud rate,
returning your own custom vehicle classes and setting the length of the connection timeout.
After connecting, the returned vehicle can be used in exactly the same way as in DKPY 1.x.
Note
The above code replaces DKPY 1.x code to get the Vehicle (similar to the example below):
# Get an instance of the API endpoint
api = local_connect()
# Get the connected vehicle (currently only one vehicle can be returned).
vehicle = api.get_vehicles()[0]
Connection status checks
DroneKit no longer runs in MAVProxy so scripts don’t need to monitor and act on external thread shutdown commands.
Remove code that checks the api.exit status (note that the api.exit call below is commented out).
while not vehicle.armed # and not api.exit:
print " Waiting for arming..."
time.sleep(1)
Note
In fact you should delete all references to APIConnection class and its methods (get_vehicles(), exit() and stop()).
Script completion checks
Examples that might possibly have outstanding messages should call Vehicle.close()
before exiting to ensure that all messages have flushed before the script completes:
# About to exit script
vehicle.close()
Command line arguments
Remove any code that uses the local_arguments array to get script-local command line arguments (via MAVProxy).
From DKPY 2.0 command line arguments are passed to sys.argv as with any other script. The examples use the
argparse module for argument parsing, but you can
use whatever method you like.
Note
In DKPY 1.x the script’s sys.argv values were the values passed to MAVProxy when it was
started. To access arguments passed to the script from MAVProxy you used the local_arguments array.
For example if you started a script as shown below:
api start my_script.py 101
Then you would read the integer in your code using
my_argument = int(local_arguments[0])
Current script directory
DroneKit-Python v1.x passed a global property load_path to any executed file containing the
directory in which the script was running. This is no longer needed in version 2 and has been removed.
Instead, use normal Python methods for getting file system information:
import os.path
full_directory_path_of_current_script = os.path.dirname(os.path.abspath(__file__))
Vehicle.location
DroneKit-Python v1.x had a Vehicle.location attribute which provided latitude and longitude information in the
global frame, and altitude either relative to sea-level or the home location (depending on the value of its is_relative member).
DKPY2.0 uses and attribute with the same name to provide location in global, global-relative and local (NED) frames:
print "Global Location: %s" % vehicle.location.global_frame
print "Global Location (relative altitude): %s" % vehicle.location.global_relative_frame
print "Local Location: %s" % vehicle.location.local_frame
For more information see: Vehicle.location,
Vehicle.location.global_frame,
Vehicle.location.global_relative_frame,
Vehicle.location.local_frame, and Vehicle State and Settings.
Takeoff and movement commands
DroneKit-Python v1.x provided guided mode takeoff and movement methods Vehicle.commands.takeoff()
and Vehicle.commands.goto().
DKPY2.0 instead provides Vehicle.simple_takeoff and
Vehicle.simple_goto. These are the same as the old methods
except that simple_goto allows you to optionally set the default target groundspeed and airspeed.
Vehicle.airspeed and
Vehicle.groundspeed are now settable values. Call these to
set the default target speed used when moving with Vehicle.simple_goto
(or other position-based movement commands).
Home location
DroneKit-Python 1.x code retrieved the home location from the first element in Vehicle.commands.
This code must be replaced with the DroneKit-Python 2.x Vehicle.home_location attribute.
Tip
Even though the home location is no longer returned as the first waypoint in Vehicle.commands,
you will still need to download the commands in order to populate the value of
Vehicle.home_location.
Missions and Waypoints
The API for working with missions has been improved and made significantly more robust.
One of the major changes is that the Vehicle.commands list no
longer includes the home location waypoint in the 0th
index. Another change is that we now wait for command download to complete using
Vehicle.commands.wait_ready().
All the known bugs have been fixed. It is now much easier to download, clear, and add items to the mission because there is no need to work around race conditions and other issues with the API.
For more information see Missions (AUTO Mode).
Observing attribute changes
The DroneKit-Python 1.x observer function vehicle.add_attribute_observer has been replaced by
Vehicle.add_attribute_listener() or
Vehicle.on_attribute() in DKYP2.x, and Vehicle.remove_attribute_observer
has been repaced by remove_attribute_listener().
The main difference is that the callback function now takes three arguments (the vehicle object, attribute name, attribute value) rather than just the attribute name. This allows you to more easily write callbacks that support attribute-specific and vehicle-specific handling and means that you can get the new value from the callback attribute rather than by re-querying the vehicle.
Note
The difference between Vehicle.add_attribute_listener() and
Vehicle.on_attribute() is that attribute listeners added using
Vehicle.on_attribute() cannot be removed (while on_attribute()
has a more elegant syntax).
A few attributes have been modified so that they only notify when the value changes:
Vehicle.system_status,
Vehicle.armed, and
Vehicle.mode. Users no longer need to add caching code
for these attributes in their listeners.
Attributes that provide “streams” of information (i.e. sensor output) remain unchanged.
Note
If you’re creating your own attributes this caching is trivially
provided using the cache=True argument to
Vehicle.notify_attribute_listeners().
See Observing attribute changes for more information.
Parameter changes
In DKPY2 you can now observe parameters in order to
be notified of changes, and also iterate
Vehicle.parameters to get a list of off the supported
values in the connected vehicle.
In addition, the code to download parameters and keep information in sync with the vehicle is now a lot more robust.
Intercepting MAVLink Messages
DroneKit-Python 1.x used Vehicle.set_mavlink_callback() and Vehicle.unset_mavlink_callback
to set/unset a callback function that was invoked for every single mavlink message.
In DKPY2 this has been replaced by the Vehicle.on_message()
decorator, which allows you to specify a callback function that will be invoked for a single message
(or all messages, by specifying the message name as the wildcard string ‘*’).
Tip
Vehicle.on_message() is used in core DroneKit code for
message capture and to create Vehicle attributes.
The API also adds Vehicle.add_message_listener()
and Vehicle.remove_message_listener().
These can be used instead of Vehicle.on_message() when you need to be
able to remove an added listener. Typically you won’t need to!
See MAVLink Messages for more information.
New attributes
In addition to the home_location,
a few more attributes have been added, including:
Vehicle.system_status,
Vehicle.heading,
Vehicle.mount_status,
Vehicle.ekf_ok,
Vehicle.is_armable,
Vehicle.last_heartbeat.
Channel Overrides
Warning
Channel overrides (a.k.a “RC overrides”) are highly discommended (they are primarily implemented for simulating user input and when implementing certain types of joystick control).
DKPY v2 replaces the vehicle.channel_readback attribute with
Vehicle.channels (and the Channels
class) and the vehicle.channel_override attribute with
Vehicle.channels.overrides
(and the ChannelsOverrides class).
Documentation and example code for how to use the new API are provided in Example: Channels and Channel Overrides.
Debugging
DroneKit-Python 1.x scripts were run in the context of a MAVProxy. This made them difficult to debug because you had to instrument your code in order to launch the debugger, and debug messages were interleaved with MAVProxy output.
Debugging on DroneKit-Python 2.x is much easier. Apps are now just standalone scripts, and can be debugged using standard Python methods (including the debugger/IDE of your choice).
Open Source Licence
DroneKit-Python is licensed under the Apache License Version 2.0, January 2004 (http://www.apache.org/licenses/). This is present in the LICENSE file in the source tree, and reproduced below:
Apache License
Version 2.0, January 2004
http://www.apache.org/licenses/
TERMS AND CONDITIONS FOR USE, REPRODUCTION, AND DISTRIBUTION
1. Definitions.
"License" shall mean the terms and conditions for use, reproduction,
and distribution as defined by Sections 1 through 9 of this document.
"Licensor" shall mean the copyright owner or entity authorized by
the copyright owner that is granting the License.
"Legal Entity" shall mean the union of the acting entity and all
other entities that control, are controlled by, or are under common
control with that entity. For the purposes of this definition,
"control" means (i) the power, direct or indirect, to cause the
direction or management of such entity, whether by contract or
otherwise, or (ii) ownership of fifty percent (50%) or more of the
outstanding shares, or (iii) beneficial ownership of such entity.
"You" (or "Your") shall mean an individual or Legal Entity
exercising permissions granted by this License.
"Source" form shall mean the preferred form for making modifications,
including but not limited to software source code, documentation
source, and configuration files.
"Object" form shall mean any form resulting from mechanical
transformation or translation of a Source form, including but
not limited to compiled object code, generated documentation,
and conversions to other media types.
"Work" shall mean the work of authorship, whether in Source or
Object form, made available under the License, as indicated by a
copyright notice that is included in or attached to the work
(an example is provided in the Appendix below).
"Derivative Works" shall mean any work, whether in Source or Object
form, that is based on (or derived from) the Work and for which the
editorial revisions, annotations, elaborations, or other modifications
represent, as a whole, an original work of authorship. For the purposes
of this License, Derivative Works shall not include works that remain
separable from, or merely link (or bind by name) to the interfaces of,
the Work and Derivative Works thereof.
"Contribution" shall mean any work of authorship, including
the original version of the Work and any modifications or additions
to that Work or Derivative Works thereof, that is intentionally
submitted to Licensor for inclusion in the Work by the copyright owner
or by an individual or Legal Entity authorized to submit on behalf of
the copyright owner. For the purposes of this definition, "submitted"
means any form of electronic, verbal, or written communication sent
to the Licensor or its representatives, including but not limited to
communication on electronic mailing lists, source code control systems,
and issue tracking systems that are managed by, or on behalf of, the
Licensor for the purpose of discussing and improving the Work, but
excluding communication that is conspicuously marked or otherwise
designated in writing by the copyright owner as "Not a Contribution."
"Contributor" shall mean Licensor and any individual or Legal Entity
on behalf of whom a Contribution has been received by Licensor and
subsequently incorporated within the Work.
2. Grant of Copyright License. Subject to the terms and conditions of
this License, each Contributor hereby grants to You a perpetual,
worldwide, non-exclusive, no-charge, royalty-free, irrevocable
copyright license to reproduce, prepare Derivative Works of,
publicly display, publicly perform, sublicense, and distribute the
Work and such Derivative Works in Source or Object form.
3. Grant of Patent License. Subject to the terms and conditions of
this License, each Contributor hereby grants to You a perpetual,
worldwide, non-exclusive, no-charge, royalty-free, irrevocable
(except as stated in this section) patent license to make, have made,
use, offer to sell, sell, import, and otherwise transfer the Work,
where such license applies only to those patent claims licensable
by such Contributor that are necessarily infringed by their
Contribution(s) alone or by combination of their Contribution(s)
with the Work to which such Contribution(s) was submitted. If You
institute patent litigation against any entity (including a
cross-claim or counterclaim in a lawsuit) alleging that the Work
or a Contribution incorporated within the Work constitutes direct
or contributory patent infringement, then any patent licenses
granted to You under this License for that Work shall terminate
as of the date such litigation is filed.
4. Redistribution. You may reproduce and distribute copies of the
Work or Derivative Works thereof in any medium, with or without
modifications, and in Source or Object form, provided that You
meet the following conditions:
(a) You must give any other recipients of the Work or
Derivative Works a copy of this License; and
(b) You must cause any modified files to carry prominent notices
stating that You changed the files; and
(c) You must retain, in the Source form of any Derivative Works
that You distribute, all copyright, patent, trademark, and
attribution notices from the Source form of the Work,
excluding those notices that do not pertain to any part of
the Derivative Works; and
(d) If the Work includes a "NOTICE" text file as part of its
distribution, then any Derivative Works that You distribute must
include a readable copy of the attribution notices contained
within such NOTICE file, excluding those notices that do not
pertain to any part of the Derivative Works, in at least one
of the following places: within a NOTICE text file distributed
as part of the Derivative Works; within the Source form or
documentation, if provided along with the Derivative Works; or,
within a display generated by the Derivative Works, if and
wherever such third-party notices normally appear. The contents
of the NOTICE file are for informational purposes only and
do not modify the License. You may add Your own attribution
notices within Derivative Works that You distribute, alongside
or as an addendum to the NOTICE text from the Work, provided
that such additional attribution notices cannot be construed
as modifying the License.
You may add Your own copyright statement to Your modifications and
may provide additional or different license terms and conditions
for use, reproduction, or distribution of Your modifications, or
for any such Derivative Works as a whole, provided Your use,
reproduction, and distribution of the Work otherwise complies with
the conditions stated in this License.
5. Submission of Contributions. Unless You explicitly state otherwise,
any Contribution intentionally submitted for inclusion in the Work
by You to the Licensor shall be under the terms and conditions of
this License, without any additional terms or conditions.
Notwithstanding the above, nothing herein shall supersede or modify
the terms of any separate license agreement you may have executed
with Licensor regarding such Contributions.
6. Trademarks. This License does not grant permission to use the trade
names, trademarks, service marks, or product names of the Licensor,
except as required for reasonable and customary use in describing the
origin of the Work and reproducing the content of the NOTICE file.
7. Disclaimer of Warranty. Unless required by applicable law or
agreed to in writing, Licensor provides the Work (and each
Contributor provides its Contributions) on an "AS IS" BASIS,
WITHOUT WARRANTIES OR CONDITIONS OF ANY KIND, either express or
implied, including, without limitation, any warranties or conditions
of TITLE, NON-INFRINGEMENT, MERCHANTABILITY, or FITNESS FOR A
PARTICULAR PURPOSE. You are solely responsible for determining the
appropriateness of using or redistributing the Work and assume any
risks associated with Your exercise of permissions under this License.
8. Limitation of Liability. In no event and under no legal theory,
whether in tort (including negligence), contract, or otherwise,
unless required by applicable law (such as deliberate and grossly
negligent acts) or agreed to in writing, shall any Contributor be
liable to You for damages, including any direct, indirect, special,
incidental, or consequential damages of any character arising as a
result of this License or out of the use or inability to use the
Work (including but not limited to damages for loss of goodwill,
work stoppage, computer failure or malfunction, or any and all
other commercial damages or losses), even if such Contributor
has been advised of the possibility of such damages.
9. Accepting Warranty or Additional Liability. While redistributing
the Work or Derivative Works thereof, You may choose to offer,
and charge a fee for, acceptance of support, warranty, indemnity,
or other liability obligations and/or rights consistent with this
License. However, in accepting such obligations, You may act only
on Your own behalf and on Your sole responsibility, not on behalf
of any other Contributor, and only if You agree to indemnify,
defend, and hold each Contributor harmless for any liability
incurred by, or claims asserted against, such Contributor by reason
of your accepting any such warranty or additional liability.
END OF TERMS AND CONDITIONS
APPENDIX: How to apply the Apache License to your work.
To apply the Apache License to your work, attach the following
boilerplate notice, with the fields enclosed by brackets "{}"
replaced with your own identifying information. (Don't include
the brackets!) The text should be enclosed in the appropriate
comment syntax for the file format. We also recommend that a
file or class name and description of purpose be included on the
same "printed page" as the copyright notice for easier
identification within third-party archives.
Copyright {yyyy} {name of copyright owner}
Licensed under the Apache License, Version 2.0 (the "License");
you may not use this file except in compliance with the License.
You may obtain a copy of the License at
http://www.apache.org/licenses/LICENSE-2.0
Unless required by applicable law or agreed to in writing, software
distributed under the License is distributed on an "AS IS" BASIS,
WITHOUT WARRANTIES OR CONDITIONS OF ANY KIND, either express or implied.
See the License for the specific language governing permissions and
limitations under the License.
Quick Start
This topic shows how to quickly install a DroneKit-Python development environment and run a simple example to get vehicle attributes from a simulated Copter.
Installation
DroneKit-Python and the dronekit-sitl simulator are installed from pip on all platforms.
On Linux you will first need to install pip and python-dev:
sudo apt-get install python-pip python-dev
pip is then used to install dronekit and dronekit-sitl.
Mac and Linux may require you to prefix these commands with sudo:
pip install dronekit
pip install dronekit-sitl
See Installing DroneKit and dronekit-sitl for more detailed installation instructions.
Basic “Hello Drone”
The script below first launches the simulator. It then
imports and calls the connect() method,
specifying the simulator’s connection string (tcp:127.0.0.1:5760).
The method returns a Vehicle object that
we then use to query the attributes.
print "Start simulator (SITL)"
import dronekit_sitl
sitl = dronekit_sitl.start_default()
connection_string = sitl.connection_string()
# Import DroneKit-Python
from dronekit import connect, VehicleMode
# Connect to the Vehicle.
print("Connecting to vehicle on: %s" % (connection_string,))
vehicle = connect(connection_string, wait_ready=True)
# Get some vehicle attributes (state)
print "Get some vehicle attribute values:"
print " GPS: %s" % vehicle.gps_0
print " Battery: %s" % vehicle.battery
print " Last Heartbeat: %s" % vehicle.last_heartbeat
print " Is Armable?: %s" % vehicle.is_armable
print " System status: %s" % vehicle.system_status.state
print " Mode: %s" % vehicle.mode.name # settable
# Close vehicle object before exiting script
vehicle.close()
# Shut down simulator
sitl.stop()
print("Completed")
Copy the text above into a new text file (hello.py) and run it in the same way as you would any other standalone Python script.
python hello.py
You should see the following output from the simulated vehicle:
Start simulator (SITL)
Downloading SITL from http://dronekit-assets.s3.amazonaws.com/sitl/copter/sitl-win-copter-3.3.tar.gz
Extracted.
Connecting to vehicle on: 'tcp:127.0.0.1:5760'
>>> APM:Copter V3.3 (d6053245)
>>> Frame: QUAD
>>> Calibrating barometer
>>> Initialising APM...
>>> barometer calibration complete
>>> GROUND START
Get some vehicle attribute values:
GPS: GPSInfo:fix=3,num_sat=10
Battery: Battery:voltage=12.587,current=0.0,level=100
Last Heartbeat: 0.713999986649
Is Armable?: False
System status: STANDBY
Mode: STABILIZE
Completed
That’s it- you’ve run your first DroneKit-Python script.
Next Steps
- Learn more about Developing with DroneKit. This covers development best practices and coding standards, and has more information about installation, working with a simulator and setting up a companion computer.
- Read through our step by step Guide to learn how to connect to your vehicle, takeoff, fly, and much more.
- Check out our Examples.
Developing with DroneKit
DroneKit-Python is primarily intended for use on Linux-based Companion Computers that travel on a vehicle and communicate with the autopilot via a serial port. It can also be used on ground-based computers running Linux, Windows or Mac OSX (communicating using WiFi or a telemetry radio).
During development you’ll generally run it on a development computer, communicating with a simulated vehicle running on the same machine (via a UDP connection).
This section contains topics explaining how to develop with DroneKit-Python, covering subjects like installation, setting up the target vehicle or simulator, best practices and coding standards.
Installing DroneKit
DroneKit-Python can be installed on a Linux, Mac OSX, or Windows computer that has Python 2.7 and can install Python packages from the Internet.
It is installed from pip on all platforms:
pip install dronekit
Installation notes:
Mac and Linux require you prefix the command with
sudo.sudo pip install dronekit
On Linux you may need to first install pip and python-dev:
sudo apt-get install python-pip python-dev
Alternatively, the easy_install tool provides another way to install pip:
sudo easy_install pip
Companion Computers are likely to run on stripped down versions of Linux. Ensure you use a variant that supports Python 2.7 and can install Python packages from the Internet.
Windows does not come with Python by default, but there are many distributions available. We have tested against:
- WinPython 2.7 64bit (see these instructions for installation and registration). This is the most tested version.
- ActiveState ActivePython 2.7.
Python 3 is not supported.
Companion Computers
A companion computer is a device that travels on-board the vehicle and controls/communicates with the autopilot over a low-latency link. Apps running on a companion computer can perform computationally intensive or time-sensitive tasks, and add much greater intelligence than is provided by the autopilot alone.
DroneKit can be used with onboard computers running variants of Linux that support both Python and the installation of Python packages from the Internet. The following computing platforms are known to work with DroneKit, and are supported by the ArduPilot developer community.
RaspberryPi
Intel Edison
BeagleBoneBlack
Setting up a Simulated Vehicle (SITL)
The SITL (Software In The Loop) simulator allows you to create and test DroneKit-Python apps without a real vehicle (and from the comfort of your own developer desktop!).
SITL can run natively on Linux (x86 architecture only), Mac and Windows, or within a virtual machine. It can be installed on the same computer as DroneKit, or on another computer on the same network.
The sections below explain how to install and run SITL, and how to connect to DroneKit-Python and Ground Stations at the same time.
DroneKit-SITL
DroneKit-SITL is the simplest, fastest and easiest way to run SITL on Windows, Linux (x86 architecture only), or Mac OS X. It is installed from Python’s pip tool on all platforms, and works by downloading and running pre-built vehicle binaries that are appropriate for the host operating system.
This section provides an overview of how to install and use DroneKit-SITL. For more information, see the project on Github.
Note
DroneKit-SITL is still relatively experimental and there are only a few pre-built vehicles (some of which are quite old and/or unstable).
The binaries are built and tested on Windows 10, Ubuntu Linux, and Mac OS X “El Capitan”. Binaries are only available for x86 architectures. ARM builds (e.g. for RPi) are not supported.
Please report any issues on Github here.
Installation
The tool is installed (or updated) on all platforms using the command:
pip install dronekit-sitl -UI
Running SITL
To run the latest version of Copter for which we have binaries (downloading the binaries if needed), you can simply call:
dronekit-sitl copter
SITL will then start and wait for TCP connections on 127.0.0.1:5760.
You can specify a particular vehicle and version, and also parameters like the home location, the vehicle model type (e.g. “quad”), etc. For example:
dronekit-sitl plane-3.3.0 --home=-35.363261,149.165230,584,353
There are a number of other useful arguments:
dronekit-sitl -h #List all parameters to dronekit-sitl.
dronekit-sitl copter -h #List additional parameters for the specified vehicle (in this case "copter").
dronekit-sitl --list #List all available vehicles.
dronekit-sitl --reset #Delete all downloaded vehicle binaries.
dronekit-sitl ./path [args...] #Start SITL instance at target file location.
Note
You can also use dronekit-sitl to start a SITL executable that you have built locally from source. To do this, put the file path of the target executable in the SITL_BINARY environment variable, or as the first argument when calling the tool.
Connecting to DroneKit-SITL
DroneKit-SITL waits for TCP connections on 127.0.0.1:5760. DroneKit-Python scripts running on the same
computer can connect to the simulation using the connection string as shown:
vehicle = connect('tcp:127.0.0.1:5760', wait_ready=True)
After something connects to port 5760, SITL will then wait for additional connections on port 5763
(and subsequently 5766, 5769 etc.)
Note
While you can connect to these additional ports, some users have reported problems when viewing the running examples with Mission Planner. If you need to connect a ground station and DroneKit at the same time we recommend you use MAVProxy (see Connecting an additional Ground Station).
DroneKit-SITL Python API
DroneKit-SITL exposes a Python API, which you can use to start and control simulation from within your scripts. This is particularly useful for test code and examples.
Building SITL from source
You can natively build SITL from source on Linux, Windows and Mac OS X, or from within a Vagrant Linux virtual environment.
Building from source is useful if you want to need to test the latest changes (or any use a version for which DroneKit-SITL does not have pre-built binaries). It can also be useful if you have problems getting DroneKit-SITL to work.
SITL built from source has a few differences from DroneKit-SITL:
- MAVProxy is included and started by default. You can use MAVProxy terminal to control the autopilot.
- You connect to SITL via UDP on
127.0.0.1:14550. You can use MAVProxy’soutput addcommand to add additional ports if needed. - You may need to disable arming checks and load autotest parameters to run examples.
- It is easier to add a virtual rangefinder and add a virtual gimbal for testing.
The following topics from the ArduPilot wiki explain how to set up Native SITL builds:
Connecting an additional Ground Station
You can connect a ground station to an unused port to which messages are being forwarded.
The most reliable way to add new ports is to use MAVProxy:
If you’re using SITL built from source you will already have MAVProxy running. You can add new ports in the MAVProxy console using
output add:output add 127.0.0.1:14552
If you’re using Dronekit-SITL you can:
Install MAVProxy for your system.
In a second terminal spawn an instance of MAVProxy to forward messages from TCP
127.0.0.1:5760to other UDP ports like127.0.0.1:14550and127.0.0.1:14551:mavproxy.py --master tcp:127.0.0.1:5760 --sitl 127.0.0.1:5501 --out 127.0.0.1:14550 --out 127.0.0.1:14551
Once you have available ports you can connect to a ground station using one UDP address, and DroneKit-Python using the other.
For example, first connect the script:
vehicle = connect('127.0.0.1:14550', wait_ready=True)
Then connect Mission Planner to the second UDP port:
Ensure the selection list at the top right of the Mission Planner screen says UDP and then select the Connect button next to it. When prompted, enter the port number (in this case 14552).

Mission Planner: Listen Port Dialog
After connecting, vehicle parameters will be loaded into Mission Planner and the vehicle is displayed on the map.
Tip
If you’re using the DroneKit-SITL Python API then you will instead have to connect to SITLs TCP port (as there is no way to set up MAVProxy in this case). So if DroneKit is connecting to TCP port 5760, you would connect your GCS to 5763.
Note that a few examples may not behave perfectly using this approach. If you need to observe them in a GCS you should run SITL externally and use MAVProxy to connect to it.
Best Practices
This guide provides a broad overview of how to use the API, its main programming idioms and best practices. More detail information is linked from each section.
General considerations
DroneKit-Python communicates with vehicle autopilots using the MAVLink protocol, which defines how commands, telemetry and vehicle settings/parameters are sent between vehicles, companion computers, ground stations and other systems on a MAVLink network.
Some general considerations from using this protocol are:
- Messages and message acknowledgments are not guaranteed to arrive (the protocol is not “lossless”).
- Commands may be silently ignored by the Autopilot if it is not in a state where it can safely act on them.
- Command acknowledgment and completion messages are not sent in most cases (and if sent, may not arrive).
- Commands may be interrupted before completion.
- Autopilots may choose to interpret the protocol in slightly different ways.
- Commands can arrive at the autopilot from multiple sources.
Developers should code defensively. Where possible:
- Check that a vehicle is in a state to obey a command (for example,
poll on
Vehicle.is_armablebefore trying to arm the vehicle). - Don’t assume that a command has succeeded until the changed behaviour is observed. In particular we recommend a launch sequence where you check that the mode and arming have succeeded before attempting to take off.
- Monitor for state changes and react accordingly.
For example, if the user changes the mode from
GUIDEDyour script should stop sending commands. - Verify that your script can run inside the normal latency limits for message passing from the vehicle and tune any monitoring appropriately.
Connecting
In most cases you’ll use the normal way to connect to a vehicle,
setting wait_ready=True to ensure that the vehicle is already populated with attributes
when the connect() returns:
from dronekit import connect
# Connect to the Vehicle (in this case a UDP endpoint)
vehicle = connect('REPLACE_connection_string_for_your_vehicle', wait_ready=True)
The connect() call will sometimes fail with an exception.
Additional information about an exception can be obtained by
running the connect within a try-catch block as shown:
import dronekit
import socket
import exceptions
try:
dronekit.connect('REPLACE_connection_string_for_your_vehicle', heartbeat_timeout=15)
# Bad TCP connection
except socket.error:
print 'No server exists!'
# Bad TTY connection
except exceptions.OSError as e:
print 'No serial exists!'
# API Error
except dronekit.APIException:
print 'Timeout!'
# Other error
except:
print 'Some other error!'
Tip
The default heartbeat_timeout on connection is 30 sections. Usually a connection will
succeed quite quickly, so you may wish to reduce this in the connect() method as shown in the
code snippet above.
If a connection succeeds from a ground station, but not from DroneKit-Python it may be that your baud
rate is incorrect for your hardware. This rate can also be set in the connect() method.
Launch sequence
Generally you should use the standard launch sequence described in Taking Off:
- Poll on
Vehicle.is_armableuntil the vehicle is ready to arm. - Set the
Vehicle.modetoGUIDED - Set
Vehicle.armedtoTrueand poll on the same attribute until the vehicle is armed. - Call
Vehicle.simple_takeoffwith a target altitude. - Poll on the altitude and allow the code to continue only when it is reached.
The approach ensures that commands are only sent to the vehicle when it is able
to act on them (e.g. we know Vehicle.is_armable
is True before trying to arm, we know
Vehicle.armed is True before we take off).
It also makes debugging takeoff problems a lot easier.
Movement commands
DroneKit-Python provides Vehicle.simple_goto for moving to a specific position (at a defined speed). It is also possible to control movement by sending commands to specify the vehicle’s velocity components.
Note
As with Vehicle.simple_takeoff, movement
commands are asynchronous, and will be interrupted if another command arrives
before the vehicle reaches its target. Calling code should block and wait (or
check that the operation is complete) before preceding to the next command.
For more information see: Guiding and Controlling Copter.
Vehicle information
Vehicle state information is exposed through vehicle attributes which can be read and observed (and in some cases written) and vehicle settings which can be read, written, iterated and observed using parameters (a special attribute). All the attributes are documented in Vehicle State and Settings.
Attributes are populated by MAVLink messages from the vehicle. Information read from an attribute may not precisely reflect the actual value on the vehicle. Commands sent to the vehicle may not arrive, or may be ignored by the autopilot.
If low-latency is critical, we recommend you verify that the update rate is achievable and
perhaps modify script behaviour if Vehicle.last_heartbeat falls outside
a useful range.
When setting attributes, poll their values to confirm that they have changed. This applies, in particular,
to Vehicle.armed and Vehicle.mode.
Missions and waypoints
DroneKit-Python can also create and modify autonomous missions.
While it is possible to construct DroneKit-Python apps by dynamically constructing missions “on the fly”, we recommend you use guided mode for Copter apps. This generally results in a better experience.
Tip
If a mission command is not available in guided mode, it can be useful to switch to a mission and call it, then change back to normal guided mode operation.
Monitor and react to state changes
Almost all attributes can be observed - see Observing attribute changes for more information.
Exactly what state information you observe, and how you react to it, depends on your particular script:
- Most standalone apps should monitor the
Vehicle.modeand stop sending commands if the mode changes unexpectedly (this usually indicates that the user has taken control of the vehicle). - Apps might monitor
Vehicle.last_heartbeatand could attempt to reconnect if the value gets too high. - Apps could monitor
Vehicle.system_statusforCRITICALorEMERGENCYin order to implement specific emergency handling.
Sleep the script when not needed
Sleeping your script can reduce the CPU overhead.
For example, at low speeds you might only need to check whether you’ve reached a target every few seconds.
Using time.sleep(2) between checks will be more efficient than checking more often.
Exiting a script
Scripts should call Vehicle.close()
before exiting to ensure that all messages have flushed before the script completes:
# About to exit script
vehicle.close()
Subclass Vehicle
If you need to use functionality that is specific to particular hardware, we
recommend you subclass Vehicle and pass this new class into
connect().
Example: Create Attribute in App shows how you can do this.
Debugging
DroneKit-Python apps are ordinary standalone Python scripts, and can be debugged using standard Python methods (including the debugger/IDE of your choice).
Launching scripts
Scripts are run from an ordinary Python command prompt. For example:
python some_python_script.py [arguments]
Command line arguments are passed into the script as sys.argv variables (the normal)
and you can use these directly or via an argument parser (e.g.
argparse).
Current script directory
You can use normal Python methods for getting file system information:
import os.path
full_directory_path_of_current_script = os.path.dirname(os.path.abspath(__file__))
Coding Standards
DroneKit-Python does not impose (or recommend) a particular set of coding standards for third party code.
Internally we run the YAPF formatter on major releases and we expect contributors to copy the patterns used in similar code within the existing code base.
Guide
The guide contains how-to documentation for using the DroneKit-Python API. Additional guide material can be found in the Examples.
Connecting to a Vehicle
The connection to the vehicle (or multiple vehicles) is set up within the
DroneKit script. Scripts import and call the connect()
method. After connecting this returns a Vehicle
object from which you can get/set parameters and attributes, and control vehicle movement.
The most common way to call connect() is shown below:
from dronekit import connect
# Connect to the Vehicle (in this case a UDP endpoint)
vehicle = connect('127.0.0.1:14550', wait_ready=True)
The first parameter specifies the target address (in this case the loopback address for UDP port 14550). See Connection string options for the strings to use for other common vehicles.
The second parameter (wait_ready) is used to determine whether connect() returns immediately
on connection or if it waits until some vehicle parameters and attributes are populated. In most cases you
should use wait_ready=True to wait on the default set of parameters.
Connecting over a serial device will look something like this:
from dronekit import connect
# Connect to the Vehicle (in this case a UDP endpoint)
vehicle = connect('/dev/ttyAMA0', wait_ready=True, baud=57600)
Tip
If the baud rate is not set correctly, connect may fail with a
timeout error. It is best to set the baud rate explicitly.
connect() also has arguments for setting the baud rate,
the length of the connection timeout, and/or to use
a custom vehicle class.
There is more documentation on all of the parameters in the API Reference.
Connection string options
The table below shows connection strings you can use for some of the more common connection types:
| Connection type | Connection string |
|---|---|
| Linux computer connected to the vehicle via USB | /dev/ttyUSB0 |
| Linux computer connected to the vehicle via Serial port (RaspberryPi example) | /dev/ttyAMA0 (also set baud=57600) |
| SITL connected to the vehicle via UDP | 127.0.0.1:14550 |
| SITL connected to the vehicle via TCP | tcp:127.0.0.1:5760 |
| OSX computer connected to the vehicle via USB | dev/cu.usbmodem1 |
| Windows computer connected to the vehicle via USB (in this case on COM14) | com14 |
| Windows computer connected to the vehicle using a 3DR Telemetry Radio on COM14 | com14 (also set baud=57600) |
Tip
The strings above are the same as are used when connecting the MAVProxy GCS. For other options see the MAVProxy documentation.
Note
The default baud rate may not be appropriate for all connection types (this may be the cause if you can connect via a GCS but not DroneKit).
Connecting to multiple vehicles
You can control multiple vehicles from within a single script by calling
connect() for each vehicle
with the appropriate connection strings.
The returned Vehicle objects are independent of
each other and can be separately used to control their respective
vehicle.
Vehicle State and Settings
The Vehicle class exposes most state information (position, speed, etc.) through python
attributes, while vehicle parameters (settings)
are accessed though named elements of Vehicle.parameters.
This topic explains how to get, set and observe vehicle state and parameter information (including getting the Home location).
Tip
You can test most of the code in this topic by running the Vehicle State example.
Attributes
Vehicle state information is exposed through vehicle attributes. DroneKit-Python currently supports the following
“standard” attributes:
Vehicle.version,
Vehicle.location.capabilities,
Vehicle.location.global_frame,
Vehicle.location.global_relative_frame,
Vehicle.location.local_frame,
Vehicle.attitude,
Vehicle.velocity,
Vehicle.gps_0,
Vehicle.gimbal,
Vehicle.battery,
Vehicle.rangefinder,
Vehicle.ekf_ok,
Vehicle.last_heartbeat,
Vehicle.home_location,
Vehicle.system_status,
Vehicle.heading,
Vehicle.is_armable,
Vehicle.airspeed,
Vehicle.groundspeed,
Vehicle.armed,
Vehicle.mode.
Attributes are initially created with None values for their members. In most cases the members are populated
(and repopulated) as new MAVLink messages of the associated types are received from the vehicle.
All of the attributes can be read,
but only the Vehicle.home_location,
Vehicle.gimbal
Vehicle.airspeed,
Vehicle.groundspeed,
Vehicle.mode and
Vehicle.armed
status can be set.
Almost all of the attributes can be observed.
The behaviour of Vehicle.home_location is different
from the other attributes, and is discussed in its own section below.
Getting attributes
The code fragment below shows how to read and print almost all the attributes (values are regularly updated from MAVLink messages sent by the vehicle).
# vehicle is an instance of the Vehicle class
print "Autopilot Firmware version: %s" % vehicle.version
print "Autopilot capabilities (supports ftp): %s" % vehicle.capabilities.ftp
print "Global Location: %s" % vehicle.location.global_frame
print "Global Location (relative altitude): %s" % vehicle.location.global_relative_frame
print "Local Location: %s" % vehicle.location.local_frame #NED
print "Attitude: %s" % vehicle.attitude
print "Velocity: %s" % vehicle.velocity
print "GPS: %s" % vehicle.gps_0
print "Groundspeed: %s" % vehicle.groundspeed
print "Airspeed: %s" % vehicle.airspeed
print "Gimbal status: %s" % vehicle.gimbal
print "Battery: %s" % vehicle.battery
print "EKF OK?: %s" % vehicle.ekf_ok
print "Last Heartbeat: %s" % vehicle.last_heartbeat
print "Rangefinder: %s" % vehicle.rangefinder
print "Rangefinder distance: %s" % vehicle.rangefinder.distance
print "Rangefinder voltage: %s" % vehicle.rangefinder.voltage
print "Heading: %s" % vehicle.heading
print "Is Armable?: %s" % vehicle.is_armable
print "System status: %s" % vehicle.system_status.state
print "Mode: %s" % vehicle.mode.name # settable
print "Armed: %s" % vehicle.armed # settable
Note
A value of None for an attribute member indicates that the value has not yet been populated from the vehicle.
For example, before GPS lock Vehicle.gps_0 will return a
GPSInfo with None values for eph, satellites_visible etc.
Attributes will also return None if the associated hardware is not present on the connected device.
Tip
If you’re using a simulated vehicle you can add support for optional hardware including rangefinders and optical flow sensors.
Setting attributes
The Vehicle.mode, Vehicle.armed
, Vehicle.airspeed and Vehicle.groundspeed,
attributes can all be “directly” written (Vehicle.home_location can also be directly written,
but has special considerations that are discussed below).
These attributes are set by assigning a value:
#disarm the vehicle
vehicle.armed = False
#set the default groundspeed to be used in movement commands
vehicle.groundspeed = 3.2
Commands to change a value are not guaranteed to succeed (or even to be received) and code should be written with this in mind. For example, the code snippet below polls the attribute values to confirm they have changed before proceeding.
vehicle.mode = VehicleMode("GUIDED")
vehicle.armed = True
while not vehicle.mode.name=='GUIDED' and not vehicle.armed and not api.exit:
print " Getting ready to take off ..."
time.sleep(1)
Note
While the autopilot does send information about the success (or failure) of the request, this is not currently handled by DroneKit.
Vehicle.gimbal can’t be written directly, but the gimbal can be controlled using the
Vehicle.gimbal.rotate() and Vehicle.gimbal.target_location()
methods. The first method lets you set the precise orientation of the gimbal while the second makes the gimbal track a specific “region of interest”.
#Point the gimbal straight down
vehicle.gimbal.rotate(-90, 0, 0)
time.sleep(10)
#Set the camera to track the current home position.
vehicle.gimbal.target_location(vehicle.home_location)
time.sleep(10)
Observing attribute changes
You can observe any of the vehicle attributes and monitor for changes without the need for polling.
Listeners (“observer callback functions”) are invoked differently based on the type of observed attribute. Attributes that represent sensor values or other
“streams of information” are updated whenever a message is received from the vehicle. Attributes which reflect vehicle
“state” are only updated when their values change (for example
Vehicle.system_status,
Vehicle.armed, and
Vehicle.mode).
Callbacks are added using Vehicle.add_attribute_listener() or the
Vehicle.on_attribute() decorator method. The main difference between these methods
is that only attribute callbacks added with Vehicle.add_attribute_listener()
can be removed (see remove_attribute_listener()).
The observer callback function is invoked with the following arguments:
self- the associatedVehicle. This may be compared to a global vehicle handle to implement vehicle-specific callback handling (if needed).attr_name- the attribute name. This can be used to infer which attribute has triggered if the same callback is used for watching several attributes.value- the attribute value (so you don’t need to re-query the vehicle object).
The code snippet below shows how to add (and remove) a callback function to observe changes
in Vehicle.location.global_frame using
Vehicle.add_attribute_listener().
The two second sleep() is required because otherwise the observer might be removed before the the
callback is first run.
#Callback to print the location in global frames. 'value' is the updated value
def location_callback(self, attr_name, value):
print "Location (Global): ", value
# Add a callback `location_callback` for the `global_frame` attribute.
vehicle.add_attribute_listener('location.global_frame', location_callback)
# Wait 2s so callback can be notified before the observer is removed
time.sleep(2)
# Remove observer - specifying the attribute and previously registered callback function
vehicle.remove_message_listener('location.global_frame', location_callback)
Note
The example above adds a listener on Vehicle to for attribute name 'location.global_frame'
You can alternatively add (and remove) a listener Vehicle.location for the attribute name 'global_frame'.
Both alternatives are shown below:
vehicle.add_attribute_listener('location.global_frame', location_callback)
vehicle.location.add_attribute_listener('global_frame', location_callback)
The example below shows how you can declare an attribute callback using the
Vehicle.on_attribute() decorator function.
last_rangefinder_distance=0
@vehicle.on_attribute('rangefinder')
def rangefinder_callback(self,attr_name):
#attr_name not used here.
global last_rangefinder_distance
if last_rangefinder_distance == round(self.rangefinder.distance, 1):
return
last_rangefinder_distance = round(self.rangefinder.distance, 1)
print " Rangefinder (metres): %s" % last_rangefinder_distance
Note
The fragment above stores the result of the previous callback and only prints the output when there is a
signficant change in Vehicle.rangefinder. You might want to
perform caching like this to ignore updates that are not significant to your code.
The examples above show how you can monitor a single attribute. You can pass the special name (‘*’) to specify a
callback that will be called for any/all attribute changes:
# Demonstrate getting callback on any attribute change
def wildcard_callback(self, attr_name, value):
print " CALLBACK: (%s): %s" % (attr_name,value)
print "\nAdd attribute callback detecting any attribute change"
vehicle.add_attribute_listener('*', wildcard_callback)
print " Wait 1s so callback invoked before observer removed"
time.sleep(1)
print " Remove Vehicle attribute observer"
# Remove observer added with `add_attribute_listener()`
vehicle.remove_attribute_listener('*', wildcard_callback)
Home location
The Home location is set when a vehicle first gets a good location fix from the GPS. The location is used as the target when the vehicle does a “return to launch”. In Copter missions (and often Plane) missions, the altitude of waypoints is set relative to this position.
Vehicle.home_location has the following behaviour:
In order to get the current value (in a
LocationGlobalobject) you must first downloadVehicle.commands, as shown:cmds = vehicle.commands cmds.download() cmds.wait_ready() print " Home Location: %s" % vehicle.home_location
The returned value is
Nonebefore you download the commands or if thehome_locationhas not yet been set by the autopilot. For this reason our example code checks that the value exists (in a loop) before writing it.# Get Vehicle Home location - will be `None` until first set by autopilot while not vehicle.home_location: cmds = vehicle.commands cmds.download() cmds.wait_ready() if not vehicle.home_location: print " Waiting for home location ..." # We have a home location. print "\n Home location: %s" % vehicle.home_location
The attribute can be set to a
LocationGlobalobject (the code fragment below sets it to the current location):vehicle.home_location=vehicle.location.global_frame
There are some caveats:
- You must be able to read a non-
Nonevalue before you can write it (the autopilot has to set the value initially before it can be written or read). - The new location must be within 50 km of the EKF origin or setting the value will silently fail.
- The value is cached in the
home_location. If the variable can potentially change on the vehicle you will need to re-download theVehicle.commandsin order to confirm the value.
- You must be able to read a non-
The attribute is not observable.
Note
Vehicle.home_location behaves this way because
ArduPilot implements/stores the home location as a waypoint rather than sending them as messages.
While DroneKit-Python hides this fact from you when working with commands, to access the value
you still need to download the commands.
We hope to improve this attribute in later versions of ArduPilot, where there may be specific commands to get the home location from the vehicle.
Parameters
Vehicle parameters provide the information used to configure the autopilot for the vehicle-specific hardware/capabilities. The available parameters for each platform are documented in the ArduPilot wiki here: Copter Parameters, Plane Parameters, Rover Parameters (the lists are automatically generated from the latest ArduPilot source code, and may contain or omit parameters in your vehicle).
DroneKit downloads all parameters when you first connect to the UAV (forcing parameter reads to wait until the download completes), and subsequently keeps the values updated by monitoring vehicle messages for changes to individual parameters. This process ensures that it is always safe to read supported parameters, and that their values will match the information on the vehicle.
Parameters can be read, set, observed and iterated using the Vehicle.parameters
attribute (a Parameters object).
Getting parameters
The parameters are read using the parameter name as a key (case-insensitive). Reads will always succeed unless you
attempt to access an unsupported parameter (which will result in a KeyError exception).
The code snippet below shows how to get the Minimum Throttle (THR_MIN) setting. On Copter and Rover (not Plane), this is the minimum PWM setting for the throttle at which the motors will keep spinning.
# Print the value of the THR_MIN parameter.
print "Param: %s" % vehicle.parameters['THR_MIN']
Setting parameters
Vehicle parameters are set as shown in the code fragment below, using the parameter name as a “key”:
# Change the parameter value (Copter, Rover)
vehicle.parameters['THR_MIN']=100
Listing all parameters
Vehicle.parameters can be iterated to list all parameters and their values:
print "\nPrint all parameters (iterate `vehicle.parameters`):"
for key, value in vehicle.parameters.iteritems():
print " Key:%s Value:%s" % (key,value)
Observing parameter changes
You can observe any of the vehicle parameters and monitor for changes without the need for polling. The parameters are cached, so that callback functions are only invoked when parameter values change.
Tip
Observing parameters is virtually identical to observing attributes.
The code snippet below shows how to add a callback function to observe changes in the “THR_MIN” parameter using a decorator. Note that the parameter name is case-insensitive, and that callbacks added using a decorator cannot be removed.
@vehicle.parameters.on_attribute('THR_MIN')
def decorated_thr_min_callback(self, attr_name, value):
print " PARAMETER CALLBACK: %s changed to: %s" % (attr_name, value)
The observer callback function is invoked with the following arguments:
self- the associatedParameters.attr_name- the parameter name (useful if the same callback is used for watching several parameters).msg- the parameter value (so you don’t need to re-query theVehicle.parametersobject).
The code snippet below demonstrates how you can add and remove a listener (in this case
for “any parameter”) using the
Parameters.add_attribute_listener() and
Parameters.remove_attribute_listener().
#Callback function for "any" parameter
def any_parameter_callback(self, attr_name, value):
print " ANY PARAMETER CALLBACK: %s changed to: %s" % (attr_name, value)
#Add observer for the vehicle's any/all parameters parameter (note wildcard string ``'*'``)
vehicle.parameters.add_attribute_listener('*', any_parameter_callback)
Known issues
Known issues and improvement suggestions can viewed on Github here.
Taking Off
This article explains how to get your Copter to take off.
At high level, the steps are: check that the vehicle is able to arm, set the mode to GUIDED,
command the vehicle to arm, takeoff and block until we reach the desired altitude.
Tip
Copter is usually started in GUIDED mode.
- For Copter 3.2.1 and earlier you cannot take off in
AUTOmode (if you need to run a mission you take off inGUIDEDmode and then switch toAUTOmode once you’re in the air). - Starting from Copter 3.3 you can takeoff in
AUTOmode (provided the mission has a MAV_CMD_NAV_TAKEOFF command) but the mission will not start until you explicitly send the MAV_CMD_MISSION_START message.
By contrast, Plane apps take off using the MAV_CMD_NAV_TAKEOFF command in a mission.
Plane should first arm and then change to AUTO mode to start the mission.
The code below shows a function to arm a Copter, take off, and fly to a specified altitude. This is taken from Example: Simple Go To (Copter).
# Connect to the Vehicle (in this case a simulator running the same computer)
vehicle = connect('tcp:127.0.0.1:5760', wait_ready=True)
def arm_and_takeoff(aTargetAltitude):
"""
Arms vehicle and fly to aTargetAltitude.
"""
print "Basic pre-arm checks"
# Don't try to arm until autopilot is ready
while not vehicle.is_armable:
print " Waiting for vehicle to initialise..."
time.sleep(1)
print "Arming motors"
# Copter should arm in GUIDED mode
vehicle.mode = VehicleMode("GUIDED")
vehicle.armed = True
# Confirm vehicle armed before attempting to take off
while not vehicle.armed:
print " Waiting for arming..."
time.sleep(1)
print "Taking off!"
vehicle.simple_takeoff(aTargetAltitude) # Take off to target altitude
# Wait until the vehicle reaches a safe height before processing the goto (otherwise the command
# after Vehicle.simple_takeoff will execute immediately).
while True:
print " Altitude: ", vehicle.location.global_relative_frame.alt
#Break and return from function just below target altitude.
if vehicle.location.global_relative_frame.alt>=aTargetAltitude*0.95:
print "Reached target altitude"
break
time.sleep(1)
arm_and_takeoff(20)
The function first performs some pre-arm checks.
Note
Arming turns on the vehicle’s motors in preparation for flight. The flight controller will not arm until the vehicle has passed a series of pre-arm checks to ensure that it is safe to fly.
These checks are encapsulated by the Vehicle.is_armable
attribute, which is true when the vehicle has booted, EKF is ready, and the vehicle has GPS lock.
print "Basic pre-arm checks"
# Don't let the user try to arm until autopilot is ready
while not vehicle.is_armable:
print " Waiting for vehicle to initialise..."
time.sleep(1)
Note
If you need more status information you can perform the following sorts of checks:
if v.mode.name == "INITIALISING":
print "Waiting for vehicle to initialise"
time.sleep(1)
while vehicle.gps_0.fix_type < 2:
print "Waiting for GPS...:", vehicle.gps_0.fix_type
time.sleep(1)
You should always do a final check on Vehicle.is_armable!
Once the vehicle is ready we set the mode to GUIDED and arm it. We then wait until arming is confirmed
before sending the takeoff command.
print "Arming motors"
# Copter should arm in GUIDED mode
vehicle.mode = VehicleMode("GUIDED")
vehicle.armed = True
while not vehicle.armed:
print " Waiting for arming..."
time.sleep(1)
print "Taking off!"
vehicle.simple_takeoff(aTargetAltitude) # Take off to target altitude
The takeoff command is asynchronous and can be interrupted if another command arrives before it reaches
the target altitude. This could have potentially serious consequences if the vehicle is commanded to move
horizontally before it reaches a safe height. In addition, there is no message sent back from the vehicle
to inform the client code that the target altitude has been reached.
To address these issues, the function waits until the vehicle reaches a specified height before returning. If you’re not concerned about reaching a particular height, a simpler implementation might just “wait” for a few seconds.
while True:
print " Altitude: ", vehicle.location.global_relative_frame.alt
#Break and return from function just below target altitude.
if vehicle.location.global_relative_frame.alt>=aTargetAltitude*0.95:
print "Reached target altitude"
break
time.sleep(1)
When the function returns the app can continue in GUIDED mode or switch to AUTO mode to start a mission.
Guiding and Controlling Copter
GUIDED mode is the recommended mode for flying Copter autonomously without a predefined a mission. It allows a Ground Control Station (GCS) or Companion Computer to control the vehicle “on the fly” and react to new events or situations as they occur.
This topic explains how you can control vehicle movement, and also how to send MAVLink commands to control vehicle orientation, region of interest, servos and other hardware. We also list a few functions that are useful for converting location and bearings from a global into a local frame of reference.
Most of the code can be observed running in Example: Guided Mode Movement and Commands (Copter).
Note
This topic is Copter specific. Plane apps typically use AUTO mode and dynamically modify missions as needed (Plane supports GUIDED mode but it is less full featured than on Copter).
Controlling vehicle movement
Copter movement can be controlled either by explicitly setting a target position, or by specifying the vehicle’s velocity components to guide it in a preferred direction.
Note
Changing to a new movement method is treated as a “mode change”. If you’ve set a yaw or region-of-interest value then this will be set to the default (vehicle faces the direction of travel).
Position control
Controlling the vehicle by explicitly setting the target position is useful when the final position is known/fixed.
The recommended method for position control is Vehicle.simple_goto().
This takes a LocationGlobal or
LocationGlobalRelative argument.
The method is used as shown below:
# Set mode to guided - this is optional as the goto method will change the mode if needed.
vehicle.mode = VehicleMode("GUIDED")
# Set the target location in global-relative frame
a_location = LocationGlobalRelative(-34.364114, 149.166022, 30)
vehicle.simple_goto(a_location)
Vehicle.simple_goto() can be interrupted by a later command, and does not provide any functionality
to indicate when the vehicle has reached its destination. Developers can use either a time delay or
measure proximity to the target to give the vehicle an
opportunity to reach its destination. The Example: Guided Mode Movement and Commands (Copter) shows both approaches.
You can optionally set the target movement speed using the function’s airspeed or groundspeed parameters
(this is equivalent to setting Vehicle.airspeed
or Vehicle.groundspeed). The speed setting will then be used
for all positional movement commands until it is set to another value.
# Set airspeed using attribute
vehicle.airspeed = 5 #m/s
# Set groundspeed using attribute
vehicle.groundspeed = 7.5 #m/s
# Set groundspeed using `simple_goto()` parameter
vehicle.simple_goto(a_location, groundspeed=10)
Note
Vehicle.simple_goto() will use the last speed value set. If both speed values are set at the
same time the resulting behaviour will be vehicle dependent.
Tip
You can also set the position by sending the MAVLink commands
SET_POSITION_TARGET_GLOBAL_INT or
SET_POSITION_TARGET_LOCAL_NED, specifying
a type_mask bitmask that enables the position parameters. The main difference between these commands is
that the former allows you to specify the location relative to the “global” frames (like
Vehicle.simple_goto()), while the later lets you specify the location in NED co-ordinates relative
to the home location or the vehicle itself. For more information on these options see the example code:
goto_position_target_global_int() and goto_position_target_local_ned().
Velocity control
Controlling vehicle movement using velocity is much smoother than using position when there are likely to be many updates (for example when tracking moving objects).
The function send_ned_velocity() below generates a SET_POSITION_TARGET_LOCAL_NED MAVLink message
which is used to directly specify the speed components of the vehicle in the MAV_FRAME_LOCAL_NED
frame (relative to home location). The message is re-sent every second for the specified duration.
Note
From Copter 3.3 the vehicle will stop moving if a new message is not received in approximately 3 seconds. Prior to Copter 3.3 the message only needs to be sent once, and the velocity remains active until the next movement command is received. The example code works for both cases!
def send_ned_velocity(velocity_x, velocity_y, velocity_z, duration):
"""
Move vehicle in direction based on specified velocity vectors.
"""
msg = vehicle.message_factory.set_position_target_local_ned_encode(
0, # time_boot_ms (not used)
0, 0, # target system, target component
mavutil.mavlink.MAV_FRAME_LOCAL_NED, # frame
0b0000111111000111, # type_mask (only speeds enabled)
0, 0, 0, # x, y, z positions (not used)
velocity_x, velocity_y, velocity_z, # x, y, z velocity in m/s
0, 0, 0, # x, y, z acceleration (not supported yet, ignored in GCS_Mavlink)
0, 0) # yaw, yaw_rate (not supported yet, ignored in GCS_Mavlink)
# send command to vehicle on 1 Hz cycle
for x in range(0,duration):
vehicle.send_mavlink(msg)
time.sleep(1)
The type_mask parameter is a bitmask that indicates which of the other parameters in the message are used/ignored by the vehicle
(0 means that the dimension is enabled, 1 means ignored). In the example the value 0b0000111111000111
is used to enable the velocity components.
In the MAV_FRAME_LOCAL_NED the speed components velocity_x and velocity_y are parallel to the North and East
directions (not to the front and side of the vehicle).
The velocity_z component is perpendicular to the plane of velocity_x and velocity_y, with a positive value towards the ground, following
the right-hand convention. For more information about the MAV_FRAME_LOCAL_NED frame of reference, see this wikipedia article
on NED.
Tip
From Copter 3.3 you can specify other frames,
for example MAV_FRAME_BODY_OFFSET_NED makes the velocity components relative to the current vehicle heading.
In Copter 3.2.1 (and earlier) the frame setting is ignored (MAV_FRAME_LOCAL_NED is always used).
The code fragment below shows how to call this method:
# Set up velocity mappings
# velocity_x > 0 => fly North
# velocity_x < 0 => fly South
# velocity_y > 0 => fly East
# velocity_y < 0 => fly West
# velocity_z < 0 => ascend
# velocity_z > 0 => descend
SOUTH=-2
UP=-0.5 #NOTE: up is negative!
#Fly south and up.
send_ned_velocity(SOUTH,0,UP,DURATION)
When moving the vehicle you can send separate commands to control the yaw (and other behaviour).
Tip
You can also control the velocity using the SET_POSITION_TARGET_GLOBAL_INT MAVLink command, as described in send_global_velocity().
Acceleration and force control
ArduPilot does not currently support controlling the vehicle by specifying acceleration/force components.
Note
The SET_POSITION_TARGET_GLOBAL_INT and SET_POSITION_TARGET_LOCAL_NED MAVLink commands allow you to specify the acceleration, force and yaw. However, commands setting these parameters are ignored by the vehicle.
Guided mode commands
This section explains how to send MAVLink commands, what commands can be sent, and lists a number of real examples you can use in your own code.
Sending messages/commands
MAVLink commands are sent by first using message_factory()
to encode the message and then calling send_mavlink() to send them.
Note
Vehicles support a subset of the messages defined in the MAVLink standard. For more information about the supported sets see wiki topics: Copter Commands in Guided Mode and Plane Commands in Guided Mode.
message_factory() uses a factory method for the encoding. The name of this method will always be the
lower case version of the message/command name with _encode appended. For example, to encode a
SET_POSITION_TARGET_LOCAL_NED
message we call message_factory.set_position_target_local_ned_encode() with values for all the
message fields as arguments:
msg = vehicle.message_factory.set_position_target_local_ned_encode(
0, # time_boot_ms (not used)
0, 0, # target_system, target_component
mavutil.mavlink.MAV_FRAME_BODY_NED, # frame
0b0000111111000111, # type_mask (only speeds enabled)
0, 0, 0, # x, y, z positions
velocity_x, velocity_y, velocity_z, # x, y, z velocity in m/s
0, 0, 0, # x, y, z acceleration (not supported yet, ignored in GCS_Mavlink)
0, 0) # yaw, yaw_rate (not supported yet, ignored in GCS_Mavlink)
# send command to vehicle
vehicle.send_mavlink(msg)
If a message includes target_system id you can set it to zero (DroneKit will automatically
update the value with the correct ID for the connected vehicle). Similarly CRC fields and sequence numbers
(if defined in the message type) can be set to zero as they are automatically updated by DroneKit.
The target_component is not updated by DroneKit, but should be set to 0 (broadcast) unless the message is
really intended for a specific component.
In Copter, the COMMAND_LONG message can be used send/package
a number of different supported MAV_CMD commands.
The factory function is again the lower case message name with suffix _encode (message_factory.command_long_encode).
The message parameters include the actual command to be sent (in the code fragment below MAV_CMD_CONDITION_YAW) and its fields.
msg = vehicle.message_factory.command_long_encode(
0, 0, # target_system, target_component
mavutil.mavlink.MAV_CMD_CONDITION_YAW, #command
0, #confirmation
heading, # param 1, yaw in degrees
0, # param 2, yaw speed deg/s
1, # param 3, direction -1 ccw, 1 cw
is_relative, # param 4, relative offset 1, absolute angle 0
0, 0, 0) # param 5 ~ 7 not used
# send command to vehicle
vehicle.send_mavlink(msg)
Supported commands
Copter Commands in Guided Mode lists all the commands that can be sent to Copter in GUIDED mode (in fact most of the commands can be sent in any mode!)
DroneKit-Python provides a friendly Python API that abstracts many of the commands. Where possible you should use the API rather than send messages directly> For example, use:
Vehicle.simple_takeoff()instead of theMAV_CMD_NAV_TAKEOFFcommand.Vehicle.simple_goto(),Vehicle.airspeed,- or
Vehicle.groundspeedrather thanMAV_CMD_DO_CHANGE_SPEED.
Some of the MAV_CMD commands that you might want to send include:
MAV_CMD_CONDITION_YAW,
MAV_CMD_DO_SET_ROI,
MAV_CMD_DO_SET_SERVO,
MAV_CMD_DO_REPEAT_SERVO,
MAV_CMD_DO_SET_RELAY,
MAV_CMD_DO_REPEAT_RELAY,
MAV_CMD_DO_FENCE_ENABLE,
MAV_CMD_DO_PARACHUTE,
MAV_CMD_DO_GRIPPER,
MAV_CMD_MISSION_START.
These would be sent in a COMMAND_LONG message as discussed above.
Setting the Yaw
The vehicle “yaw” is the direction that the vehicle is facing in the horizontal plane. On Copter this yaw need not be the direction of travel (though it is by default).
You can set the yaw direction using the MAV_CMD_CONDITION_YAW command, encoded in a COMMAND_LONG message as shown below.
def condition_yaw(heading, relative=False):
if relative:
is_relative=1 #yaw relative to direction of travel
else:
is_relative=0 #yaw is an absolute angle
# create the CONDITION_YAW command using command_long_encode()
msg = vehicle.message_factory.command_long_encode(
0, 0, # target system, target component
mavutil.mavlink.MAV_CMD_CONDITION_YAW, #command
0, #confirmation
heading, # param 1, yaw in degrees
0, # param 2, yaw speed deg/s
1, # param 3, direction -1 ccw, 1 cw
is_relative, # param 4, relative offset 1, absolute angle 0
0, 0, 0) # param 5 ~ 7 not used
# send command to vehicle
vehicle.send_mavlink(msg)
The command allows you to specify that whether the heading is an absolute angle in degrees (0 degrees is North) or a value that is relative to the previously set heading.
Note
- The yaw will return to the default (facing direction of travel) after you set the mode or change the command used for controlling movement.
- At time of writing there is no safe way to return to the default yaw “face direction of travel” behaviour.
- After taking off, yaw commands are ignored until the first “movement” command has been received. If you need to yaw immediately following takeoff then send a command to “move” to your current position.
- Setting the ROI may work to get yaw to track a particular point (depending on the gimbal setup).
Setting the ROI
Send the MAV_CMD_DO_SET_ROI command to point camera gimbal at a specified region of interest (LocationGlobal). The vehicle may also turn to face the ROI.
def set_roi(location):
# create the MAV_CMD_DO_SET_ROI command
msg = vehicle.message_factory.command_long_encode(
0, 0, # target system, target component
mavutil.mavlink.MAV_CMD_DO_SET_ROI, #command
0, #confirmation
0, 0, 0, 0, #params 1-4
location.lat,
location.lon,
location.alt
)
# send command to vehicle
vehicle.send_mavlink(msg)
New in version Copter: 3.2.1. You can explicitly reset the ROI by sending the MAV_CMD_DO_SET_ROI command with zero in all parameters. The front of the vehicle will then follow the direction of travel.
The ROI (and yaw) is also reset when the mode, or the command used to control movement, is changed.
Command acknowledgements and response values
ArduPilot typically sends a command acknowledgement indicating whether a command was received, and whether it was accepted or rejected. At time of writing there is no way to intercept this acknowledgement in the API (#168).
Some MAVLink messages request information from the autopilot, and expect the result to be returned in another message. Provided the message is handled by the AutoPilot in GUIDED mode you can send the request and process the response by creating a message listener.
Frame conversion functions
The functions in this section help convert between different frames-of-reference. In particular they make it easier to navigate in terms of “metres from the current position” when using commands that take absolute positions in decimal degrees.
The methods are approximations only, and may be less accurate over longer distances, and when close to the Earth’s poles.
def get_location_metres(original_location, dNorth, dEast):
"""
Returns a LocationGlobal object containing the latitude/longitude `dNorth` and `dEast` metres from the
specified `original_location`. The returned LocationGlobal has the same `alt` value
as `original_location`.
The function is useful when you want to move the vehicle around specifying locations relative to
the current vehicle position.
The algorithm is relatively accurate over small distances (10m within 1km) except close to the poles.
For more information see:
http://gis.stackexchange.com/questions/2951/algorithm-for-offsetting-a-latitude-longitude-by-some-amount-of-meters
"""
earth_radius=6378137.0 #Radius of "spherical" earth
#Coordinate offsets in radians
dLat = dNorth/earth_radius
dLon = dEast/(earth_radius*math.cos(math.pi*original_location.lat/180))
#New position in decimal degrees
newlat = original_location.lat + (dLat * 180/math.pi)
newlon = original_location.lon + (dLon * 180/math.pi)
if type(original_location) is LocationGlobal:
targetlocation=LocationGlobal(newlat, newlon,original_location.alt)
elif type(original_location) is LocationGlobalRelative:
targetlocation=LocationGlobalRelative(newlat, newlon,original_location.alt)
else:
raise Exception("Invalid Location object passed")
return targetlocation;
def get_distance_metres(aLocation1, aLocation2):
"""
Returns the ground distance in metres between two `LocationGlobal` or `LocationGlobalRelative` objects.
This method is an approximation, and will not be accurate over large distances and close to the
earth's poles. It comes from the ArduPilot test code:
https://github.com/diydrones/ardupilot/blob/master/Tools/autotest/common.py
"""
dlat = aLocation2.lat - aLocation1.lat
dlong = aLocation2.lon - aLocation1.lon
return math.sqrt((dlat*dlat) + (dlong*dlong)) * 1.113195e5
def get_bearing(aLocation1, aLocation2):
"""
Returns the bearing between the two LocationGlobal objects passed as parameters.
This method is an approximation, and may not be accurate over large distances and close to the
earth's poles. It comes from the ArduPilot test code:
https://github.com/diydrones/ardupilot/blob/master/Tools/autotest/common.py
"""
off_x = aLocation2.lon - aLocation1.lon
off_y = aLocation2.lat - aLocation1.lat
bearing = 90.00 + math.atan2(-off_y, off_x) * 57.2957795
if bearing < 0:
bearing += 360.00
return bearing;
Tip
The common.py file in the ArduPilot test code may have other functions that you will find useful.
Other information
- NED Frame
- MISSION_ITEM
- GUIDED Mode for Copter (wiki).
- GUIDED mode for Plane (wiki).
- Copter Commands in Guided Mode (wiki).
- MAVLink mission command messages (wiki).
- GCS_Mavlink.cpp (Copter)
Missions (AUTO Mode)
AUTO mode is used run pre-defined waypoint missions on Copter, Plane and Rover.
DroneKit-Python provides basic methods to download and clear the current mission commands from the vehicle, to add and upload new mission commands, to count the number of waypoints, and to read and set the currently executed mission command. You can build upon these basic primitives to create high-level mission planning functionality.
This section shows how to use the basic methods and provides a few useful helper functions. Most of the code can be observed running in Example: Basic Mission and Example: Mission Import/Export.
Note
We recommend that you use GUIDED mode instead of AUTO mode where possible, because it offers finer and more responsive control over movement, and can emulate most mission planning activities.
AUTO mode can be helpful if a command you need is not supported in GUIDED mode on a particular vehicle type.
Mission Command Overview
The mission commands (e.g. MAV_CMD_NAV_TAKEOFF, MAV_CMD_NAV_WAYPOINT ) supported for each vehicle type are listed here:
Copter,
Plane,
Rover.
There are three types of commands:
- NAVigation commands (
MAV_CMD_NAV_*) are used to control vehicle movement, including takeoff, moving to and around waypoints, changing altitude, and landing. - DO commands (
MAV_CMD_DO_*) are for auxiliary functions that do not affect the vehicle’s position (for example, setting the camera trigger distance, or setting a servo value). - CONDITION commands (
MAV_CMD_NAV_*) are used to delay DO commands until some condition is met. For exampleMAV_CMD_CONDITION_DISTANCEwill prevent DO commands executing until the vehicle reaches the specified distance from the waypoint.
During a mission at most one NAV command and one DO or CONDITION command can be running at the same time. CONDITION and DO commands are associated with the last NAV command that was sent: if the UAV reaches the waypoint before these commands are executed, the next NAV command is loaded and they will be skipped.
The MAVLink Mission Command Messages (MAV_CMD) wiki topic provides a more detailed overview of commands.
Note
- If the autopilot receives a command that it cannot handle, then the command will be (silently) dropped.
- You cannot yet determine dynamically what commands are supported. We hope to deliver this functionality in the forthcoming capability API.
Download current mission
The mission commands for a vehicle are accessed using the Vehicle.commands
attribute. The attribute is of type CommandSequence, a class that provides ‘array style’ indexed access to the
waypoints which make up the mission.
Waypoints are not downloaded from vehicle until download() is called. The download is asynchronous;
use wait_ready() to block your thread until the download is complete:
# Connect to the Vehicle (in this case a simulated vehicle at 127.0.0.1:14550)
vehicle = connect('127.0.0.1:14550', wait_ready=True)
# Download the vehicle waypoints (commands). Wait until download is complete.
cmds = vehicle.commands
cmds.download()
cmds.wait_ready()
Note
In DroneKit-Python 2 Vehicle.commands contains just the editable waypoints (in version 1.x, the
commands included the non-editable home location as the first item).
Clearing current mission
To clear a mission you call clear() and then
Vehicle.commands.upload() (to upload the changes to the vehicle):
# Connect to the Vehicle (in this case a simulated vehicle at 127.0.0.1:14550)
vehicle = connect('127.0.0.1:14550', wait_ready=True)
# Get commands object from Vehicle.
cmds = vehicle.commands
# Call clear() on Vehicle.commands and upload the command to the vehicle.
cmds.clear()
cmds.upload()
Note
If a mission that is underway is cleared, the mission will continue to the next waypoint. If you don’t add a new command before the waypoint is reached then the vehicle mode will change to RTL (return to launch) mode.
Creating/adding mission commands
After downloading or clearing a mission new commands
can be added and uploaded to the vehicle. Commands are added to the mission using add()
and are sent to the vehicle (either individually or in batches) using upload().
Each command is packaged in a Command object (see that class for the order/meaning of the parameters).
The supported commands for each vehicle are linked above.
# Connect to the Vehicle (in this case a simulated vehicle at 127.0.0.1:14550)
vehicle = connect('127.0.0.1:14550', wait_ready=True)
# Get the set of commands from the vehicle
cmds = vehicle.commands
cmds.download()
cmds.wait_ready()
# Create and add commands
cmd1=Command( 0, 0, 0, mavutil.mavlink.MAV_FRAME_GLOBAL_RELATIVE_ALT, mavutil.mavlink.MAV_CMD_NAV_TAKEOFF, 0, 0, 0, 0, 0, 0, 0, 0, 10)
cmd2=Command( 0, 0, 0, mavutil.mavlink.MAV_FRAME_GLOBAL_RELATIVE_ALT, mavutil.mavlink.MAV_CMD_NAV_WAYPOINT, 0, 0, 0, 0, 0, 0, 10, 10, 10)
cmds.add(cmd1)
cmds.add(cmd2)
cmds.upload() # Send commands
Modifying missions
While you can add new commands after downloading a mission
it is not possible to directly modify and upload existing commands in Vehicle.commands (you can modify the commands but
changes do not propagate to the vehicle).
Instead you copy all the commands into another container (e.g. a list),
modify them as needed, then clear Vehicle.commands and upload the list as a new mission:
# Connect to the Vehicle (in this case a simulated vehicle at 127.0.0.1:14550)
vehicle = connect('127.0.0.1:14550', wait_ready=True)
# Get the set of commands from the vehicle
cmds = vehicle.commands
cmds.download()
cmds.wait_ready()
# Save the vehicle commands to a list
missionlist=[]
for cmd in cmds:
missionlist.append(cmd)
# Modify the mission as needed. For example, here we change the
# first waypoint into a MAV_CMD_NAV_TAKEOFF command.
missionlist[0].command=mavutil.mavlink.MAV_CMD_NAV_TAKEOFF
# Clear the current mission (command is sent when we call upload())
cmds.clear()
#Write the modified mission and flush to the vehicle
for cmd in missionlist:
cmds.add(cmd)
cmds.upload()
The changes are not guaranteed to be complete until
upload() is called on the parent Vehicle.commands object.
Running and monitoring missions
To start a mission, change the mode to AUTO:
# Connect to the Vehicle (in this case a simulated vehicle at 127.0.0.1:14550)
vehicle = connect('127.0.0.1:14550', wait_ready=True)
# Set the vehicle into auto mode
vehicle.mode = VehicleMode("AUTO")
Note
If the vehicle is in the air, then changing the mode to AUTO is all that is required to start the mission.
Copter 3.3 release and later: If the vehicle is on the ground (only), you will additionally need to send the MAV_CMD_MISSION_START command.
You can stop/pause the current mission by switching out of AUTO mode (e.g. into GUIDED mode). If you switch back to AUTO mode the mission will either restart at the beginning or resume at the current waypoint - the behaviour depends on the value of the MIS_RESTART parameter (available on all vehicle types).
You can monitor the progress of the mission by polling the Vehicle.commands.next attribute
to get the current command number. You can also change the current command by setting the attribute to the desired command number.
vehicle.commands.next=2
print "Current Waypoint: %s" % vehicle.commands.next
vehicle.commands.next=4
print "Current Waypoint: %s" % vehicle.commands.next
There is no need to upload() changes to send an update to the next attribute to the vehicle
(and as with other attributes, if you fetch a value, it is updated from the vehicle).
Handling the end of a mission
At the end of the mission the vehicle will enter LOITER mode (hover in place for Copter, circle for Plane, stop for Rover). You can add new commands to the mission, but you will need to toggle from/back to AUTO mode to start it running again.
Currently there is no notification in DroneKit when a mission completes. If you need to detect mission end (in order to perform some other operation) then you can either:
- Add a dummy mission command and poll
Vehicle.commands.nextfor the transition to the final command, or - Compare the current position to the target position in the final waypoint.
Useful Mission functions
This example code contains a number of functions that might be useful for managing and monitoring missions:
Load a mission from a file
upload_mission() uploads a mission from a file.
The implementation calls readmission() (below) to import the mission from a file into a list. The method then
clears the existing mission and uploads the new version.
Adding mission commands is discussed here in the guide.
def upload_mission(aFileName):
"""
Upload a mission from a file.
"""
#Read mission from file
missionlist = readmission(aFileName)
print "\nUpload mission from a file: %s" % import_mission_filename
#Clear existing mission from vehicle
print ' Clear mission'
cmds = vehicle.commands
cmds.clear()
#Add new mission to vehicle
for command in missionlist:
cmds.add(command)
print ' Upload mission'
vehicle.commands.upload()
readmission() reads a mission from the specified file and returns a list of Command objects.
Each line is split up. The first line is used to test whether the file has the correct (stated) format.
For subsequent lines the values are stored in a Command object
(the values are first cast to the correct float and int types for their associated parameters).
The commands are added to a list which is returned by the function.
def readmission(aFileName):
"""
Load a mission from a file into a list.
This function is used by upload_mission().
"""
print "Reading mission from file: %s\n" % aFileName
cmds = vehicle.commands
missionlist=[]
with open(aFileName) as f:
for i, line in enumerate(f):
if i==0:
if not line.startswith('QGC WPL 110'):
raise Exception('File is not supported WP version')
else:
linearray=line.split('\t')
ln_index=int(linearray[0])
ln_currentwp=int(linearray[1])
ln_frame=int(linearray[2])
ln_command=int(linearray[3])
ln_param1=float(linearray[4])
ln_param2=float(linearray[5])
ln_param3=float(linearray[6])
ln_param4=float(linearray[7])
ln_param5=float(linearray[8])
ln_param6=float(linearray[9])
ln_param7=float(linearray[10])
ln_autocontinue=int(linearray[11].strip())
cmd = Command( 0, 0, 0, ln_frame, ln_command, ln_currentwp, ln_autocontinue, ln_param1, ln_param2, ln_param3, ln_param4, ln_param5, ln_param6, ln_param7)
missionlist.append(cmd)
return missionlist
Save a mission to a file
save_mission() saves the current mission to a file (in the Waypoint file format).
It uses download_mission() (below) to get them mission, and then writes the list line-by-line to the file.
def save_mission(aFileName):
"""
Save a mission in the Waypoint file format (http://qgroundcontrol.org/mavlink/waypoint_protocol#waypoint_file_format).
"""
missionlist = download_mission()
output='QGC WPL 110\n'
for cmd in missionlist:
commandline="%s\t%s\t%s\t%s\t%s\t%s\t%s\t%s\t%s\t%s\t%s\t%s\n" % (cmd.seq,cmd.current,cmd.frame,cmd.command,cmd.param1,cmd.param2,cmd.param3,cmd.param4,cmd.x,cmd.y,cmd.z,cmd.autocontinue)
output+=commandline
with open(aFileName, 'w') as file_:
file_.write(output)
download_mission() downloads the Vehicle.commands from the vehicle and
adds them to a list. Downloading mission is discussed in the guide.
def download_mission():
"""
Downloads the current mission and returns it in a list.
It is used in save_mission() to get the file information to save.
"""
missionlist=[]
cmds = vehicle.commands
cmds.download()
cmds.wait_ready()
for cmd in cmds:
missionlist.append(cmd)
return missionlist
Get distance to waypoint
distance_to_current_waypoint() returns the distance (in metres) to the next waypoint:
def distance_to_current_waypoint():
"""
Gets distance in metres to the current waypoint.
It returns None for the first waypoint (Home location).
"""
nextwaypoint=vehicle.commands.next
if nextwaypoint ==0:
return None
missionitem=vehicle.commands[nextwaypoint-1] #commands are zero indexed
lat=missionitem.x
lon=missionitem.y
alt=missionitem.z
targetWaypointLocation=LocationGlobalRelative(lat,lon,alt)
distancetopoint = get_distance_metres(vehicle.location.global_frame, targetWaypointLocation)
return distancetopoint
The function determines the current target waypoint number with Vehicle.commands.next
and uses it to index the commands to get the latitude, longitude and altitude of the target waypoint. The get_distance_metres() function
(see Frame conversion functions) is then used to calculate and return the (horizontal) distance
from the current vehicle location.
Tip
This implementation is very basic. It assumes that the next command number is for a valid NAV command (it might not be) and that the lat/lon/alt values are non-zero. It is however a useful indicator for test code.
Useful Links
- MAVLink mission command messages (all vehicle types - wiki).
Debugging
DroneKit-Python apps can be debugged in the same way as any other standalone Python scripts. The sections below outline a few methods.
pdb - The Python Debugger
The Python Debugger - pdb can be used to debug DroneKit-Python apps.
The command below can be used to run a script in debug mode:
python -m pdb my_dronekit_script.py
You can also instrument your code to invoke the debugger at a certain point. To do this
add set-trace() at the point where you want to break execution:
# Connect to the Vehicle on udp at 127.0.0.1:14550
vehicle = connect('127.0.0.1:14550', wait_ready=True)
import pdb; pdb.set_trace()
print "Global Location: %s" % vehicle.location.global_frame
The available debugger commands are listed here.
pudb - A full-screen, console-based Python debugger
If you prefer a IDE like debug you can use pudb - A full-screen, console-based Python debugger.
pip install pudb
To start debugging, simply insert:
from pudb import set_trace; set_trace()
Insert either of these snippets into the piece of code you want to debug, or run the entire script with:
pudb my-script.py
Print/log statements
The simplest and most common method of debugging is to manually add debug/print statements to the source.
# Connect to the Vehicle on udp at 127.0.0.1:14550
vehicle = connect('127.0.0.1:14550', wait_ready=True)
# print out debug information
print "Global Location: %s" % vehicle.location.global_frame
In addition to printing DroneKit variables, Python provides numerous inbuilt and add-on modules/methods for inspecting code (e.g. dir(), traceback, etc.)
Other IDEs/debuggers
There is no reason you should not be able to straightforwardly use other popular Python IDEs including IDLE and Eclipse.
MAVLink Messages
Some useful MAVLink messages sent by the autopilot are not (yet) directly available to DroneKit-Python scripts
through the observable attributes in Vehicle.
This topic shows how you can intercept specific MAVLink messages by defining a listener callback function
using the Vehicle.on_message() decorator.
Tip
Example: Create Attribute in App shows how you can extend this approach to create a new Vehicle
attribute in your client code.
Creating a message listener
The Vehicle.on_message() decorator can be used to
set a particular function as the callback handler for a particular message type. You can create listeners
for as many messages as you like, or even multiple listeners for the same message.
For example, the code snippet below shows how to set a listener for the RANGEFINDER message:
#Create a message listener using the decorator.
@vehicle.on_message('RANGEFINDER')
def listener(self, name, message):
print message
Tip
Every single listener can have the same name/prototpye as above (“listener”) because
Python does not notice the decorated functions are in the same scope.
Unfortunately this also means that you can’t unregister a callback created using this method.
The messages are classes from the pymavlink library. The output of the code above looks something like:
RANGEFINDER {distance : 0.0899999961257, voltage : 0.00900000054389}
...
You can access the message fields directly. For example, to access the RANGEFINDER message your listener
function might look like this:
#Create a message listener using the decorator.
@vehicle.on_message('RANGEFINDER')
def listener(self, name, message):
print 'distance: %s' % message.distance
print 'voltage: %s' % message.voltage
Watching all messages
You can register a callback for all messages by setting the message name as the wildcard string (‘*’):
#Create a message listener for all messages.
@vehicle.on_message('*')
def listener(self, name, message):
print 'message: %s' % message
Removing an observer
Callbacks registered using the Vehicle.on_message() decorator cannot be removed.
This is generally not a problem, because in most cases you’re interested in messages for the lifetime of a session.
If you do need to be able to remove messages you can instead add the callback using
Vehicle.add_message_listener, and then remove it by calling
Vehicle.remove_message_listener.
Examples
This section contains the documentation for a number of useful DroneKit-Python examples. These demonstrate common use-cases, and show (among other things) how to use the API to query vehicle state and parameters, and how to control a vehicle during missions and outside missions using custom commands.
Running the Examples
General instructions for running the example source code are given below. More explicit instructions are provided within the documentation for each example (and within the examples themselves by passing the -h (help) command line argument).
Tip
The examples all launch the dronekit-sitl simulator and connect to it by default. The --connect argument is used to instead specify the connection string for a target vehicle or an externally managed SITL instance.
To run the examples:
Install DroneKit-Python if you have not already done so! Install dronekit-sitl if you want to test against simulated vehicles.
Get the DroneKit-Python example source code onto your local machine. The easiest way to do this is to clone the dronekit-python repository from Github.
On the command prompt enter:
git clone http://github.com/dronekit/dronekit-python.git
Navigate to the example you wish to run (or specify the full path in the next step). The examples are all stored in subdirectories of dronekit-python/examples/.
For example, to run the vehicle_state example, you would navigate as shown:
cd dronekit-python/examples/vehicle_state/Start the example as shown:
To connect to a simulator started/managed by the script:
python vehicle_state.py
To connect to a specific vehicle, pass its connection string via the
connectargument. For example, to run the example on Solo you would use the following command:python vehicle_state.py --connect udpin:0.0.0.0:14550
Warning
Propellers should be removed before testing examples indoors (on real vehicles).
Example: Vehicle State
This example shows how to get/set vehicle attribute and parameter information, how to observe vehicle attribute changes, and how to get the home position.
The guide topic Vehicle State and Settings provides a more detailed explanation of how the API should be used.
Running the example
The example can be run as described in Running the Examples (which in turn assumes that the vehicle and DroneKit have been set up as described in Installing DroneKit).
In summary, after cloning the repository:
Navigate to the example folder as shown:
cd dronekit-python/examples/vehicle_state/You can run the example against a simulator (DroneKit-SITL) by specifying the Python script without any arguments. The example will download SITL binaries (if needed), start the simulator, and then connect to it:
python vehicle_state.py
On the command prompt you should see (something like):
Connecting to vehicle on: tcp:127.0.0.1:5760 >>> APM:Copter V3.3 (d6053245) >>> Frame: QUAD >>> Calibrating barometer >>> Initialising APM... >>> barometer calibration complete >>> GROUND START Get all vehicle attribute values: Autopilot Firmware version: APM:Copter-3.3.0-alpha64 Major version number: 3 Minor version number: 3 Patch version number: 0 Release type: rc Release version: 0 Stable release?: True Autopilot capabilities Supports MISSION_FLOAT message type: True Supports PARAM_FLOAT message type: True Supports MISSION_INT message type: False Supports COMMAND_INT message type: False Supports PARAM_UNION message type: False Supports ftp for file transfers: False Supports commanding attitude offboard: False Supports commanding position and velocity targets in local NED frame: True Supports set position + velocity targets in global scaled integers: True Supports terrain protocol / data handling: True Supports direct actuator control: False Supports the flight termination command: True Supports mission_float message type: True Supports onboard compass calibration: False Global Location: LocationGlobal:lat=-35.363261,lon=149.1652299,alt=None Global Location (relative altitude): LocationGlobalRelative:lat=-35.363261,lon=149.1652299,alt=0.0 Local Location: LocationLocal:north=None,east=None,down=None Attitude: Attitude:pitch=0.00294387154281,yaw=-0.11805768311,roll=0.00139428151306 Velocity: [-0.03, 0.02, 0.0] GPS: GPSInfo:fix=3,num_sat=10 Gimbal status: Gimbal: pitch=None, roll=None, yaw=None Battery: Battery:voltage=12.587,current=0.0,level=100 EKF OK?: False Last Heartbeat: 0.769999980927 Rangefinder: Rangefinder: distance=None, voltage=None Rangefinder distance: None Rangefinder voltage: None Heading: 353 Is Armable?: False System status: STANDBY Groundspeed: 0.0 Airspeed: 0.0 Mode: STABILIZE Armed: False Waiting for home location ... ... Waiting for home location ... Waiting for home location ... Home location: LocationGlobal:lat=-35.3632621765,lon=149.165237427,alt=583.989990234 Set new home location New Home Location (from attribute - altitude should be 222): LocationGlobal:lat=-35.363261,lon=149.1652299,alt=222 New Home Location (from vehicle - altitude should be 222): LocationGlobal:lat=-35.3632621765,lon=149.165237427,alt=222.0 Set Vehicle.mode=GUIDED (currently: STABILIZE) Waiting for mode change ... Set Vehicle.armed=True (currently: False) Waiting for arming... Waiting for arming... Waiting for arming... >>> ARMING MOTORS >>> GROUND START Waiting for arming... Waiting for arming... >>> Initialising APM... Vehicle is armed: True Add `attitude` attribute callback/observer on `vehicle` Wait 2s so callback invoked before observer removed CALLBACK: Attitude changed to Attitude:pitch=-0.000483880605316,yaw=-0.0960851684213,roll=-0.00799709651619 CALLBACK: Attitude changed to Attitude:pitch=0.000153727291035,yaw=-0.0962921902537,roll=-0.00707155792043 ... CALLBACK: Attitude changed to Attitude:pitch=0.00485319690779,yaw=-0.100129388273,roll=0.00181497994345 Remove Vehicle.attitude observer Add `mode` attribute callback/observer using decorator Set mode=STABILIZE (currently: GUIDED) and wait for callback Wait 2s so callback invoked before moving to next example CALLBACK: Mode changed to VehicleMode:STABILIZE Attempt to remove observer added with `on_attribute` decorator (should fail) Exception: Cannot remove observer added using decorator Add attribute callback detecting ANY attribute change Wait 1s so callback invoked before observer removed CALLBACK: (attitude): Attitude:pitch=0.00716688157991,yaw=-0.0950401723385,roll=0.00759896961972 CALLBACK: (heading): 354 CALLBACK: (location): <dronekit.Locations object at 0x000000000767F2B0> CALLBACK: (airspeed): 0.0 CALLBACK: (groundspeed): 0.0 CALLBACK: (ekf_ok): True CALLBACK: (battery): Battery:voltage=12.538,current=3.48,level=99 CALLBACK: (gps_0): GPSInfo:fix=3,num_sat=10 CALLBACK: (location): <dronekit.Locations object at 0x000000000767F2B0> CALLBACK: (velocity): [-0.14, 0.1, 0.0] CALLBACK: (local_position): LocationLocal:north=-0.136136248708,east=-0.0430941730738,down=-0.00938374921679 CALLBACK: (channels): {'1': 1500, '3': 1000, '2': 1500, '5': 1800, '4': 1500, '7': 1000, '6': 1000, '8': 1800} ... CALLBACK: (ekf_ok): True Remove Vehicle attribute observer Read and write parameters Read vehicle param 'THR_MIN': 130.0 Write vehicle param 'THR_MIN' : 10 Read new value of param 'THR_MIN': 10.0 Print all parameters (iterate `vehicle.parameters`): Key:RC7_REV Value:1.0 Key:GPS_INJECT_TO Value:127.0 Key:FLTMODE1 Value:7.0 ... Key:SR2_POSITION Value:0.0 Key:SIM_FLOW_DELAY Value:0.0 Key:BATT_CURR_PIN Value:12.0 Create parameter observer using decorator Write vehicle param 'THR_MIN' : 20 (and wait for callback) PARAMETER CALLBACK: THR_MIN changed to: 20.0 Create (removable) observer for any parameter using wildcard string Change THR_MID and THR_MIN parameters (and wait for callback) ANY PARAMETER CALLBACK: THR_MID changed to: 400.0 PARAMETER CALLBACK: THR_MIN changed to: 30.0 ANY PARAMETER CALLBACK: THR_MIN changed to: 30.0 Reset vehicle attributes/parameters and exit >>> DISARMING MOTORS PARAMETER CALLBACK: THR_MIN changed to: 130.0 ANY PARAMETER CALLBACK: THR_MIN changed to: 130.0 ANY PARAMETER CALLBACK: THR_MID changed to: 500.0 Close vehicle object CompletedYou can run the example against a specific connection (simulated or otherwise) by passing the connection string for your vehicle in the
--connectparameter.For example, to connect to SITL running on UDP port 14550 on your local computer:
python vehicle_state.py --connect 127.0.0.1:14550
Note
DroneKit-SITL does not automatically add a virtual gimbal and rangefinder,
so these attributes will always report None.
How does it work?
The guide topic Vehicle State and Settings provides an explanation of how this code works.
Known issues
This example has no known issues.
Source code
The full source code at documentation build-time is listed below (current version on github):
#!/usr/bin/env python
# -*- coding: utf-8 -*-
"""
© Copyright 2015-2016, 3D Robotics.
vehicle_state.py:
Demonstrates how to get and set vehicle state and parameter information,
and how to observe vehicle attribute (state) changes.
Full documentation is provided at http://python.dronekit.io/examples/vehicle_state.html
"""
from __future__ import print_function
from dronekit import connect, VehicleMode
import time
#Set up option parsing to get connection string
import argparse
parser = argparse.ArgumentParser(description='Print out vehicle state information. Connects to SITL on local PC by default.')
parser.add_argument('--connect',
help="vehicle connection target string. If not specified, SITL automatically started and used.")
args = parser.parse_args()
connection_string = args.connect
sitl = None
#Start SITL if no connection string specified
if not connection_string:
import dronekit_sitl
sitl = dronekit_sitl.start_default()
connection_string = sitl.connection_string()
# Connect to the Vehicle.
# Set `wait_ready=True` to ensure default attributes are populated before `connect()` returns.
print("\nConnecting to vehicle on: %s" % connection_string)
vehicle = connect(connection_string, wait_ready=True)
vehicle.wait_ready('autopilot_version')
# Get all vehicle attributes (state)
print("\nGet all vehicle attribute values:")
print(" Autopilot Firmware version: %s" % vehicle.version)
print(" Major version number: %s" % vehicle.version.major)
print(" Minor version number: %s" % vehicle.version.minor)
print(" Patch version number: %s" % vehicle.version.patch)
print(" Release type: %s" % vehicle.version.release_type())
print(" Release version: %s" % vehicle.version.release_version())
print(" Stable release?: %s" % vehicle.version.is_stable())
print(" Autopilot capabilities")
print(" Supports MISSION_FLOAT message type: %s" % vehicle.capabilities.mission_float)
print(" Supports PARAM_FLOAT message type: %s" % vehicle.capabilities.param_float)
print(" Supports MISSION_INT message type: %s" % vehicle.capabilities.mission_int)
print(" Supports COMMAND_INT message type: %s" % vehicle.capabilities.command_int)
print(" Supports PARAM_UNION message type: %s" % vehicle.capabilities.param_union)
print(" Supports ftp for file transfers: %s" % vehicle.capabilities.ftp)
print(" Supports commanding attitude offboard: %s" % vehicle.capabilities.set_attitude_target)
print(" Supports commanding position and velocity targets in local NED frame: %s" % vehicle.capabilities.set_attitude_target_local_ned)
print(" Supports set position + velocity targets in global scaled integers: %s" % vehicle.capabilities.set_altitude_target_global_int)
print(" Supports terrain protocol / data handling: %s" % vehicle.capabilities.terrain)
print(" Supports direct actuator control: %s" % vehicle.capabilities.set_actuator_target)
print(" Supports the flight termination command: %s" % vehicle.capabilities.flight_termination)
print(" Supports mission_float message type: %s" % vehicle.capabilities.mission_float)
print(" Supports onboard compass calibration: %s" % vehicle.capabilities.compass_calibration)
print(" Global Location: %s" % vehicle.location.global_frame)
print(" Global Location (relative altitude): %s" % vehicle.location.global_relative_frame)
print(" Local Location: %s" % vehicle.location.local_frame)
print(" Attitude: %s" % vehicle.attitude)
print(" Velocity: %s" % vehicle.velocity)
print(" GPS: %s" % vehicle.gps_0)
print(" Gimbal status: %s" % vehicle.gimbal)
print(" Battery: %s" % vehicle.battery)
print(" EKF OK?: %s" % vehicle.ekf_ok)
print(" Last Heartbeat: %s" % vehicle.last_heartbeat)
print(" Rangefinder: %s" % vehicle.rangefinder)
print(" Rangefinder distance: %s" % vehicle.rangefinder.distance)
print(" Rangefinder voltage: %s" % vehicle.rangefinder.voltage)
print(" Heading: %s" % vehicle.heading)
print(" Is Armable?: %s" % vehicle.is_armable)
print(" System status: %s" % vehicle.system_status.state)
print(" Groundspeed: %s" % vehicle.groundspeed) # settable
print(" Airspeed: %s" % vehicle.airspeed) # settable
print(" Mode: %s" % vehicle.mode.name) # settable
print(" Armed: %s" % vehicle.armed) # settable
# Get Vehicle Home location - will be `None` until first set by autopilot
while not vehicle.home_location:
cmds = vehicle.commands
cmds.download()
cmds.wait_ready()
if not vehicle.home_location:
print(" Waiting for home location ...")
# We have a home location, so print it!
print("\n Home location: %s" % vehicle.home_location)
# Set vehicle home_location, mode, and armed attributes (the only settable attributes)
print("\nSet new home location")
# Home location must be within 50km of EKF home location (or setting will fail silently)
# In this case, just set value to current location with an easily recognisable altitude (222)
my_location_alt = vehicle.location.global_frame
my_location_alt.alt = 222.0
vehicle.home_location = my_location_alt
print(" New Home Location (from attribute - altitude should be 222): %s" % vehicle.home_location)
#Confirm current value on vehicle by re-downloading commands
cmds = vehicle.commands
cmds.download()
cmds.wait_ready()
print(" New Home Location (from vehicle - altitude should be 222): %s" % vehicle.home_location)
print("\nSet Vehicle.mode = GUIDED (currently: %s)" % vehicle.mode.name)
vehicle.mode = VehicleMode("GUIDED")
while not vehicle.mode.name=='GUIDED': #Wait until mode has changed
print(" Waiting for mode change ...")
time.sleep(1)
# Check that vehicle is armable
while not vehicle.is_armable:
print(" Waiting for vehicle to initialise...")
time.sleep(1)
# If required, you can provide additional information about initialisation
# using `vehicle.gps_0.fix_type` and `vehicle.mode.name`.
#print "\nSet Vehicle.armed=True (currently: %s)" % vehicle.armed
#vehicle.armed = True
#while not vehicle.armed:
# print " Waiting for arming..."
# time.sleep(1)
#print " Vehicle is armed: %s" % vehicle.armed
# Add and remove and attribute callbacks
#Define callback for `vehicle.attitude` observer
last_attitude_cache = None
def attitude_callback(self, attr_name, value):
# `attr_name` - the observed attribute (used if callback is used for multiple attributes)
# `self` - the associated vehicle object (used if a callback is different for multiple vehicles)
# `value` is the updated attribute value.
global last_attitude_cache
# Only publish when value changes
if value!=last_attitude_cache:
print(" CALLBACK: Attitude changed to", value)
last_attitude_cache=value
print("\nAdd `attitude` attribute callback/observer on `vehicle`")
vehicle.add_attribute_listener('attitude', attitude_callback)
print(" Wait 2s so callback invoked before observer removed")
time.sleep(2)
print(" Remove Vehicle.attitude observer")
# Remove observer added with `add_attribute_listener()` specifying the attribute and callback function
vehicle.remove_attribute_listener('attitude', attitude_callback)
# Add mode attribute callback using decorator (callbacks added this way cannot be removed).
print("\nAdd `mode` attribute callback/observer using decorator")
@vehicle.on_attribute('mode')
def decorated_mode_callback(self, attr_name, value):
# `attr_name` is the observed attribute (used if callback is used for multiple attributes)
# `attr_name` - the observed attribute (used if callback is used for multiple attributes)
# `value` is the updated attribute value.
print(" CALLBACK: Mode changed to", value)
print(" Set mode=STABILIZE (currently: %s) and wait for callback" % vehicle.mode.name)
vehicle.mode = VehicleMode("STABILIZE")
print(" Wait 2s so callback invoked before moving to next example")
time.sleep(2)
print("\n Attempt to remove observer added with `on_attribute` decorator (should fail)")
try:
vehicle.remove_attribute_listener('mode', decorated_mode_callback)
except:
print(" Exception: Cannot remove observer added using decorator")
# Demonstrate getting callback on any attribute change
def wildcard_callback(self, attr_name, value):
print(" CALLBACK: (%s): %s" % (attr_name,value))
print("\nAdd attribute callback detecting ANY attribute change")
vehicle.add_attribute_listener('*', wildcard_callback)
print(" Wait 1s so callback invoked before observer removed")
time.sleep(1)
print(" Remove Vehicle attribute observer")
# Remove observer added with `add_attribute_listener()`
vehicle.remove_attribute_listener('*', wildcard_callback)
# Get/Set Vehicle Parameters
print("\nRead and write parameters")
print(" Read vehicle param 'THR_MIN': %s" % vehicle.parameters['THR_MIN'])
print(" Write vehicle param 'THR_MIN' : 10")
vehicle.parameters['THR_MIN']=10
print(" Read new value of param 'THR_MIN': %s" % vehicle.parameters['THR_MIN'])
print("\nPrint all parameters (iterate `vehicle.parameters`):")
for key, value in vehicle.parameters.iteritems():
print(" Key:%s Value:%s" % (key,value))
print("\nCreate parameter observer using decorator")
# Parameter string is case-insensitive
# Value is cached (listeners are only updated on change)
# Observer added using decorator can't be removed.
@vehicle.parameters.on_attribute('THR_MIN')
def decorated_thr_min_callback(self, attr_name, value):
print(" PARAMETER CALLBACK: %s changed to: %s" % (attr_name, value))
print("Write vehicle param 'THR_MIN' : 20 (and wait for callback)")
vehicle.parameters['THR_MIN']=20
for x in range(1,5):
#Callbacks may not be updated for a few seconds
if vehicle.parameters['THR_MIN']==20:
break
time.sleep(1)
#Callback function for "any" parameter
print("\nCreate (removable) observer for any parameter using wildcard string")
def any_parameter_callback(self, attr_name, value):
print(" ANY PARAMETER CALLBACK: %s changed to: %s" % (attr_name, value))
#Add observer for the vehicle's any/all parameters parameter (defined using wildcard string ``'*'``)
vehicle.parameters.add_attribute_listener('*', any_parameter_callback)
print(" Change THR_MID and THR_MIN parameters (and wait for callback)")
vehicle.parameters['THR_MID']=400
vehicle.parameters['THR_MIN']=30
## Reset variables to sensible values.
print("\nReset vehicle attributes/parameters and exit")
vehicle.mode = VehicleMode("STABILIZE")
#vehicle.armed = False
vehicle.parameters['THR_MIN']=130
vehicle.parameters['THR_MID']=500
#Close vehicle object before exiting script
print("\nClose vehicle object")
vehicle.close()
# Shut down simulator if it was started.
if sitl is not None:
sitl.stop()
print("Completed")
Example: Simple Go To (Copter)
This example demonstrates how to arm and launch a Copter in GUIDED mode, travel towards a number of target points, and then return
to the home location. It uses Vehicle.simple_takeoff(),
Vehicle.simple_goto() and Vehicle.mode.
The target locations are centered around the home location when the Simulated Vehicle is booted; you can edit the latitude and longitude to use more appropriate positions for your own vehicle.
Note
This example will only run on Copter:
- Plane does not support
takeoffin GUIDED mode. - Rover will ignore the
takeoffcommand and will then stick at the altitude check.

Simple Goto Example: Flight path
Running the example
The example can be run as described in Running the Examples (which in turn assumes that the vehicle and DroneKit have been set up as described in Installing DroneKit).
In summary, after cloning the repository:
Navigate to the example folder as shown:
cd dronekit-python/examples/simple_goto/You can run the example against a simulator (DroneKit-SITL) by specifying the Python script without any arguments. The example will download SITL binaries if needed, start the simulator, and then connect to it:
python simple_goto.py
On the command prompt you should see (something like):
Starting copter simulator (SITL) SITL already Downloaded. Connecting to vehicle on: tcp:127.0.0.1:5760 >>> APM:Copter V3.3 (d6053245) >>> Frame: QUAD >>> Calibrating barometer >>> Initialising APM... >>> barometer calibration complete >>> GROUND START Basic pre-arm checks Waiting for vehicle to initialise... ... Waiting for vehicle to initialise... Arming motors Waiting for arming... ... Waiting for arming... >>> ARMING MOTORS >>> GROUND START Waiting for arming... >>> Initialising APM... Taking off! Altitude: 0.0 ... Altitude: 7.4 Altitude: 9.0 Altitude: 9.65 Reached target altitude Set default/target airspeed to 3 Going towards first point for 30 seconds ... Going towards second point for 30 seconds (groundspeed set to 10 m/s) ... Returning to Launch Close vehicle object
Tip
It is more interesting to watch the example run on a map than the console. The topic Connecting an additional Ground Station explains how to set up Mission Planner to view a vehicle running on the simulator (SITL).
You can run the example against a specific connection (simulated or otherwise) by passing the connection string for your vehicle in the
--connectparameter.For example, to connect to SITL running on UDP port 14550 on your local computer:
python simple_goto.py --connect 127.0.0.1:14550
How does it work?
The code has three distinct sections: arming and takeoff, flight to two locations, and return-to-home.
Takeoff
To launch Copter you need to first check that the vehicle Vehicle.is_armable.
Then set the mode to GUIDED, arm the vehicle, and call
Vehicle.simple_takeoff(). The takeoff code in this example
is explained in the guide topic Taking Off.
Flying to a point - simple_goto
The vehicle is already in GUIDED mode, so to send it to a certain point we just need to
call Vehicle.simple_goto() with the target
dronekit.LocationGlobalRelative:
# set the default travel speed
vehicle.airspeed=3
point1 = LocationGlobalRelative(-35.361354, 149.165218, 20)
vehicle.simple_goto(point1)
# sleep so we can see the change in map
time.sleep(30)
Tip
Without some sort of “wait” the next command would be executed immediately. In this example we just sleep for 30 seconds before executing the next command.
When moving towards the first point we set the airspeed using the Vehicle.airspeed
attribute. For the second point the example specifies the target groundspeed when calling
Vehicle.simple_goto()
vehicle.simple_goto(point2, groundspeed=10)
Tip
The script doesn’t report anything during the sleep periods, but you can observe the vehicle’s movement on a ground station map.
RTL - Return to launch
To return to the home position and land, we set the mode to RTL.
The vehicle travels at the previously set default speed:
vehicle.mode = VehicleMode("RTL")
Source code
The full source code at documentation build-time is listed below (current version on Github):
#!/usr/bin/env python
# -*- coding: utf-8 -*-
"""
© Copyright 2015-2016, 3D Robotics.
simple_goto.py: GUIDED mode "simple goto" example (Copter Only)
Demonstrates how to arm and takeoff in Copter and how to navigate to points using Vehicle.simple_goto.
Full documentation is provided at http://python.dronekit.io/examples/simple_goto.html
"""
from __future__ import print_function
import time
from dronekit import connect, VehicleMode, LocationGlobalRelative
# Set up option parsing to get connection string
import argparse
parser = argparse.ArgumentParser(description='Commands vehicle using vehicle.simple_goto.')
parser.add_argument('--connect',
help="Vehicle connection target string. If not specified, SITL automatically started and used.")
args = parser.parse_args()
connection_string = args.connect
sitl = None
# Start SITL if no connection string specified
if not connection_string:
import dronekit_sitl
sitl = dronekit_sitl.start_default()
connection_string = sitl.connection_string()
# Connect to the Vehicle
print('Connecting to vehicle on: %s' % connection_string)
vehicle = connect(connection_string, wait_ready=True)
def arm_and_takeoff(aTargetAltitude):
"""
Arms vehicle and fly to aTargetAltitude.
"""
print("Basic pre-arm checks")
# Don't try to arm until autopilot is ready
while not vehicle.is_armable:
print(" Waiting for vehicle to initialise...")
time.sleep(1)
print("Arming motors")
# Copter should arm in GUIDED mode
vehicle.mode = VehicleMode("GUIDED")
vehicle.armed = True
# Confirm vehicle armed before attempting to take off
while not vehicle.armed:
print(" Waiting for arming...")
time.sleep(1)
print("Taking off!")
vehicle.simple_takeoff(aTargetAltitude) # Take off to target altitude
# Wait until the vehicle reaches a safe height before processing the goto
# (otherwise the command after Vehicle.simple_takeoff will execute
# immediately).
while True:
print(" Altitude: ", vehicle.location.global_relative_frame.alt)
# Break and return from function just below target altitude.
if vehicle.location.global_relative_frame.alt >= aTargetAltitude * 0.95:
print("Reached target altitude")
break
time.sleep(1)
arm_and_takeoff(10)
print("Set default/target airspeed to 3")
vehicle.airspeed = 3
print("Going towards first point for 30 seconds ...")
point1 = LocationGlobalRelative(-35.361354, 149.165218, 20)
vehicle.simple_goto(point1)
# sleep so we can see the change in map
time.sleep(30)
print("Going towards second point for 30 seconds (groundspeed set to 10 m/s) ...")
point2 = LocationGlobalRelative(-35.363244, 149.168801, 20)
vehicle.simple_goto(point2, groundspeed=10)
# sleep so we can see the change in map
time.sleep(30)
print("Returning to Launch")
vehicle.mode = VehicleMode("RTL")
# Close vehicle object before exiting script
print("Close vehicle object")
vehicle.close()
# Shut down simulator if it was started.
if sitl:
sitl.stop()
Example: Guided Mode Movement and Commands (Copter)
This example shows how to control Copter movement and send immediate commands in GUIDED mode. It demonstrates three methods for explicitly specifying a target position and two commands for controlling movement by setting the vehicle’s velocity vectors. It also shows how to send commands to control the yaw (direction that the front of the vehicle is pointing), region of interest, speed and home location, along with some useful functions for converting between frames of reference.
The example is documented in the source code. More detailed information about using GUIDED mode can be found in the guide: Guiding and Controlling Copter.

Setting destination using position and changing speed and ROI

Setting destination using velocity and changing yaw and home location
Running the example
The example can be run as described in Running the Examples (which in turn assumes that the vehicle and DroneKit have been set up as described in Installing DroneKit).
In summary, after cloning the repository:
Navigate to the example folder as shown:
cd dronekit-python/examples/guided_set_speed_yaw/You can run the example against a simulator (DroneKit-SITL) by specifying the Python script without any arguments. The example will download SITL binaries if needed, start the simulator, and then connect to it:
python guided_set_speed_yaw.py
On the command prompt you should see (something like):
Starting copter simulator (SITL) SITL already Downloaded. Connecting to vehicle on: tcp:127.0.0.1:5760 >>> APM:Copter V3.3 (d6053245) >>> Frame: QUAD >>> Calibrating barometer >>> Initialising APM... >>> barometer calibration complete >>> GROUND START Basic pre-arm checks Waiting for vehicle to initialise... ... Waiting for vehicle to initialise... Arming motors Waiting for arming... ... Waiting for arming... >>> ARMING MOTORS >>> GROUND START Waiting for arming... >>> Link timeout, no heartbeat in last 5 seconds >>> ...link restored. >>> Initialising APM... Taking off! Altitude: 0.0 Altitude: 0.28 ... Altitude: 4.76 Reached target altitude TRIANGLE path using standard Vehicle.simple_goto() Set groundspeed to 5m/s. Position North 80 West 50 Distance to target: 100.792763565 Distance to target: 99.912599325 ... Distance to target: 1.21731863826 Distance to target: 0.846001925791 Reached target Position North 0 East 100 Distance to target: 122.623210813 ... Distance to target: 4.75876224557 Distance to target: 0.244650555031 Reached target Position North -80 West 50 Distance to target: 100.792430814 Distance to target: 100.592652053 ... Distance to target: 2.48849019535 Distance to target: 0.73822537077 Reached target TRIANGLE path using standard SET_POSITION_TARGET_GLOBAL_INT message and with varying speed. Position South 100 West 130 Set groundspeed to 5m/s. Distance to target: 188.180927131 Distance to target: 186.578341133 ... Distance to target: 9.87090024758 Distance to target: 1.4668164732 Reached target Set groundspeed to 15m/s (max). Position South 0 East 200 Distance to target: 318.826732298 Distance to target: 320.787965033 ... Distance to target: 11.5626483964 Distance to target: 0.335164775811 Reached target Set airspeed to 10m/s (max). Position North 100 West 130 Distance to target: 188.182420209 Distance to target: 189.860730713 ... Distance to target: 10.4263414971 Distance to target: 1.29857175712 Reached target SQUARE path using SET_POSITION_TARGET_LOCAL_NED and position parameters North 50m, East 0m, 10m altitude for 20 seconds Point ROI at current location (home position) North 50m, East 50m, 10m altitude Point ROI at current location North 0m, East 50m, 10m altitude North 0m, East 0m, 10m altitude SQUARE path using SET_POSITION_TARGET_LOCAL_NED and velocity parameters Yaw 180 absolute (South) Velocity South & up Yaw 270 absolute (West) Velocity West & down Yaw 0 absolute (North) Velocity North Yaw 90 absolute (East) Velocity East DIAMOND path using SET_POSITION_TARGET_GLOBAL_INT and velocity parameters Yaw 225 absolute Velocity South, West and Up Yaw 90 relative (to previous yaw heading) Velocity North, West and Down Set new home location to current location Get new home location Home Location: LocationGlobal:lat=-35.363243103,lon=149.164337158,alt=593.890014648 Yaw 90 relative (to previous yaw heading) Velocity North and East Yaw 90 relative (to previous yaw heading) Velocity South and East Setting LAND mode... Close vehicle object Completed
Tip
It is more interesting to watch the example run on a map than the console. The topic Connecting an additional Ground Station explains how to set up Mission Planner to view a vehicle running on the simulator (SITL).
You can run the example against a specific connection (simulated or otherwise) by passing the connection string for your vehicle in the
--connectparameter.For example, to connect to SITL running on UDP port 14550 on your local computer:
python guided_set_speed_yaw.py --connect 127.0.0.1:14550
How does it work?
The example is documented in source code. Additional information on the methods is provided either below or in the guide.
The functions for controlling vehicle movement are:
- Vehicle.simple_goto() is the standard DroneKit position controller method. It is called from goto to fly a triangular path.
- goto_position_target_global_int() is a position controller that uses the SET_POSITION_TARGET_GLOBAL_INT command.
- goto_position_target_local_ned() is a position controller that uses SET_POSITION_TARGET_LOCAL_NED command (taking values in NED frame, relative to the home position). This is used to fly a square path. The script is put to sleep for a certain time in order to allow the vehicle to reach the specified position.
- send_ned_velocity() is a velocity controller. It uses SET_POSITION_TARGET_LOCAL_NED to fly a square path using velocity vectors to define the speed in each direction.
- send_global_velocity() is a velocity controller.
It uses SET_POSITION_TARGET_GLOBAL_INT
to fly a diamond-shaped path. The behaviour is essentially the same as for
send_ned_velocity()because the velocity components in both commands are in the NED frame. - goto is a convenience function for specifying a target location in metres from the current location and reporting the result.
The functions sending immediate commands are:
The example uses a number functions to convert global locations co-ordinates (decimal degrees) into local coordinates relative to the vehicle (in metres). These are described in the guide.
goto() - convenience function
This is a convenience function for setting position targets in metres North and East of the current location. It reports the distance to the target every two seconds and completes when the target is reached.
This takes a function argument of either Vehicle.simple_goto() or goto_position_target_global_int()
def goto(dNorth, dEast, gotoFunction=vehicle.simple_goto):
currentLocation=vehicle.location.global_relative_frame
targetLocation=get_location_metres(currentLocation, dNorth, dEast)
targetDistance=get_distance_metres(currentLocation, targetLocation)
gotoFunction(targetLocation)
while vehicle.mode.name=="GUIDED": #Stop action if we are no longer in guided mode.
remainingDistance=get_distance_metres(vehicle.location.global_frame, targetLocation)
print "Distance to target: ", remainingDistance
if remainingDistance<=targetDistance*0.01: #Just below target, in case of undershoot.
print "Reached target"
break;
time.sleep(2)
send_ned_velocity()
The function send_ned_velocity() generates a SET_POSITION_TARGET_LOCAL_NED MAVLink message
which is used to directly specify the speed components of the vehicle.
The message is resent at 1Hz for a set duration.
This is documented in the guide here.
send_global_velocity()
The function send_global_velocity() generates a
SET_POSITION_TARGET_GLOBAL_INT
MAVLink message which is used to directly specify the speed components of the vehicle in the NED
frame.
The function behaviour is otherwise exactly the same as when using SET_POSITION_TARGET_LOCAL_NED.
def send_global_velocity(velocity_x, velocity_y, velocity_z, duration):
"""
Move vehicle in direction based on specified velocity vectors.
"""
msg = vehicle.message_factory.set_position_target_global_int_encode(
0, # time_boot_ms (not used)
0, 0, # target system, target component
mavutil.mavlink.MAV_FRAME_GLOBAL_RELATIVE_ALT_INT, # frame
0b0000111111000111, # type_mask (only speeds enabled)
0, # lat_int - X Position in WGS84 frame in 1e7 * meters
0, # lon_int - Y Position in WGS84 frame in 1e7 * meters
0, # alt - Altitude in meters in AMSL altitude(not WGS84 if absolute or relative)
# altitude above terrain if GLOBAL_TERRAIN_ALT_INT
velocity_x, # X velocity in NED frame in m/s
velocity_y, # Y velocity in NED frame in m/s
velocity_z, # Z velocity in NED frame in m/s
0, 0, 0, # afx, afy, afz acceleration (not supported yet, ignored in GCS_Mavlink)
0, 0) # yaw, yaw_rate (not supported yet, ignored in GCS_Mavlink)
# send command to vehicle on 1 Hz cycle
for x in range(0,duration):
vehicle.send_mavlink(msg)
time.sleep(1)
Note
The message is re-sent every second for the specified duration. From Copter 3.3 the vehicle will stop moving if a new message is not received in approximately 3 seconds. Prior to Copter 3.3 the message only needs to be sent once, and the velocity remains active until the next movement message is received. The above code works for both cases!
goto_position_target_global_int()
The function goto_position_target_global_int() generates a
SET_POSITION_TARGET_GLOBAL_INT
MAVLink message which is used to directly specify the target location of the vehicle.
When used with MAV_FRAME_GLOBAL_RELATIVE_ALT_INT as shown below,
this method is effectively the same as Vehicle.simple_goto.
def goto_position_target_global_int(aLocation):
"""
Send SET_POSITION_TARGET_GLOBAL_INT command to request the vehicle fly to a specified location.
"""
msg = vehicle.message_factory.set_position_target_global_int_encode(
0, # time_boot_ms (not used)
0, 0, # target system, target component
mavutil.mavlink.MAV_FRAME_GLOBAL_RELATIVE_ALT_INT, # frame
0b0000111111111000, # type_mask (only speeds enabled)
aLocation.lat*1e7, # lat_int - X Position in WGS84 frame in 1e7 * meters
aLocation.lon*1e7, # lon_int - Y Position in WGS84 frame in 1e7 * meters
aLocation.alt, # alt - Altitude in meters in AMSL altitude, not WGS84 if absolute or relative, above terrain if GLOBAL_TERRAIN_ALT_INT
0, # X velocity in NED frame in m/s
0, # Y velocity in NED frame in m/s
0, # Z velocity in NED frame in m/s
0, 0, 0, # afx, afy, afz acceleration (not supported yet, ignored in GCS_Mavlink)
0, 0) # yaw, yaw_rate (not supported yet, ignored in GCS_Mavlink)
# send command to vehicle
vehicle.send_mavlink(msg)
In the example code this function is called from the goto() convenience function.
goto_position_target_local_ned()
The function goto_position_target_local_ned() generates a
SET_POSITION_TARGET_LOCAL_NED
MAVLink message which is used to directly specify the target location in the North, East, Down frame.
The type_mask enables the position parameters (the last three bits of of the mask are zero).
Warning
In the NED frame positive altitudes are entered as negative “Down” values. So if down is “10”, this will be 10 metres below the home altitude.
Note
The MAVLink protocol documentation lists a number of possible frames of reference. Up until Copter 3.2.1 the actual frame used is always relative to the home location (as indicated by MAV_FRAME_LOCAL_NED). Starting from Copter 3.3 you can specify other frames, for example to move the vehicle relative to its current position.
def goto_position_target_local_ned(north, east, down):
"""
Send SET_POSITION_TARGET_LOCAL_NED command to request the vehicle fly to a specified
location in the North, East, Down frame.
"""
msg = vehicle.message_factory.set_position_target_local_ned_encode(
0, # time_boot_ms (not used)
0, 0, # target system, target component
mavutil.mavlink.MAV_FRAME_LOCAL_NED, # frame
0b0000111111111000, # type_mask (only positions enabled)
north, east, down,
0, 0, 0, # x, y, z velocity in m/s (not used)
0, 0, 0, # x, y, z acceleration (not supported yet, ignored in GCS_Mavlink)
0, 0) # yaw, yaw_rate (not supported yet, ignored in GCS_Mavlink)
# send command to vehicle
vehicle.send_mavlink(msg)
At time of writing, acceleration and yaw bits are ignored.
Testbed settings
This example has been tested on Windows against SITL running both natively and in a virtual machine (as described in Installing DroneKit).
- DroneKit version: 2.0.2
- ArduPilot version: 3.3
Source code
The full source code at documentation build-time is listed below (current version on Github):
#!/usr/bin/env python
# -*- coding: utf-8 -*-
"""
© Copyright 2015-2016, 3D Robotics.
guided_set_speed_yaw.py: (Copter Only)
This example shows how to move/direct Copter and send commands in GUIDED mode using DroneKit Python.
Example documentation: http://python.dronekit.io/examples/guided-set-speed-yaw-demo.html
"""
from __future__ import print_function
from dronekit import connect, VehicleMode, LocationGlobal, LocationGlobalRelative
from pymavlink import mavutil # Needed for command message definitions
import time
import math
#Set up option parsing to get connection string
import argparse
parser = argparse.ArgumentParser(description='Control Copter and send commands in GUIDED mode ')
parser.add_argument('--connect',
help="Vehicle connection target string. If not specified, SITL automatically started and used.")
args = parser.parse_args()
connection_string = args.connect
sitl = None
#Start SITL if no connection string specified
if not connection_string:
import dronekit_sitl
sitl = dronekit_sitl.start_default()
connection_string = sitl.connection_string()
# Connect to the Vehicle
print('Connecting to vehicle on: %s' % connection_string)
vehicle = connect(connection_string, wait_ready=True)
def arm_and_takeoff(aTargetAltitude):
"""
Arms vehicle and fly to aTargetAltitude.
"""
print("Basic pre-arm checks")
# Don't let the user try to arm until autopilot is ready
while not vehicle.is_armable:
print(" Waiting for vehicle to initialise...")
time.sleep(1)
print("Arming motors")
# Copter should arm in GUIDED mode
vehicle.mode = VehicleMode("GUIDED")
vehicle.armed = True
while not vehicle.armed:
print(" Waiting for arming...")
time.sleep(1)
print("Taking off!")
vehicle.simple_takeoff(aTargetAltitude) # Take off to target altitude
# Wait until the vehicle reaches a safe height before processing the goto (otherwise the command
# after Vehicle.simple_takeoff will execute immediately).
while True:
print(" Altitude: ", vehicle.location.global_relative_frame.alt)
if vehicle.location.global_relative_frame.alt>=aTargetAltitude*0.95: #Trigger just below target alt.
print("Reached target altitude")
break
time.sleep(1)
#Arm and take of to altitude of 5 meters
arm_and_takeoff(5)
"""
Convenience functions for sending immediate/guided mode commands to control the Copter.
The set of commands demonstrated here include:
* MAV_CMD_CONDITION_YAW - set direction of the front of the Copter (latitude, longitude)
* MAV_CMD_DO_SET_ROI - set direction where the camera gimbal is aimed (latitude, longitude, altitude)
* MAV_CMD_DO_CHANGE_SPEED - set target speed in metres/second.
The full set of available commands are listed here:
http://dev.ardupilot.com/wiki/copter-commands-in-guided-mode/
"""
def condition_yaw(heading, relative=False):
"""
Send MAV_CMD_CONDITION_YAW message to point vehicle at a specified heading (in degrees).
This method sets an absolute heading by default, but you can set the `relative` parameter
to `True` to set yaw relative to the current yaw heading.
By default the yaw of the vehicle will follow the direction of travel. After setting
the yaw using this function there is no way to return to the default yaw "follow direction
of travel" behaviour (https://github.com/diydrones/ardupilot/issues/2427)
For more information see:
http://copter.ardupilot.com/wiki/common-mavlink-mission-command-messages-mav_cmd/#mav_cmd_condition_yaw
"""
if relative:
is_relative = 1 #yaw relative to direction of travel
else:
is_relative = 0 #yaw is an absolute angle
# create the CONDITION_YAW command using command_long_encode()
msg = vehicle.message_factory.command_long_encode(
0, 0, # target system, target component
mavutil.mavlink.MAV_CMD_CONDITION_YAW, #command
0, #confirmation
heading, # param 1, yaw in degrees
0, # param 2, yaw speed deg/s
1, # param 3, direction -1 ccw, 1 cw
is_relative, # param 4, relative offset 1, absolute angle 0
0, 0, 0) # param 5 ~ 7 not used
# send command to vehicle
vehicle.send_mavlink(msg)
def set_roi(location):
"""
Send MAV_CMD_DO_SET_ROI message to point camera gimbal at a
specified region of interest (LocationGlobal).
The vehicle may also turn to face the ROI.
For more information see:
http://copter.ardupilot.com/common-mavlink-mission-command-messages-mav_cmd/#mav_cmd_do_set_roi
"""
# create the MAV_CMD_DO_SET_ROI command
msg = vehicle.message_factory.command_long_encode(
0, 0, # target system, target component
mavutil.mavlink.MAV_CMD_DO_SET_ROI, #command
0, #confirmation
0, 0, 0, 0, #params 1-4
location.lat,
location.lon,
location.alt
)
# send command to vehicle
vehicle.send_mavlink(msg)
"""
Functions to make it easy to convert between the different frames-of-reference. In particular these
make it easy to navigate in terms of "metres from the current position" when using commands that take
absolute positions in decimal degrees.
The methods are approximations only, and may be less accurate over longer distances, and when close
to the Earth's poles.
Specifically, it provides:
* get_location_metres - Get LocationGlobal (decimal degrees) at distance (m) North & East of a given LocationGlobal.
* get_distance_metres - Get the distance between two LocationGlobal objects in metres
* get_bearing - Get the bearing in degrees to a LocationGlobal
"""
def get_location_metres(original_location, dNorth, dEast):
"""
Returns a LocationGlobal object containing the latitude/longitude `dNorth` and `dEast` metres from the
specified `original_location`. The returned LocationGlobal has the same `alt` value
as `original_location`.
The function is useful when you want to move the vehicle around specifying locations relative to
the current vehicle position.
The algorithm is relatively accurate over small distances (10m within 1km) except close to the poles.
For more information see:
http://gis.stackexchange.com/questions/2951/algorithm-for-offsetting-a-latitude-longitude-by-some-amount-of-meters
"""
earth_radius = 6378137.0 #Radius of "spherical" earth
#Coordinate offsets in radians
dLat = dNorth/earth_radius
dLon = dEast/(earth_radius*math.cos(math.pi*original_location.lat/180))
#New position in decimal degrees
newlat = original_location.lat + (dLat * 180/math.pi)
newlon = original_location.lon + (dLon * 180/math.pi)
if type(original_location) is LocationGlobal:
targetlocation=LocationGlobal(newlat, newlon,original_location.alt)
elif type(original_location) is LocationGlobalRelative:
targetlocation=LocationGlobalRelative(newlat, newlon,original_location.alt)
else:
raise Exception("Invalid Location object passed")
return targetlocation;
def get_distance_metres(aLocation1, aLocation2):
"""
Returns the ground distance in metres between two LocationGlobal objects.
This method is an approximation, and will not be accurate over large distances and close to the
earth's poles. It comes from the ArduPilot test code:
https://github.com/diydrones/ardupilot/blob/master/Tools/autotest/common.py
"""
dlat = aLocation2.lat - aLocation1.lat
dlong = aLocation2.lon - aLocation1.lon
return math.sqrt((dlat*dlat) + (dlong*dlong)) * 1.113195e5
def get_bearing(aLocation1, aLocation2):
"""
Returns the bearing between the two LocationGlobal objects passed as parameters.
This method is an approximation, and may not be accurate over large distances and close to the
earth's poles. It comes from the ArduPilot test code:
https://github.com/diydrones/ardupilot/blob/master/Tools/autotest/common.py
"""
off_x = aLocation2.lon - aLocation1.lon
off_y = aLocation2.lat - aLocation1.lat
bearing = 90.00 + math.atan2(-off_y, off_x) * 57.2957795
if bearing < 0:
bearing += 360.00
return bearing;
"""
Functions to move the vehicle to a specified position (as opposed to controlling movement by setting velocity components).
The methods include:
* goto_position_target_global_int - Sets position using SET_POSITION_TARGET_GLOBAL_INT command in
MAV_FRAME_GLOBAL_RELATIVE_ALT_INT frame
* goto_position_target_local_ned - Sets position using SET_POSITION_TARGET_LOCAL_NED command in
MAV_FRAME_BODY_NED frame
* goto - A convenience function that can use Vehicle.simple_goto (default) or
goto_position_target_global_int to travel to a specific position in metres
North and East from the current location.
This method reports distance to the destination.
"""
def goto_position_target_global_int(aLocation):
"""
Send SET_POSITION_TARGET_GLOBAL_INT command to request the vehicle fly to a specified LocationGlobal.
For more information see: https://pixhawk.ethz.ch/mavlink/#SET_POSITION_TARGET_GLOBAL_INT
See the above link for information on the type_mask (0=enable, 1=ignore).
At time of writing, acceleration and yaw bits are ignored.
"""
msg = vehicle.message_factory.set_position_target_global_int_encode(
0, # time_boot_ms (not used)
0, 0, # target system, target component
mavutil.mavlink.MAV_FRAME_GLOBAL_RELATIVE_ALT_INT, # frame
0b0000111111111000, # type_mask (only speeds enabled)
aLocation.lat*1e7, # lat_int - X Position in WGS84 frame in 1e7 * meters
aLocation.lon*1e7, # lon_int - Y Position in WGS84 frame in 1e7 * meters
aLocation.alt, # alt - Altitude in meters in AMSL altitude, not WGS84 if absolute or relative, above terrain if GLOBAL_TERRAIN_ALT_INT
0, # X velocity in NED frame in m/s
0, # Y velocity in NED frame in m/s
0, # Z velocity in NED frame in m/s
0, 0, 0, # afx, afy, afz acceleration (not supported yet, ignored in GCS_Mavlink)
0, 0) # yaw, yaw_rate (not supported yet, ignored in GCS_Mavlink)
# send command to vehicle
vehicle.send_mavlink(msg)
def goto_position_target_local_ned(north, east, down):
"""
Send SET_POSITION_TARGET_LOCAL_NED command to request the vehicle fly to a specified
location in the North, East, Down frame.
It is important to remember that in this frame, positive altitudes are entered as negative
"Down" values. So if down is "10", this will be 10 metres below the home altitude.
Starting from AC3.3 the method respects the frame setting. Prior to that the frame was
ignored. For more information see:
http://dev.ardupilot.com/wiki/copter-commands-in-guided-mode/#set_position_target_local_ned
See the above link for information on the type_mask (0=enable, 1=ignore).
At time of writing, acceleration and yaw bits are ignored.
"""
msg = vehicle.message_factory.set_position_target_local_ned_encode(
0, # time_boot_ms (not used)
0, 0, # target system, target component
mavutil.mavlink.MAV_FRAME_LOCAL_NED, # frame
0b0000111111111000, # type_mask (only positions enabled)
north, east, down, # x, y, z positions (or North, East, Down in the MAV_FRAME_BODY_NED frame
0, 0, 0, # x, y, z velocity in m/s (not used)
0, 0, 0, # x, y, z acceleration (not supported yet, ignored in GCS_Mavlink)
0, 0) # yaw, yaw_rate (not supported yet, ignored in GCS_Mavlink)
# send command to vehicle
vehicle.send_mavlink(msg)
def goto(dNorth, dEast, gotoFunction=vehicle.simple_goto):
"""
Moves the vehicle to a position dNorth metres North and dEast metres East of the current position.
The method takes a function pointer argument with a single `dronekit.lib.LocationGlobal` parameter for
the target position. This allows it to be called with different position-setting commands.
By default it uses the standard method: dronekit.lib.Vehicle.simple_goto().
The method reports the distance to target every two seconds.
"""
currentLocation = vehicle.location.global_relative_frame
targetLocation = get_location_metres(currentLocation, dNorth, dEast)
targetDistance = get_distance_metres(currentLocation, targetLocation)
gotoFunction(targetLocation)
#print "DEBUG: targetLocation: %s" % targetLocation
#print "DEBUG: targetLocation: %s" % targetDistance
while vehicle.mode.name=="GUIDED": #Stop action if we are no longer in guided mode.
#print "DEBUG: mode: %s" % vehicle.mode.name
remainingDistance=get_distance_metres(vehicle.location.global_relative_frame, targetLocation)
print("Distance to target: ", remainingDistance)
if remainingDistance<=targetDistance*0.01: #Just below target, in case of undershoot.
print("Reached target")
break;
time.sleep(2)
"""
Functions that move the vehicle by specifying the velocity components in each direction.
The two functions use different MAVLink commands. The main difference is
that depending on the frame used, the NED velocity can be relative to the vehicle
orientation.
The methods include:
* send_ned_velocity - Sets velocity components using SET_POSITION_TARGET_LOCAL_NED command
* send_global_velocity - Sets velocity components using SET_POSITION_TARGET_GLOBAL_INT command
"""
def send_ned_velocity(velocity_x, velocity_y, velocity_z, duration):
"""
Move vehicle in direction based on specified velocity vectors and
for the specified duration.
This uses the SET_POSITION_TARGET_LOCAL_NED command with a type mask enabling only
velocity components
(http://dev.ardupilot.com/wiki/copter-commands-in-guided-mode/#set_position_target_local_ned).
Note that from AC3.3 the message should be re-sent every second (after about 3 seconds
with no message the velocity will drop back to zero). In AC3.2.1 and earlier the specified
velocity persists until it is canceled. The code below should work on either version
(sending the message multiple times does not cause problems).
See the above link for information on the type_mask (0=enable, 1=ignore).
At time of writing, acceleration and yaw bits are ignored.
"""
msg = vehicle.message_factory.set_position_target_local_ned_encode(
0, # time_boot_ms (not used)
0, 0, # target system, target component
mavutil.mavlink.MAV_FRAME_LOCAL_NED, # frame
0b0000111111000111, # type_mask (only speeds enabled)
0, 0, 0, # x, y, z positions (not used)
velocity_x, velocity_y, velocity_z, # x, y, z velocity in m/s
0, 0, 0, # x, y, z acceleration (not supported yet, ignored in GCS_Mavlink)
0, 0) # yaw, yaw_rate (not supported yet, ignored in GCS_Mavlink)
# send command to vehicle on 1 Hz cycle
for x in range(0,duration):
vehicle.send_mavlink(msg)
time.sleep(1)
def send_global_velocity(velocity_x, velocity_y, velocity_z, duration):
"""
Move vehicle in direction based on specified velocity vectors.
This uses the SET_POSITION_TARGET_GLOBAL_INT command with type mask enabling only
velocity components
(http://dev.ardupilot.com/wiki/copter-commands-in-guided-mode/#set_position_target_global_int).
Note that from AC3.3 the message should be re-sent every second (after about 3 seconds
with no message the velocity will drop back to zero). In AC3.2.1 and earlier the specified
velocity persists until it is canceled. The code below should work on either version
(sending the message multiple times does not cause problems).
See the above link for information on the type_mask (0=enable, 1=ignore).
At time of writing, acceleration and yaw bits are ignored.
"""
msg = vehicle.message_factory.set_position_target_global_int_encode(
0, # time_boot_ms (not used)
0, 0, # target system, target component
mavutil.mavlink.MAV_FRAME_GLOBAL_RELATIVE_ALT_INT, # frame
0b0000111111000111, # type_mask (only speeds enabled)
0, # lat_int - X Position in WGS84 frame in 1e7 * meters
0, # lon_int - Y Position in WGS84 frame in 1e7 * meters
0, # alt - Altitude in meters in AMSL altitude(not WGS84 if absolute or relative)
# altitude above terrain if GLOBAL_TERRAIN_ALT_INT
velocity_x, # X velocity in NED frame in m/s
velocity_y, # Y velocity in NED frame in m/s
velocity_z, # Z velocity in NED frame in m/s
0, 0, 0, # afx, afy, afz acceleration (not supported yet, ignored in GCS_Mavlink)
0, 0) # yaw, yaw_rate (not supported yet, ignored in GCS_Mavlink)
# send command to vehicle on 1 Hz cycle
for x in range(0,duration):
vehicle.send_mavlink(msg)
time.sleep(1)
"""
Fly a triangular path using the standard Vehicle.simple_goto() method.
The method is called indirectly via a custom "goto" that allows the target position to be
specified as a distance in metres (North/East) from the current position, and which reports
the distance-to-target.
"""
print("TRIANGLE path using standard Vehicle.simple_goto()")
print("Set groundspeed to 5m/s.")
vehicle.groundspeed=5
print("Position North 80 West 50")
goto(80, -50)
print("Position North 0 East 100")
goto(0, 100)
print("Position North -80 West 50")
goto(-80, -50)
"""
Fly a triangular path using the SET_POSITION_TARGET_GLOBAL_INT command and specifying
a target position (rather than controlling movement using velocity vectors). The command is
called from goto_position_target_global_int() (via `goto`).
The goto_position_target_global_int method is called indirectly from a custom "goto" that allows
the target position to be specified as a distance in metres (North/East) from the current position,
and which reports the distance-to-target.
The code also sets the speed (MAV_CMD_DO_CHANGE_SPEED). In AC3.2.1 Copter will accelerate to this speed
near the centre of its journey and then decelerate as it reaches the target.
In AC3.3 the speed changes immediately.
"""
print("TRIANGLE path using standard SET_POSITION_TARGET_GLOBAL_INT message and with varying speed.")
print("Position South 100 West 130")
print("Set groundspeed to 5m/s.")
vehicle.groundspeed = 5
goto(-100, -130, goto_position_target_global_int)
print("Set groundspeed to 15m/s (max).")
vehicle.groundspeed = 15
print("Position South 0 East 200")
goto(0, 260, goto_position_target_global_int)
print("Set airspeed to 10m/s (max).")
vehicle.airspeed = 10
print("Position North 100 West 130")
goto(100, -130, goto_position_target_global_int)
"""
Fly the vehicle in a 50m square path, using the SET_POSITION_TARGET_LOCAL_NED command
and specifying a target position (rather than controlling movement using velocity vectors).
The command is called from goto_position_target_local_ned() (via `goto`).
The position is specified in terms of the NED (North East Down) relative to the Home location.
WARNING: The "D" in NED means "Down". Using a positive D value will drive the vehicle into the ground!
The code sleeps for a time (DURATION) to give the vehicle time to reach each position (rather than
sending commands based on proximity).
The code also sets the region of interest (MAV_CMD_DO_SET_ROI) via the `set_roi()` method. This points the
camera gimbal at the the selected location (in this case it aligns the whole vehicle to point at the ROI).
"""
print("SQUARE path using SET_POSITION_TARGET_LOCAL_NED and position parameters")
DURATION = 20 #Set duration for each segment.
print("North 50m, East 0m, 10m altitude for %s seconds" % DURATION)
goto_position_target_local_ned(50,0,-10)
print("Point ROI at current location (home position)")
# NOTE that this has to be called after the goto command as first "move" command of a particular type
# "resets" ROI/YAW commands
set_roi(vehicle.location.global_relative_frame)
time.sleep(DURATION)
print("North 50m, East 50m, 10m altitude")
goto_position_target_local_ned(50,50,-10)
time.sleep(DURATION)
print("Point ROI at current location")
set_roi(vehicle.location.global_relative_frame)
print("North 0m, East 50m, 10m altitude")
goto_position_target_local_ned(0,50,-10)
time.sleep(DURATION)
print("North 0m, East 0m, 10m altitude")
goto_position_target_local_ned(0,0,-10)
time.sleep(DURATION)
"""
Fly the vehicle in a SQUARE path using velocity vectors (the underlying code calls the
SET_POSITION_TARGET_LOCAL_NED command with the velocity parameters enabled).
The thread sleeps for a time (DURATION) which defines the distance that will be travelled.
The code also sets the yaw (MAV_CMD_CONDITION_YAW) using the `set_yaw()` method in each segment
so that the front of the vehicle points in the direction of travel
"""
#Set up velocity vector to map to each direction.
# vx > 0 => fly North
# vx < 0 => fly South
NORTH = 2
SOUTH = -2
# Note for vy:
# vy > 0 => fly East
# vy < 0 => fly West
EAST = 2
WEST = -2
# Note for vz:
# vz < 0 => ascend
# vz > 0 => descend
UP = -0.5
DOWN = 0.5
# Square path using velocity
print("SQUARE path using SET_POSITION_TARGET_LOCAL_NED and velocity parameters")
print("Yaw 180 absolute (South)")
condition_yaw(180)
print("Velocity South & up")
send_ned_velocity(SOUTH,0,UP,DURATION)
send_ned_velocity(0,0,0,1)
print("Yaw 270 absolute (West)")
condition_yaw(270)
print("Velocity West & down")
send_ned_velocity(0,WEST,DOWN,DURATION)
send_ned_velocity(0,0,0,1)
print("Yaw 0 absolute (North)")
condition_yaw(0)
print("Velocity North")
send_ned_velocity(NORTH,0,0,DURATION)
send_ned_velocity(0,0,0,1)
print("Yaw 90 absolute (East)")
condition_yaw(90)
print("Velocity East")
send_ned_velocity(0,EAST,0,DURATION)
send_ned_velocity(0,0,0,1)
"""
Fly the vehicle in a DIAMOND path using velocity vectors (the underlying code calls the
SET_POSITION_TARGET_GLOBAL_INT command with the velocity parameters enabled).
The thread sleeps for a time (DURATION) which defines the distance that will be travelled.
The code sets the yaw (MAV_CMD_CONDITION_YAW) using the `set_yaw()` method using relative headings
so that the front of the vehicle points in the direction of travel.
At the end of the second segment the code sets a new home location to the current point.
"""
print("DIAMOND path using SET_POSITION_TARGET_GLOBAL_INT and velocity parameters")
# vx, vy are parallel to North and East (independent of the vehicle orientation)
print("Yaw 225 absolute")
condition_yaw(225)
print("Velocity South, West and Up")
send_global_velocity(SOUTH,WEST,UP,DURATION)
send_global_velocity(0,0,0,1)
print("Yaw 90 relative (to previous yaw heading)")
condition_yaw(90,relative=True)
print("Velocity North, West and Down")
send_global_velocity(NORTH,WEST,DOWN,DURATION)
send_global_velocity(0,0,0,1)
print("Set new home location to current location")
vehicle.home_location=vehicle.location.global_frame
print("Get new home location")
#This reloads the home location in DroneKit and GCSs
cmds = vehicle.commands
cmds.download()
cmds.wait_ready()
print(" Home Location: %s" % vehicle.home_location)
print("Yaw 90 relative (to previous yaw heading)")
condition_yaw(90,relative=True)
print("Velocity North and East")
send_global_velocity(NORTH,EAST,0,DURATION)
send_global_velocity(0,0,0,1)
print("Yaw 90 relative (to previous yaw heading)")
condition_yaw(90,relative=True)
print("Velocity South and East")
send_global_velocity(SOUTH,EAST,0,DURATION)
send_global_velocity(0,0,0,1)
"""
The example is completing. LAND at current location.
"""
print("Setting LAND mode...")
vehicle.mode = VehicleMode("LAND")
#Close vehicle object before exiting script
print("Close vehicle object")
vehicle.close()
# Shut down simulator if it was started.
if sitl is not None:
sitl.stop()
print("Completed")
Example: Basic Mission
This example demonstrates the basic mission operations provided by DroneKit-Python, including: downloading missions from the vehicle, clearing missions, creating mission commands and uploading them to the vehicle, monitoring the current active command, and changing the active command.
The guide topic Missions (AUTO Mode) provides more detailed explanation of how the API should be used.

Basic Mission Example: Flight path
Running the example
The example can be run as described in Running the Examples (which in turn assumes that the vehicle and DroneKit have been set up as described in Installing DroneKit).
In summary, after cloning the repository:
Navigate to the example folder as shown:
cd dronekit-python/examples/mission_basic/You can run the example against a simulator (DroneKit-SITL) by specifying the Python script without any arguments. The example will download SITL binaries (if needed), start the simulator, and then connect to it:
python mission_basic.py
On the command prompt you should see (something like):
Starting copter simulator (SITL) SITL already Downloaded. Connecting to vehicle on: tcp:127.0.0.1:5760 >>> APM:Copter V3.3 (d6053245) >>> Frame: QUAD >>> Calibrating barometer >>> Initialising APM... >>> barometer calibration complete >>> GROUND START >>> Mission Planner 1.3.35 Create a new mission (for current location) Clear any existing commands Define/add new commands. Upload new commands to vehicle Basic pre-arm checks Waiting for vehicle to initialise... >>> flight plan received Waiting for vehicle to initialise... ... Waiting for vehicle to initialise... Arming motors Waiting for arming... ... Waiting for arming... >>> ARMING MOTORS >>> GROUND START Waiting for arming... >>> Initialising APM... Taking off! Altitude: 0.0 Altitude: 0.11 ... Altitude: 8.9 Altitude: 9.52 Reached target altitude Starting mission Distance to waypoint (0): None Distance to waypoint (1): 78.8000191616 Distance to waypoint (1): 78.3723704927 ... Distance to waypoint (1): 20.7131390269 Distance to waypoint (1): 15.4196151863 >>> Reached Command #1 Distance to waypoint (2): 115.043560356 Distance to waypoint (2): 117.463458185 ... Distance to waypoint (2): 25.7122243168 Distance to waypoint (2): 16.8624794106 >>> Reached Command #2 Distance to waypoint (3): 100.45231832 Skipping to Waypoint 5 when reach waypoint 3 Distance to waypoint (5): 154.645144788 Exit 'standard' mission when start heading to final waypoint (5) Return to launch Close vehicle object
Tip
It is more interesting to watch the example run on a map than the console. The topic Connecting an additional Ground Station explains how to set up Mission Planner to view a vehicle running on the simulator (SITL).
You can run the example against a specific connection (simulated or otherwise) by passing the connection string for your vehicle in the
--connectparameter.For example, to connect to SITL running on UDP port 14550 on your local computer:
python mission_basic.py --connect 127.0.0.1:14550
How does it work?
The source code is relatively self-documenting, and most of its main operations are explained in the guide topic Missions (AUTO Mode) .
In overview, the example calls adds_square_mission(vehicle.location.global_frame,50) to first
clear the current mission and then define a new mission with a takeoff command and four waypoints arranged
in a square around the central position (two waypoints are added in the last position -
we use next to determine when we’ve reached the final point).
The clear command and new mission items are then uploaded to the vehicle.
After taking off (in guided mode using the takeoff() function) the example starts the mission by setting the mode to AUTO:
print "Starting mission"
# Set mode to AUTO to start mission
vehicle.mode = VehicleMode("AUTO")
The progress of the mission is monitored in a loop. The convenience function
distance_to_current_waypoint()
gets the distance to the next waypoint and
Vehicle.commands.next gets the value of
the next command.
We also show how to jump to a specified command using
Vehicle.commands.next (note how we skip the third command below):
while True:
nextwaypoint=vehicle.commands.next
print 'Distance to waypoint (%s): %s' % (nextwaypoint, distance_to_current_waypoint())
if nextwaypoint==3: #Skip to next waypoint
print 'Skipping to Waypoint 5 when reach waypoint 3'
vehicle.commands.next=5
vehicle.commands.upload()
if nextwaypoint==5: #Dummy waypoint - as soon as we reach waypoint 4 this is true and we exit.
print "Exit 'standard' mission when start heading to final waypoint (5)"
break;
time.sleep(1)
When the vehicle starts the 5th command (a dummy waypoint) the loop breaks and the mode is set to RTL (return to launch).
Known issues
This example has no known issues.
Source code
The full source code at documentation build-time is listed below (current version on Github):
#!/usr/bin/env python
# -*- coding: utf-8 -*-
"""
© Copyright 2015-2016, 3D Robotics.
mission_basic.py: Example demonstrating basic mission operations including creating, clearing and monitoring missions.
Full documentation is provided at http://python.dronekit.io/examples/mission_basic.html
"""
from __future__ import print_function
from dronekit import connect, VehicleMode, LocationGlobalRelative, LocationGlobal, Command
import time
import math
from pymavlink import mavutil
#Set up option parsing to get connection string
import argparse
parser = argparse.ArgumentParser(description='Demonstrates basic mission operations.')
parser.add_argument('--connect',
help="vehicle connection target string. If not specified, SITL automatically started and used.")
args = parser.parse_args()
connection_string = args.connect
sitl = None
#Start SITL if no connection string specified
if not connection_string:
import dronekit_sitl
sitl = dronekit_sitl.start_default()
connection_string = sitl.connection_string()
# Connect to the Vehicle
print('Connecting to vehicle on: %s' % connection_string)
vehicle = connect(connection_string, wait_ready=True)
def get_location_metres(original_location, dNorth, dEast):
"""
Returns a LocationGlobal object containing the latitude/longitude `dNorth` and `dEast` metres from the
specified `original_location`. The returned Location has the same `alt` value
as `original_location`.
The function is useful when you want to move the vehicle around specifying locations relative to
the current vehicle position.
The algorithm is relatively accurate over small distances (10m within 1km) except close to the poles.
For more information see:
http://gis.stackexchange.com/questions/2951/algorithm-for-offsetting-a-latitude-longitude-by-some-amount-of-meters
"""
earth_radius=6378137.0 #Radius of "spherical" earth
#Coordinate offsets in radians
dLat = dNorth/earth_radius
dLon = dEast/(earth_radius*math.cos(math.pi*original_location.lat/180))
#New position in decimal degrees
newlat = original_location.lat + (dLat * 180/math.pi)
newlon = original_location.lon + (dLon * 180/math.pi)
return LocationGlobal(newlat, newlon,original_location.alt)
def get_distance_metres(aLocation1, aLocation2):
"""
Returns the ground distance in metres between two LocationGlobal objects.
This method is an approximation, and will not be accurate over large distances and close to the
earth's poles. It comes from the ArduPilot test code:
https://github.com/diydrones/ardupilot/blob/master/Tools/autotest/common.py
"""
dlat = aLocation2.lat - aLocation1.lat
dlong = aLocation2.lon - aLocation1.lon
return math.sqrt((dlat*dlat) + (dlong*dlong)) * 1.113195e5
def distance_to_current_waypoint():
"""
Gets distance in metres to the current waypoint.
It returns None for the first waypoint (Home location).
"""
nextwaypoint = vehicle.commands.next
if nextwaypoint==0:
return None
missionitem=vehicle.commands[nextwaypoint-1] #commands are zero indexed
lat = missionitem.x
lon = missionitem.y
alt = missionitem.z
targetWaypointLocation = LocationGlobalRelative(lat,lon,alt)
distancetopoint = get_distance_metres(vehicle.location.global_frame, targetWaypointLocation)
return distancetopoint
def download_mission():
"""
Download the current mission from the vehicle.
"""
cmds = vehicle.commands
cmds.download()
cmds.wait_ready() # wait until download is complete.
def adds_square_mission(aLocation, aSize):
"""
Adds a takeoff command and four waypoint commands to the current mission.
The waypoints are positioned to form a square of side length 2*aSize around the specified LocationGlobal (aLocation).
The function assumes vehicle.commands matches the vehicle mission state
(you must have called download at least once in the session and after clearing the mission)
"""
cmds = vehicle.commands
print(" Clear any existing commands")
cmds.clear()
print(" Define/add new commands.")
# Add new commands. The meaning/order of the parameters is documented in the Command class.
#Add MAV_CMD_NAV_TAKEOFF command. This is ignored if the vehicle is already in the air.
cmds.add(Command( 0, 0, 0, mavutil.mavlink.MAV_FRAME_GLOBAL_RELATIVE_ALT, mavutil.mavlink.MAV_CMD_NAV_TAKEOFF, 0, 0, 0, 0, 0, 0, 0, 0, 10))
#Define the four MAV_CMD_NAV_WAYPOINT locations and add the commands
point1 = get_location_metres(aLocation, aSize, -aSize)
point2 = get_location_metres(aLocation, aSize, aSize)
point3 = get_location_metres(aLocation, -aSize, aSize)
point4 = get_location_metres(aLocation, -aSize, -aSize)
cmds.add(Command( 0, 0, 0, mavutil.mavlink.MAV_FRAME_GLOBAL_RELATIVE_ALT, mavutil.mavlink.MAV_CMD_NAV_WAYPOINT, 0, 0, 0, 0, 0, 0, point1.lat, point1.lon, 11))
cmds.add(Command( 0, 0, 0, mavutil.mavlink.MAV_FRAME_GLOBAL_RELATIVE_ALT, mavutil.mavlink.MAV_CMD_NAV_WAYPOINT, 0, 0, 0, 0, 0, 0, point2.lat, point2.lon, 12))
cmds.add(Command( 0, 0, 0, mavutil.mavlink.MAV_FRAME_GLOBAL_RELATIVE_ALT, mavutil.mavlink.MAV_CMD_NAV_WAYPOINT, 0, 0, 0, 0, 0, 0, point3.lat, point3.lon, 13))
cmds.add(Command( 0, 0, 0, mavutil.mavlink.MAV_FRAME_GLOBAL_RELATIVE_ALT, mavutil.mavlink.MAV_CMD_NAV_WAYPOINT, 0, 0, 0, 0, 0, 0, point4.lat, point4.lon, 14))
#add dummy waypoint "5" at point 4 (lets us know when have reached destination)
cmds.add(Command( 0, 0, 0, mavutil.mavlink.MAV_FRAME_GLOBAL_RELATIVE_ALT, mavutil.mavlink.MAV_CMD_NAV_WAYPOINT, 0, 0, 0, 0, 0, 0, point4.lat, point4.lon, 14))
print(" Upload new commands to vehicle")
cmds.upload()
def arm_and_takeoff(aTargetAltitude):
"""
Arms vehicle and fly to aTargetAltitude.
"""
print("Basic pre-arm checks")
# Don't let the user try to arm until autopilot is ready
while not vehicle.is_armable:
print(" Waiting for vehicle to initialise...")
time.sleep(1)
print("Arming motors")
# Copter should arm in GUIDED mode
vehicle.mode = VehicleMode("GUIDED")
vehicle.armed = True
while not vehicle.armed:
print(" Waiting for arming...")
time.sleep(1)
print("Taking off!")
vehicle.simple_takeoff(aTargetAltitude) # Take off to target altitude
# Wait until the vehicle reaches a safe height before processing the goto (otherwise the command
# after Vehicle.simple_takeoff will execute immediately).
while True:
print(" Altitude: ", vehicle.location.global_relative_frame.alt)
if vehicle.location.global_relative_frame.alt>=aTargetAltitude*0.95: #Trigger just below target alt.
print("Reached target altitude")
break
time.sleep(1)
print('Create a new mission (for current location)')
adds_square_mission(vehicle.location.global_frame,50)
# From Copter 3.3 you will be able to take off using a mission item. Plane must take off using a mission item (currently).
arm_and_takeoff(10)
print("Starting mission")
# Reset mission set to first (0) waypoint
vehicle.commands.next=0
# Set mode to AUTO to start mission
vehicle.mode = VehicleMode("AUTO")
# Monitor mission.
# Demonstrates getting and setting the command number
# Uses distance_to_current_waypoint(), a convenience function for finding the
# distance to the next waypoint.
while True:
nextwaypoint=vehicle.commands.next
print('Distance to waypoint (%s): %s' % (nextwaypoint, distance_to_current_waypoint()))
if nextwaypoint==3: #Skip to next waypoint
print('Skipping to Waypoint 5 when reach waypoint 3')
vehicle.commands.next = 5
if nextwaypoint==5: #Dummy waypoint - as soon as we reach waypoint 4 this is true and we exit.
print("Exit 'standard' mission when start heading to final waypoint (5)")
break;
time.sleep(1)
print('Return to launch')
vehicle.mode = VehicleMode("RTL")
#Close vehicle object before exiting script
print("Close vehicle object")
vehicle.close()
# Shut down simulator if it was started.
if sitl is not None:
sitl.stop()
Example: Mission Import/Export
This example shows how to import and export files in the Waypoint file format.
The commands are first imported from a file into a list and then uploaded to the vehicle. Then the current mission is downloaded from the vehicle and put into a list, which is then saved into (another file). Finally, we print out both the original and new files for comparison
The example does not show how missions can be modified, but once the mission is in a list, changing the order and content of commands is straightforward.
The guide topic Missions (AUTO Mode) provides information about missions and AUTO mode.
Running the example
The example can be run as described in Running the Examples (which in turn assumes that the vehicle and DroneKit have been set up as described in Installing DroneKit).
In summary, after cloning the repository:
Navigate to the example folder as shown:
cd dronekit-python/examples/mission_import_export/You can run the example against a simulator (DroneKit-SITL) by specifying the Python script without any arguments. The example will download SITL binaries (if needed), start the simulator, and then connect to it:
python mission_import_export.py
On the command prompt you should see (something like):
Starting copter simulator (SITL) SITL already Downloaded. Connecting to vehicle on: tcp:127.0.0.1:5760 >>> APM:Copter V3.3 (d6053245) >>> Frame: QUAD >>> Calibrating barometer >>> Initialising APM... >>> barometer calibration complete >>> GROUND START Waiting for vehicle to initialise... Waiting for vehicle to initialise... Waiting for vehicle to initialise... Waiting for vehicle to initialise... Waiting for vehicle to initialise... Reading mission from file: mpmission.txt Upload mission from a file: mpmission.txt Clear mission Upload mission Save mission from Vehicle to file: exportedmission.txt Download mission from vehicle >>> flight plan received Write mission to file Close vehicle object Show original and uploaded/downloaded files: Mission file: mpmission.txt QGC WPL 110 0 1 0 16 0 0 0 0 -35.363262 149.165237 584.000000 1 1 0 0 22 0.000000 0.000000 0.000000 0.000000 -35.361988 149.163753 00.000000 1 2 0 0 16 0.000000 0.000000 0.000000 0.000000 -35.361992 149.163593 00.000000 1 3 0 0 16 0.000000 0.000000 0.000000 0.000000 -35.363812 149.163609 00.000000 1 4 0 0 16 0.000000 0.000000 0.000000 0.000000 -35.363768 149.166055 00.000000 1 5 0 0 16 0.000000 0.000000 0.000000 0.000000 -35.361835 149.166012 00.000000 1 6 0 0 16 0.000000 0.000000 0.000000 0.000000 -35.362150 149.165046 00.000000 1 Mission file: exportedmission.txt QGC WPL 110 0 1 0 16 0 0 0 0 -35.3632621765 149.165237427 583.989990234 1 1 0 0 22 0.0 0.0 0.0 0.0 -35.3619880676 149.163757324 100.0 1 2 0 0 16 0.0 0.0 0.0 0.0 -35.3619918823 149.163589478 100.0 1 3 0 0 16 0.0 0.0 0.0 0.0 -35.3638114929 149.163604736 100.0 1 4 0 0 16 0.0 0.0 0.0 0.0 -35.3637695312 149.166061401 100.0 1 5 0 0 16 0.0 0.0 0.0 0.0 -35.3618354797 149.166015625 100.0 1 6 0 0 16 0.0 0.0 0.0 0.0 -35.3621482849 149.165039062 100.0 1
Note
The position values uploaded and then downloaded above do not match exactly. This rounding error can be ignored because the difference is much smaller than the precision provided by GPS.
The error occurs because all the params are encoded as 32-bit floats rather than 64-bit doubles (Python’s native datatype).
You can run the example against a specific connection (simulated or otherwise) by passing the connection string for your vehicle in the
--connectparameter.For example, to connect to SITL running on UDP port 14550 on your local computer:
python mission_import_export.py --connect 127.0.0.1:14550
How does it work?
The source code is largely self-documenting.
More information about the functions can be found in the guide at Load a mission from a file and Save a mission to a file.
Known issues
There are no known issues with this example.
Source code
The full source code at documentation build-time is listed below (current version on github):
#!/usr/bin/env python
# -*- coding: utf-8 -*-
"""
© Copyright 2015-2016, 3D Robotics.
mission_import_export.py:
This example demonstrates how to import and export files in the Waypoint file format
(http://qgroundcontrol.org/mavlink/waypoint_protocol#waypoint_file_format). The commands are imported
into a list, and can be modified before saving and/or uploading.
Documentation is provided at http://python.dronekit.io/examples/mission_import_export.html
"""
from __future__ import print_function
from dronekit import connect, Command
import time
#Set up option parsing to get connection string
import argparse
parser = argparse.ArgumentParser(description='Demonstrates mission import/export from a file.')
parser.add_argument('--connect',
help="Vehicle connection target string. If not specified, SITL automatically started and used.")
args = parser.parse_args()
connection_string = args.connect
sitl = None
#Start SITL if no connection string specified
if not connection_string:
import dronekit_sitl
sitl = dronekit_sitl.start_default()
connection_string = sitl.connection_string()
# Connect to the Vehicle
print('Connecting to vehicle on: %s' % connection_string)
vehicle = connect(connection_string, wait_ready=True)
# Check that vehicle is armable.
# This ensures home_location is set (needed when saving WP file)
while not vehicle.is_armable:
print(" Waiting for vehicle to initialise...")
time.sleep(1)
def readmission(aFileName):
"""
Load a mission from a file into a list. The mission definition is in the Waypoint file
format (http://qgroundcontrol.org/mavlink/waypoint_protocol#waypoint_file_format).
This function is used by upload_mission().
"""
print("\nReading mission from file: %s" % aFileName)
cmds = vehicle.commands
missionlist=[]
with open(aFileName) as f:
for i, line in enumerate(f):
if i==0:
if not line.startswith('QGC WPL 110'):
raise Exception('File is not supported WP version')
else:
linearray=line.split('\t')
ln_index=int(linearray[0])
ln_currentwp=int(linearray[1])
ln_frame=int(linearray[2])
ln_command=int(linearray[3])
ln_param1=float(linearray[4])
ln_param2=float(linearray[5])
ln_param3=float(linearray[6])
ln_param4=float(linearray[7])
ln_param5=float(linearray[8])
ln_param6=float(linearray[9])
ln_param7=float(linearray[10])
ln_autocontinue=int(linearray[11].strip())
cmd = Command( 0, 0, 0, ln_frame, ln_command, ln_currentwp, ln_autocontinue, ln_param1, ln_param2, ln_param3, ln_param4, ln_param5, ln_param6, ln_param7)
missionlist.append(cmd)
return missionlist
def upload_mission(aFileName):
"""
Upload a mission from a file.
"""
#Read mission from file
missionlist = readmission(aFileName)
print("\nUpload mission from a file: %s" % aFileName)
#Clear existing mission from vehicle
print(' Clear mission')
cmds = vehicle.commands
cmds.clear()
#Add new mission to vehicle
for command in missionlist:
cmds.add(command)
print(' Upload mission')
vehicle.commands.upload()
def download_mission():
"""
Downloads the current mission and returns it in a list.
It is used in save_mission() to get the file information to save.
"""
print(" Download mission from vehicle")
missionlist=[]
cmds = vehicle.commands
cmds.download()
cmds.wait_ready()
for cmd in cmds:
missionlist.append(cmd)
return missionlist
def save_mission(aFileName):
"""
Save a mission in the Waypoint file format
(http://qgroundcontrol.org/mavlink/waypoint_protocol#waypoint_file_format).
"""
print("\nSave mission from Vehicle to file: %s" % aFileName)
#Download mission from vehicle
missionlist = download_mission()
#Add file-format information
output='QGC WPL 110\n'
#Add home location as 0th waypoint
home = vehicle.home_location
output+="%s\t%s\t%s\t%s\t%s\t%s\t%s\t%s\t%s\t%s\t%s\t%s\n" % (0,1,0,16,0,0,0,0,home.lat,home.lon,home.alt,1)
#Add commands
for cmd in missionlist:
commandline="%s\t%s\t%s\t%s\t%s\t%s\t%s\t%s\t%s\t%s\t%s\t%s\n" % (cmd.seq,cmd.current,cmd.frame,cmd.command,cmd.param1,cmd.param2,cmd.param3,cmd.param4,cmd.x,cmd.y,cmd.z,cmd.autocontinue)
output+=commandline
with open(aFileName, 'w') as file_:
print(" Write mission to file")
file_.write(output)
def printfile(aFileName):
"""
Print a mission file to demonstrate "round trip"
"""
print("\nMission file: %s" % aFileName)
with open(aFileName) as f:
for line in f:
print(' %s' % line.strip())
import_mission_filename = 'mpmission.txt'
export_mission_filename = 'exportedmission.txt'
#Upload mission from file
upload_mission(import_mission_filename)
#Download mission we just uploaded and save to a file
save_mission(export_mission_filename)
#Close vehicle object before exiting script
print("Close vehicle object")
vehicle.close()
# Shut down simulator if it was started.
if sitl is not None:
sitl.stop()
print("\nShow original and uploaded/downloaded files:")
#Print original file (for demo purposes only)
printfile(import_mission_filename)
#Print exported file (for demo purposes only)
printfile(export_mission_filename)
Example: Create Attribute in App
This example shows how you can subclass Vehicle in order to support
new attributes for MAVLink messages within your DroneKit-Python script. The new class is defined in a
separate file (making re-use easy) and is very similar to the code used to implement the in-built attributes.
The new attributes are used in the same way as the built-in
Vehicle attributes.
The new class uses the Vehicle.on_message() decorator
to set a function that is called to process a specific message, copy its values into an attribute, and notify
observers. An observer is then set on the new attribute using
Vehicle.add_attribute_listener().
Additional information is provided in the guide topic MAVLink Messages.
Tip
This approach is useful when you urgently need to access messages that are not yet supported as
Vehicle attributes.
Please contribute your code to the API so that it is available to (and can be tested by) the whole DroneKit-Python community.
Running the example
The example can be run as described in Running the Examples (which in turn assumes that the vehicle and DroneKit have been set up as described in Installing DroneKit).
In summary, after cloning the repository:
Navigate to the example folder as shown:
cd dronekit-python\examples\create_attribute\
You can run the example against a simulator (DroneKit-SITL) by specifying the Python script without any arguments. The example will download SITL binaries (if needed), start the simulator, and then connect to it:
python create_attribute.py
On the command prompt you should see (something like):
Starting copter simulator (SITL) SITL already Downloaded. Connecting to vehicle on: tcp:127.0.0.1:5760 >>> APM:Copter V3.3 (d6053245) >>> Frame: QUAD >>> Calibrating barometer >>> Initialising APM... >>> barometer calibration complete >>> GROUND START Display RAW_IMU messages for 5 seconds and then exit. RAW_IMU: time_boot_us=15340000,xacc=0,yacc=0,zacc=-1000,xgyro=0,ygyro=1,zgyro=0,xmag=161,ymag=19,zmag=-365 RAW_IMU: time_boot_us=15580000,xacc=0,yacc=0,zacc=-1000,xgyro=0,ygyro=0,zgyro=0,xmag=161,ymag=19,zmag=-365 RAW_IMU: time_boot_us=15820000,xacc=0,yacc=0,zacc=-999,xgyro=0,ygyro=1,zgyro=0,xmag=161,ymag=19,zmag=-365 RAW_IMU: time_boot_us=16060000,xacc=0,yacc=1,zacc=-999,xgyro=0,ygyro=0,zgyro=0,xmag=161,ymag=19,zmag=-365 RAW_IMU: time_boot_us=16300000,xacc=0,yacc=0,zacc=-999,xgyro=0,ygyro=0,zgyro=0,xmag=161,ymag=19,zmag=-365 RAW_IMU: time_boot_us=16540000,xacc=0,yacc=0,zacc=-1000,xgyro=0,ygyro=1,zgyro=0,xmag=161,ymag=19,zmag=-365 RAW_IMU: time_boot_us=16780000,xacc=0,yacc=0,zacc=-999,xgyro=0,ygyro=0,zgyro=0,xmag=161,ymag=19,zmag=-365 RAW_IMU: time_boot_us=17020000,xacc=1,yacc=0,zacc=-999,xgyro=0,ygyro=0,zgyro=0,xmag=161,ymag=19,zmag=-365 RAW_IMU: time_boot_us=17260000,xacc=0,yacc=0,zacc=-999,xgyro=0,ygyro=0,zgyro=0,xmag=161,ymag=19,zmag=-365 RAW_IMU: time_boot_us=17500000,xacc=0,yacc=0,zacc=-1000,xgyro=1,ygyro=0,zgyro=0,xmag=161,ymag=19,zmag=-365 RAW_IMU: time_boot_us=17740000,xacc=0,yacc=0,zacc=-999,xgyro=0,ygyro=0,zgyro=0,xmag=161,ymag=19,zmag=-365 RAW_IMU: time_boot_us=17980000,xacc=0,yacc=0,zacc=-999,xgyro=0,ygyro=0,zgyro=0,xmag=161,ymag=19,zmag=-365 RAW_IMU: time_boot_us=18220000,xacc=0,yacc=0,zacc=-1000,xgyro=0,ygyro=0,zgyro=1,xmag=161,ymag=19,zmag=-365 RAW_IMU: time_boot_us=18460000,xacc=0,yacc=0,zacc=-1000,xgyro=0,ygyro=0,zgyro=0,xmag=161,ymag=19,zmag=-365 RAW_IMU: time_boot_us=18700000,xacc=0,yacc=0,zacc=-999,xgyro=0,ygyro=0,zgyro=0,xmag=161,ymag=19,zmag=-365 RAW_IMU: time_boot_us=18940000,xacc=1,yacc=0,zacc=-1000,xgyro=0,ygyro=1,zgyro=0,xmag=161,ymag=19,zmag=-365 RAW_IMU: time_boot_us=19180000,xacc=1,yacc=0,zacc=-1000,xgyro=0,ygyro=0,zgyro=0,xmag=161,ymag=19,zmag=-365 RAW_IMU: time_boot_us=19420000,xacc=0,yacc=0,zacc=-999,xgyro=0,ygyro=0,zgyro=0,xmag=161,ymag=19,zmag=-365 RAW_IMU: time_boot_us=19660000,xacc=0,yacc=0,zacc=-1000,xgyro=0,ygyro=0,zgyro=0,xmag=154,ymag=52,zmag=-365 RAW_IMU: time_boot_us=19900000,xacc=0,yacc=0,zacc=-999,xgyro=0,ygyro=0,zgyro=0,xmag=154,ymag=52,zmag=-365 RAW_IMU: time_boot_us=20140000,xacc=0,yacc=0,zacc=-1000,xgyro=0,ygyro=0,zgyro=0,xmag=154,ymag=52,zmag=-365 Close vehicle object
You can run the example against a specific connection (simulated or otherwise) by passing the connection string for your vehicle in the
--connectparameter.For example, to connect to SITL running on UDP port 14550 on your local computer:
python create_attribute.py --connect 127.0.0.1:14550
How does it work?
Subclassing Vehicle
The example file my_vehicle.py defines a class for the new attribute (RawIMU) and a new vehicle subclass (MyVehicle).
Note
The example uses the same documentation markup used by the native code, which can be generated into a document set using Sphinx/autodoc.
RawIMU has members for each of the values in the message
(in this case RAW_IMU). It provides an initialiser that sets all the values to
None and a string representation for printing the object.
class RawIMU(object):
"""
The RAW IMU readings for the usual 9DOF sensor setup.
This contains the true raw values without any scaling to allow data capture and system debugging.
The message definition is here: http://mavlink.org/messages/common#RAW_IMU
:param time_boot_us: Timestamp (microseconds since system boot). #Note, not milliseconds as per spec
:param xacc: X acceleration (mg)
:param yacc: Y acceleration (mg)
:param zacc: Z acceleration (mg)
:param xgyro: Angular speed around X axis (millirad /sec)
:param ygyro: Angular speed around Y axis (millirad /sec)
:param zgyro: Angular speed around Z axis (millirad /sec)
:param xmag: X Magnetic field (milli tesla)
:param ymag: Y Magnetic field (milli tesla)
:param zmag: Z Magnetic field (milli tesla)
"""
def __init__(self, time_boot_us=None, xacc=None, yacc=None, zacc=None, xygro=None, ygyro=None, zgyro=None, xmag=None, ymag=None, zmag=None):
"""
RawIMU object constructor.
"""
self.time_boot_us = time_boot_us
self.xacc = xacc
self.yacc = yacc
self.zacc = zacc
self.xgyro = zgyro
self.ygyro = ygyro
self.zgyro = zgyro
self.xmag = xmag
self.ymag = ymag
self.zmag = zmag
def __str__(self):
"""
String representation of the RawIMU object
"""
return "RAW_IMU: time_boot_us={},xacc={},yacc={},zacc={},xgyro={},ygyro={},zgyro={},xmag={},ymag={},zmag={}".format(self.time_boot_us, self.xacc, self.yacc,self.zacc,self.xgyro,self.ygyro,self.zgyro,self.xmag,self.ymag,self.zmag)
MyVehicle is a superclass of Vehicle (and hence inherits all its attributes).
This first creates a private instance of RawIMU.
We create a listener using the Vehicle.on_message()
decorator. The listener is called for messages that contain the string “RAW_IMU”,
with arguments for the vehicle, message name, and the message. It copies the message information into
the attribute and then notifies all observers.
class MyVehicle(Vehicle):
def __init__(self, *args):
super(MyVehicle, self).__init__(*args)
# Create an Vehicle.raw_imu object with initial values set to None.
self._raw_imu = RawIMU()
# Create a message listener using the decorator.
@self.on_message('RAW_IMU')
def listener(self, name, message):
"""
The listener is called for messages that contain the string specified in the decorator,
passing the vehicle, message name, and the message.
The listener writes the message to the (newly attached) ``vehicle.raw_imu`` object
and notifies observers.
"""
self._raw_imu.time_boot_us=message.time_usec
self._raw_imu.xacc=message.xacc
self._raw_imu.yacc=message.yacc
self._raw_imu.zacc=message.zacc
self._raw_imu.xgyro=message.xgyro
self._raw_imu.ygyro=message.ygyro
self._raw_imu.zgyro=message.zgyro
self._raw_imu.xmag=message.xmag
self._raw_imu.ymag=message.ymag
self._raw_imu.zmag=message.zmag
# Notify all observers of new message (with new value)
# Note that argument `cache=False` by default so listeners
# are updaed with every new message
self.notify_attribute_listeners('raw_imu', self._raw_imu)
@property
def raw_imu(self):
return self._raw_imu
Note
The notifier function (Vehicle.notify_attribute_listeners())
should be called every time there is an update from the vehicle.
You can set a third parameter (cache=True) so that it only invokes the listeners when the value changes.
This is normally used for attributes like the vehicle mode, where the information is updated
regularly from the vehicle, but client code is only interested when the attribute changes.
You should not set cache=True for attributes that represent sensor information or other “live” information, including
the RAW_IMU attribute demonstrated here. Clients can then implement their own caching strategy if needed.
At the end of the class we create the public properly raw_imu which client code may read and observe.
Note
The decorator pattern means that you can have multiple listeners for a particular message or for different
messages and they can all have the same function name/prototype (in this case listener(self, name, message).
Using the Vehicle subclass
The create_attribute.py file first imports the MyVehicle class.
from dronekit import connect, Vehicle
from my_vehicle import MyVehicle #Our custom vehicle class
import time
We then call connect(), specifying this new class in the vehicle_class argument.
# Connect to our custom vehicle_class `MyVehicle` at address `args.connect`
vehicle = connect(args.connect, wait_ready=True, vehicle_class=MyVehicle)
connect() returns a MyVehicle class which can be used in exactly the same way as Vehicle but with an
additional attribute raw_imu. You can query the attribute to get any of its members, and even add an observer as shown:
# Add observer for the custom attribute
def raw_imu_callback(self, attr_name, value):
# attr_name == 'raw_imu'
# value == vehicle.raw_imu
print value
vehicle.add_attribute_listener('raw_imu', raw_imu_callback)
Known issues
This code has no known issues.
Source code
The full source code at documentation build-time is listed below (current version on github):
#!/usr/bin/env python
# -*- coding: utf-8 -*-
"""
© Copyright 2015-2016, 3D Robotics.
create_attribute.py:
Demonstrates how to create attributes from MAVLink messages within your DroneKit-Python script
and use them in the same way as the built-in Vehicle attributes.
The code adds a new attribute to the Vehicle class, populating it with information from RAW_IMU messages
intercepted using the message_listener decorator.
Full documentation is provided at http://python.dronekit.io/examples/create_attribute.html
"""
from __future__ import print_function
from dronekit import connect, Vehicle
from my_vehicle import MyVehicle #Our custom vehicle class
import time
#Set up option parsing to get connection string
import argparse
parser = argparse.ArgumentParser(description='Demonstrates how to create attributes from MAVLink messages. ')
parser.add_argument('--connect',
help="Vehicle connection target string. If not specified, SITL automatically started and used.")
args = parser.parse_args()
connection_string = args.connect
sitl = None
#Start SITL if no connection string specified
if not connection_string:
import dronekit_sitl
sitl = dronekit_sitl.start_default()
connection_string = sitl.connection_string()
# Connect to the Vehicle
print('Connecting to vehicle on: %s' % connection_string)
vehicle = connect(connection_string, wait_ready=True, vehicle_class=MyVehicle)
# Add observer for the custom attribute
def raw_imu_callback(self, attr_name, value):
# attr_name == 'raw_imu'
# value == vehicle.raw_imu
print(value)
vehicle.add_attribute_listener('raw_imu', raw_imu_callback)
print('Display RAW_IMU messages for 5 seconds and then exit.')
time.sleep(5)
#The message listener can be unset using ``vehicle.remove_message_listener``
#Close vehicle object before exiting script
print("Close vehicle object")
vehicle.close()
# Shut down simulator if it was started.
if sitl is not None:
sitl.stop()
#!/usr/bin/env python
# -*- coding: utf-8 -*-
"""
© Copyright 2015-2016, 3D Robotics.
my_vehicle.py:
Custom Vehicle subclass to add IMU data.
"""
from dronekit import Vehicle
class RawIMU(object):
"""
The RAW IMU readings for the usual 9DOF sensor setup.
This contains the true raw values without any scaling to allow data capture and system debugging.
The message definition is here: https://mavlink.io/en/messages/common.html#RAW_IMU
:param time_boot_us: Timestamp (microseconds since system boot). #Note, not milliseconds as per spec
:param xacc: X acceleration (mg)
:param yacc: Y acceleration (mg)
:param zacc: Z acceleration (mg)
:param xgyro: Angular speed around X axis (millirad /sec)
:param ygyro: Angular speed around Y axis (millirad /sec)
:param zgyro: Angular speed around Z axis (millirad /sec)
:param xmag: X Magnetic field (milli tesla)
:param ymag: Y Magnetic field (milli tesla)
:param zmag: Z Magnetic field (milli tesla)
"""
def __init__(self, time_boot_us=None, xacc=None, yacc=None, zacc=None, xygro=None, ygyro=None, zgyro=None, xmag=None, ymag=None, zmag=None):
"""
RawIMU object constructor.
"""
self.time_boot_us = time_boot_us
self.xacc = xacc
self.yacc = yacc
self.zacc = zacc
self.xgyro = zgyro
self.ygyro = ygyro
self.zgyro = zgyro
self.xmag = xmag
self.ymag = ymag
self.zmag = zmag
def __str__(self):
"""
String representation used to print the RawIMU object.
"""
return "RAW_IMU: time_boot_us={},xacc={},yacc={},zacc={},xgyro={},ygyro={},zgyro={},xmag={},ymag={},zmag={}".format(self.time_boot_us, self.xacc, self.yacc,self.zacc,self.xgyro,self.ygyro,self.zgyro,self.xmag,self.ymag,self.zmag)
class MyVehicle(Vehicle):
def __init__(self, *args):
super(MyVehicle, self).__init__(*args)
# Create an Vehicle.raw_imu object with initial values set to None.
self._raw_imu = RawIMU()
# Create a message listener using the decorator.
@self.on_message('RAW_IMU')
def listener(self, name, message):
"""
The listener is called for messages that contain the string specified in the decorator,
passing the vehicle, message name, and the message.
The listener writes the message to the (newly attached) ``vehicle.raw_imu`` object
and notifies observers.
"""
self._raw_imu.time_boot_us=message.time_usec
self._raw_imu.xacc=message.xacc
self._raw_imu.yacc=message.yacc
self._raw_imu.zacc=message.zacc
self._raw_imu.xgyro=message.xgyro
self._raw_imu.ygyro=message.ygyro
self._raw_imu.zgyro=message.zgyro
self._raw_imu.xmag=message.xmag
self._raw_imu.ymag=message.ymag
self._raw_imu.zmag=message.zmag
# Notify all observers of new message (with new value)
# Note that argument `cache=False` by default so listeners
# are updated with every new message
self.notify_attribute_listeners('raw_imu', self._raw_imu)
@property
def raw_imu(self):
return self._raw_imu
Example: Follow Me
The Follow Me example moves a vehicle to track your position, using location information from a USB GPS attached to your (Linux) laptop.
The source code is a good starting point for your own applications. It can be extended to use other python language features and libraries (OpenCV, classes, lots of packages etc…)
Note
This example can only run on a Linux computer, because it depends on the Linux-only gpsd service.
Warning
Run this example with caution - be ready to exit follow-me mode by switching the flight mode switch on your RC radio.
Running the example
DroneKit (for Linux) and the vehicle should be set up as described in Installing DroneKit.
Once you’ve done that:
Install the gpsd service (as shown for Ubuntu Linux below):
sudo apt-get install gpsd gpsd-clients
You can then plug in a USB GPS and run the “xgps” client to confirm that it is working.
Note
If you do not have a USB GPS you can use simulated data by running dronekit-python/examples/follow_me/run-fake-gps.sh (in a separate terminal from where you’re running DroneKit-Python). This approach simulates a single location, and so is really only useful for verifying that the script is working correctly.
Get the DroneKit-Python example source code onto your local machine. The easiest way to do this is to clone the dronekit-python repository from Github. On the command prompt enter:
git clone http://github.com/dronekit/dronekit-python.git
Navigate to the example folder as shown:
cd dronekit-python/examples/follow_me/You can run the example against a simulator (DroneKit-SITL) by specifying the Python script without any arguments. The example will download SITL binaries (if needed), start the simulator, and then connect to it:
python follow_me.py
On the command prompt you should see (something like):
Starting copter simulator (SITL) SITL already Downloaded. Connecting to vehicle on: tcp:127.0.0.1:5760 >>> APM:Copter V3.4-dev (e0810c2e) >>> Frame: QUAD Link timeout, no heartbeat in last 5 seconds Basic pre-arm checks Waiting for GPS...: None ... Waiting for GPS...: None Taking off! Altitude: 0.019999999553 ... Altitude: 4.76000022888 Reached target altitude Going to: Location:lat=50.616468333,lon=7.131903333,alt=30,is_relative=True ... Going to: Location:lat=50.616468333,lon=7.131903333,alt=30,is_relative=True Going to: Location:lat=50.616468333,lon=7.131903333,alt=30,is_relative=True User has changed flight modes - aborting follow-me Close vehicle object Completed
Note
The terminal output above was created using simulated GPS data (which is why the same target location is returned every time).
To stop follow-me you can change the vehicle mode or do Ctrl+C (on a real flight you can just change the mode switch on your RC transmitter).
You can run the example against a specific connection (simulated or otherwise) by passing the connection string for your vehicle in the
--connectparameter.For example, to connect to SITL running on UDP port 14550 on your local computer:
python follow_me.py --connect 127.0.0.1:14550
How does it work?
Most of the example should be fairly familiar as it uses the same code as other examples for connecting to the vehicle, taking off, and closing the vehicle object.
The example-specific code is shown below. All this does is attempt to get a gps socket and read the location in a two second loop. If it is successful it
reports the value and uses Vehicle.simple_goto to move to the new position. The loop exits when
the mode is changed.
import gps
import socket
...
try:
# Use the python gps package to access the laptop GPS
gpsd = gps.gps(mode=gps.WATCH_ENABLE)
#Arm and take off to an altitude of 5 meters
arm_and_takeoff(5)
while True:
if vehicle.mode.name != "GUIDED":
print "User has changed flight modes - aborting follow-me"
break
# Read the GPS state from the laptop
gpsd.next()
# Once we have a valid location (see gpsd documentation) we can start moving our vehicle around
if (gpsd.valid & gps.LATLON_SET) != 0:
altitude = 30 # in meters
dest = LocationGlobalRelative(gpsd.fix.latitude, gpsd.fix.longitude, altitude)
print "Going to: %s" % dest
# A better implementation would only send new waypoints if the position had changed significantly
vehicle.simple_goto(dest)
# Send a new target every two seconds
# For a complete implementation of follow me you'd want adjust this delay
time.sleep(2)
except socket.error:
print "Error: gpsd service does not seem to be running, plug in USB GPS or run run-fake-gps.sh"
sys.exit(1)
Source code
The full source code at documentation build-time is listed below (current version on github):
#!/usr/bin/env python
# -*- coding: utf-8 -*-
"""
© Copyright 2015-2016, 3D Robotics.
followme - Tracks GPS position of your computer (Linux only).
This example uses the python gps package to read positions from a GPS attached to your
laptop and sends a new vehicle.simple_goto command every two seconds to move the
vehicle to the current point.
When you want to stop follow-me, either change vehicle modes or type Ctrl+C to exit the script.
Example documentation: http://python.dronekit.io/examples/follow_me.html
"""
from __future__ import print_function
from dronekit import connect, VehicleMode, LocationGlobalRelative
import gps
import socket
import time
import sys
#Set up option parsing to get connection string
import argparse
parser = argparse.ArgumentParser(description='Tracks GPS position of your computer (Linux only).')
parser.add_argument('--connect',
help="vehicle connection target string. If not specified, SITL automatically started and used.")
args = parser.parse_args()
connection_string = args.connect
sitl = None
#Start SITL if no connection string specified
if not connection_string:
import dronekit_sitl
sitl = dronekit_sitl.start_default()
connection_string = sitl.connection_string()
# Connect to the Vehicle
print('Connecting to vehicle on: %s' % connection_string)
vehicle = connect(connection_string, wait_ready=True, timeout=300)
def arm_and_takeoff(aTargetAltitude):
"""
Arms vehicle and fly to aTargetAltitude.
"""
print("Basic pre-arm checks")
# Don't let the user try to arm until autopilot is ready
while not vehicle.is_armable:
print(" Waiting for vehicle to initialise...")
time.sleep(1)
print("Arming motors")
# Copter should arm in GUIDED mode
vehicle.mode = VehicleMode("GUIDED")
vehicle.armed = True
while not vehicle.armed:
print(" Waiting for arming...")
time.sleep(1)
print("Taking off!")
vehicle.simple_takeoff(aTargetAltitude) # Take off to target altitude
# Wait until the vehicle reaches a safe height before processing the goto (otherwise the command
# after Vehicle.simple_takeoff will execute immediately).
while True:
print(" Altitude: ", vehicle.location.global_relative_frame.alt)
if vehicle.location.global_relative_frame.alt>=aTargetAltitude*0.95: #Trigger just below target alt.
print("Reached target altitude")
break
time.sleep(1)
try:
# Use the python gps package to access the laptop GPS
gpsd = gps.gps(mode=gps.WATCH_ENABLE)
#Arm and take off to altitude of 5 meters
arm_and_takeoff(5)
while True:
if vehicle.mode.name != "GUIDED":
print("User has changed flight modes - aborting follow-me")
break
# Read the GPS state from the laptop
next(gpsd)
# Once we have a valid location (see gpsd documentation) we can start moving our vehicle around
if (gpsd.valid & gps.LATLON_SET) != 0:
altitude = 30 # in meters
dest = LocationGlobalRelative(gpsd.fix.latitude, gpsd.fix.longitude, altitude)
print("Going to: %s" % dest)
# A better implementation would only send new waypoints if the position had changed significantly
vehicle.simple_goto(dest)
# Send a new target every two seconds
# For a complete implementation of follow me you'd want adjust this delay
time.sleep(2)
except socket.error:
print("Error: gpsd service does not seem to be running, plug in USB GPS or run run-fake-gps.sh")
sys.exit(1)
#Close vehicle object before exiting script
print("Close vehicle object")
vehicle.close()
# Shut down simulator if it was started.
if sitl is not None:
sitl.stop()
print("Completed")
Example: Drone Delivery
This example shows how to create a CherryPy based web application that displays a mapbox map to let you view the current vehicle position and send the vehicle commands to fly to a particular latitude and longitude.
New functionality demonstrated by this example includes:
- Using attribute observers to be notified of vehicle state changes.
- Starting CherryPy from a DroneKit application.
Running the example
The example can be run much as described in Running the Examples (which in turn assumes that the vehicle and DroneKit have been set up as described in Installing DroneKit). The main exception is that you need to install the CherryPy dependencies and view the behaviour in a web browser.
In summary, after cloning the repository:
Navigate to the example folder as shown:
cd dronekit-python\examples\drone_delivery\
Install CherryPy and any other dependencies from requirements.pip in that directory:
pip install -r requirements.pip
You can run the example against the simulator by specifying the Python script without any arguments. The example will download and start DroneKit-SITL, and then connect to it:
python drone_delivery.py
On the command prompt you should see (something like):
>python drone_delivery.py D:\Github\dronekit-python\examples\drone_delivery>drone_delivery.py Starting copter simulator (SITL) SITL already Downloaded. local path: D:\Github\dronekit-python\examples\drone_delivery Connecting to vehicle on: tcp:127.0.0.1:5760 >>> APM:Copter V3.3 (d6053245) >>> Frame: QUAD >>> Calibrating barometer >>> Initialising APM... >>> barometer calibration complete >>> GROUND START Launching Drone... [DEBUG]: Connected to vehicle. [DEBUG]: DroneDelivery Start [DEBUG]: Waiting for location... [DEBUG]: Waiting for ability to arm... [DEBUG]: Running initial boot sequence [DEBUG]: Changing to mode: GUIDED [DEBUG]: ... polled mode: GUIDED [DEBUG]: Waiting for arming... >>> ARMING MOTORS >>> GROUND START >>> Initialising APM... [DEBUG]: Taking off http://localhost:8080/ Waiting for cherrypy engine...
You can run the example against a specific connection (simulated or otherwise) by passing the connection string for your vehicle in the
--connectparameter. For example, to connect to Solo:python drone_delivery.py --connect udpin:0.0.0.0:14550
After a short while you should be able to reach your new webserver at http://localhost:8080. Navigate to the Command screen, select a target on the map, then select Go. The command prompt will show something like the message below.
[DEBUG]: Goto: [u'-35.4', u'149.2'], 29.98
The web server will switch you to the Track screen. You can view the vehicle progress by pressing the Update button.


How it works
Using attribute observers
All attributes in DroneKit can have observers - this is the primary mechanism you should use to be notified of changes in vehicle state. For instance, drone_delivery.py calls:
self.vehicle.add_attribute_listener('location', self.location_callback)
...
def location_callback(self, vehicle, name, location):
if location.global_relative_frame.alt is not None:
self.altitude = location.global_relative_frame.alt
self.current_location = location.global_relative_frame
This results in DroneKit calling our location_callback method any time the location attribute gets changed.
Tip
It is also possible (and often more elegant) to add listeners using a decorator
- see Vehicle.on_attribute.
Known issues
This example has the following issues:
Source code
The full source code at documentation build-time is listed below (current version on github):
#!/usr/bin/env python
# -*- coding: utf-8 -*-
"""
© Copyright 2015-2016, 3D Robotics.
drone_delivery.py:
A CherryPy based web application that displays a mapbox map to let you view the current vehicle position and send the vehicle commands to fly to a particular latitude and longitude.
Full documentation is provided at http://python.dronekit.io/examples/drone_delivery.html
"""
from __future__ import print_function
import os
import simplejson
import time
from dronekit import connect, VehicleMode, LocationGlobal, LocationGlobalRelative
import cherrypy
from jinja2 import Environment, FileSystemLoader
# Set up option parsing to get connection string
import argparse
parser = argparse.ArgumentParser(description='Creates a CherryPy based web application that displays a mapbox map to let you view the current vehicle position and send the vehicle commands to fly to a particular latitude and longitude. Will start and connect to SITL if no connection string specified.')
parser.add_argument('--connect',
help="vehicle connection target string. If not specified, SITL is automatically started and used.")
args = parser.parse_args()
connection_string = args.connect
# Start SITL if no connection string specified
if not connection_string:
import dronekit_sitl
sitl = dronekit_sitl.start_default()
connection_string = sitl.connection_string()
local_path = os.path.dirname(os.path.abspath(__file__))
print("local path: %s" % local_path)
cherrypy_conf = {
'/': {
'tools.sessions.on': True,
'tools.staticdir.root': local_path
},
'/static': {
'tools.staticdir.on': True,
'tools.staticdir.dir': './html/assets'
}
}
class Drone(object):
def __init__(self, server_enabled=True):
self.gps_lock = False
self.altitude = 30.0
# Connect to the Vehicle
self._log('Connected to vehicle.')
self.vehicle = vehicle
self.commands = self.vehicle.commands
self.current_coords = []
self.webserver_enabled = server_enabled
self._log("DroneDelivery Start")
# Register observers
self.vehicle.add_attribute_listener('location', self.location_callback)
def launch(self):
self._log("Waiting for location...")
while self.vehicle.location.global_frame.lat == 0:
time.sleep(0.1)
self.home_coords = [self.vehicle.location.global_frame.lat,
self.vehicle.location.global_frame.lon]
self._log("Waiting for ability to arm...")
while not self.vehicle.is_armable:
time.sleep(.1)
self._log('Running initial boot sequence')
self.change_mode('GUIDED')
self.arm()
self.takeoff()
if self.webserver_enabled is True:
self._run_server()
def takeoff(self):
self._log("Taking off")
self.vehicle.simple_takeoff(30.0)
def arm(self, value=True):
if value:
self._log('Waiting for arming...')
self.vehicle.armed = True
while not self.vehicle.armed:
time.sleep(.1)
else:
self._log("Disarming!")
self.vehicle.armed = False
def _run_server(self):
# Start web server if enabled
cherrypy.tree.mount(DroneDelivery(self), '/', config=cherrypy_conf)
cherrypy.config.update({'server.socket_port': 8080,
'server.socket_host': '0.0.0.0',
'log.screen': None})
print('''Server is bound on all addresses, port 8080
You may connect to it using your web broser using a URL looking like this:
http://localhost:8080/
''')
cherrypy.engine.start()
def change_mode(self, mode):
self._log("Changing to mode: {0}".format(mode))
self.vehicle.mode = VehicleMode(mode)
while self.vehicle.mode.name != mode:
self._log(' ... polled mode: {0}'.format(mode))
time.sleep(1)
def goto(self, location, relative=None):
self._log("Goto: {0}, {1}".format(location, self.altitude))
if relative:
self.vehicle.simple_goto(
LocationGlobalRelative(
float(location[0]), float(location[1]),
float(self.altitude)
)
)
else:
self.vehicle.simple_goto(
LocationGlobal(
float(location[0]), float(location[1]),
float(self.altitude)
)
)
self.vehicle.flush()
def get_location(self):
return [self.current_location.lat, self.current_location.lon]
def location_callback(self, vehicle, name, location):
if location.global_relative_frame.alt is not None:
self.altitude = location.global_relative_frame.alt
self.current_location = location.global_relative_frame
def _log(self, message):
print("[DEBUG]: {0}".format(message))
class Templates:
def __init__(self, home_coords):
self.home_coords = home_coords
self.options = self.get_options()
self.environment = Environment(loader=FileSystemLoader(local_path + '/html'))
def get_options(self):
return {'width': 670,
'height': 470,
'zoom': 13,
'format': 'png',
'access_token': 'pk.eyJ1Ijoia2V2aW4zZHIiLCJhIjoiY2lrOGoxN2s2MDJzYnR6a3drbTYwdGxmMiJ9.bv5u7QgmcJd6dZfLDGoykw',
'mapid': 'kevin3dr.n56ffjoo',
'home_coords': self.home_coords,
'menu': [{'name': 'Home', 'location': '/'},
{'name': 'Track', 'location': '/track'},
{'name': 'Command', 'location': '/command'}],
'current_url': '/',
'json': ''
}
def index(self):
self.options = self.get_options()
self.options['current_url'] = '/'
return self.get_template('index')
def track(self, current_coords):
self.options = self.get_options()
self.options['current_url'] = '/track'
self.options['current_coords'] = current_coords
self.options['json'] = simplejson.dumps(self.options)
return self.get_template('track')
def command(self, current_coords):
self.options = self.get_options()
self.options['current_url'] = '/command'
self.options['current_coords'] = current_coords
return self.get_template('command')
def get_template(self, file_name):
template = self.environment.get_template(file_name + '.html')
return template.render(options=self.options)
class DroneDelivery(object):
def __init__(self, drone):
self.drone = drone
self.templates = Templates(self.drone.home_coords)
@cherrypy.expose
def index(self):
return self.templates.index()
@cherrypy.expose
def command(self):
return self.templates.command(self.drone.get_location())
@cherrypy.expose
@cherrypy.tools.json_out()
def vehicle(self):
return dict(position=self.drone.get_location())
@cherrypy.expose
def track(self, lat=None, lon=None):
# Process POST request from Command
# Sending MAVLink packet with goto instructions
if(lat is not None and lon is not None):
self.drone.goto([lat, lon], True)
return self.templates.track(self.drone.get_location())
# Connect to the Vehicle
print('Connecting to vehicle on: %s' % connection_string)
vehicle = connect(connection_string, wait_ready=True)
print('Launching Drone...')
Drone().launch()
print('Waiting for cherrypy engine...')
cherrypy.engine.block()
if not args.connect:
# Shut down simulator if it was started.
sitl.stop()
Example: Flight Replay
This example creates and runs a waypoint mission using position information from a TLOG file.
The log used in this example contains around 2700 points. This is too many points to upload to the autopilot (and to usefully display). Instead we only add points that are more than 3 metres away from the previously kept point, and only store 99 points in total. After 60 seconds the mission is ended by setting the mode to RTL (return to launch).

99 point mission generated from log
Note
The method used to reduce the number of points is fairly effective, but we could do better by grouping some of the waypoints, and mapping others using spline waypoints. This might be a fun research project!
Running the example
The example can be run as described in Running the Examples (which in turn assumes that the vehicle and DroneKit have been set up as described in Installing DroneKit).
In summary, after cloning the repository:
Navigate to the example folder as shown:
cd dronekit-python/examples/flight_replay/You can run the example against a simulator (DroneKit-SITL) by specifying the Python script without any arguments. The example will download SITL binaries if needed, start the simulator, and then connect to it:
python flight_replay.py
On the command prompt you should see (something like):
Generating waypoints from tlog... Generated 100 waypoints from tlog Starting copter simulator (SITL) SITL already Downloaded. Connecting to vehicle on: tcp:127.0.0.1:5760 >>> APM:Copter V3.3 (d6053245) >>> Frame: QUAD >>> Calibrating barometer >>> Initialising APM... >>> barometer calibration complete >>> GROUND START Uploading 100 waypoints to vehicle... Arm and Takeoff Waiting for vehicle to initialise... >>> flight plan received Waiting for arming... Waiting for arming... Waiting for arming... Waiting for arming... >>> ARMING MOTORS >>> GROUND START Waiting for arming... >>> Initialising APM... Waiting for arming... >>> ARMING MOTORS Taking off! Altitude: 0.000000 < 28.500000 Altitude: 0.010000 < 28.500000 ... Altitude: 26.350000 < 28.500000 Altitude: 28.320000 < 28.500000 Reached target altitude of ~30.000000 Starting mission Distance to waypoint (1): 3.02389745499 >>> Reached Command #1 Distance to waypoint (2): 5.57718471895 Distance to waypoint (2): 4.1504263025 >>> Reached Command #2 Distance to waypoint (3): 0.872847106279 Distance to waypoint (3): 1.88967925144 Distance to waypoint (3): 2.16157704522 >>> Reached Command #3 Distance to waypoint (4): 4.91867197924 ... ... Distance to waypoint (35): 4.37309981133 >>> Reached Command #35 Distance to waypoint (36): 5.61829417257 >>> Reached Command #36 Return to launch Close vehicle object Completed...
Tip
It is more interesting to watch the example run on a map than the console. The topic Connecting an additional Ground Station explains how to set up Mission Planner to view a vehicle running on the simulator (SITL).
You can run the example against a specific connection (simulated or otherwise) by passing the connection string for your vehicle in the
--connectparameter.For example, to connect to SITL running on UDP port 14550 on your local computer:
python simple_goto.py --connect 127.0.0.1:14550
How it works
Getting the points
The example parses the flight.tlog file for position information. First we read all the points. We then keep the first 99 points that are at least 3 metres separated from the preceding kept point.
For safety reasons, the altitude for the waypoints is set to 30 meters (irrespective of the recorded height).
def position_messages_from_tlog(filename):
"""
Given telemetry log, get a series of wpts approximating the previous flight
"""
# Pull out just the global position msgs
messages = []
mlog = mavutil.mavlink_connection(filename)
while True:
try:
m = mlog.recv_match(type=['GLOBAL_POSITION_INT'])
if m is None:
break
except Exception:
break
# ignore we get where there is no fix:
if m.lat == 0:
continue
messages.append(m)
# Shrink the number of points for readability and to stay within autopilot memory limits.
# For coding simplicity we:
# - only keep points that are with 3 metres of the previous kept point.
# - only keep the first 100 points that meet the above criteria.
num_points = len(messages)
keep_point_distance=3 #metres
kept_messages = []
kept_messages.append(messages[0]) #Keep the first message
pt1num=0
pt2num=1
while True:
#Keep the last point. Only record 99 points.
if pt2num==num_points-1 or len(kept_messages)==99:
kept_messages.append(messages[pt2num])
break
pt1 = LocationGlobalRelative(messages[pt1num].lat/1.0e7,messages[pt1num].lon/1.0e7,0)
pt2 = LocationGlobalRelative(messages[pt2num].lat/1.0e7,messages[pt2num].lon/1.0e7,0)
distance_between_points = get_distance_metres(pt1,pt2)
if distance_between_points > keep_point_distance:
kept_messages.append(messages[pt2num])
pt1num=pt2num
pt2num=pt2num+1
return kept_messages
Setting the new waypoints
The following code shows how the vehicle writes the received messages as commands (this part of the code is very similar to that shown in Example: Basic Mission):
print "Generating %s waypoints from replay..." % len(messages)
cmds = vehicle.commands
cmds.clear()
for i in xrange(0, len(messages)):
pt = messages[i]
lat = pt['lat']
lon = pt['lon']
# To prevent accidents we don't trust the altitude in the original flight, instead
# we just put in a conservative cruising altitude.
altitude = 30.0 # pt['alt']
cmd = Command( 0,
0,
0,
mavutil.mavlink.MAV_FRAME_GLOBAL_RELATIVE_ALT,
mavutil.mavlink.MAV_CMD_NAV_WAYPOINT,
0, 0, 0, 0, 0, 0,
lat, lon, altitude)
cmds.add(cmd)
#Upload clear message and command messages to vehicle.
cmds.upload()
Known issues
There are no known issues with this example.
Source code
The full source code at documentation build-time is listed below (current version on github):
#!/usr/bin/env python
# -*- coding: utf-8 -*-
"""
© Copyright 2015-2016, 3D Robotics.
flight_replay.py:
This example requests a past flight from Droneshare, and then 'replays'
the flight by sending waypoints to a vehicle.
Full documentation is provided at http://python.dronekit.io/examples/flight_replay.html
"""
from __future__ import print_function
from dronekit import connect, Command, VehicleMode, LocationGlobalRelative
from pymavlink import mavutil
import json, urllib, math
import time
#Set up option parsing to get connection string
import argparse
parser = argparse.ArgumentParser(description='Load a telemetry log and use position data to create mission waypoints for a vehicle. Connects to SITL on local PC by default.')
parser.add_argument('--connect', help="vehicle connection target.")
parser.add_argument('--tlog', default='flight.tlog',
help="Telemetry log containing path to replay")
args = parser.parse_args()
def get_distance_metres(aLocation1, aLocation2):
"""
Returns the ground distance in metres between two LocationGlobal objects.
This method is an approximation, and will not be accurate over large distances and close to the
earth's poles. It comes from the ArduPilot test code:
https://github.com/diydrones/ardupilot/blob/master/Tools/autotest/common.py
"""
dlat = aLocation2.lat - aLocation1.lat
dlong = aLocation2.lon - aLocation1.lon
return math.sqrt((dlat*dlat) + (dlong*dlong)) * 1.113195e5
def distance_to_current_waypoint():
"""
Gets distance in metres to the current waypoint.
It returns None for the first waypoint (Home location).
"""
nextwaypoint = vehicle.commands.next
if nextwaypoint==0:
return None
missionitem=vehicle.commands[nextwaypoint-1] #commands are zero indexed
lat = missionitem.x
lon = missionitem.y
alt = missionitem.z
targetWaypointLocation = LocationGlobalRelative(lat,lon,alt)
distancetopoint = get_distance_metres(vehicle.location.global_frame, targetWaypointLocation)
return distancetopoint
def position_messages_from_tlog(filename):
"""
Given telemetry log, get a series of wpts approximating the previous flight
"""
# Pull out just the global position msgs
messages = []
mlog = mavutil.mavlink_connection(filename)
while True:
try:
m = mlog.recv_match(type=['GLOBAL_POSITION_INT'])
if m is None:
break
except Exception:
break
# ignore we get where there is no fix:
if m.lat == 0:
continue
messages.append(m)
# Shrink the number of points for readability and to stay within autopilot memory limits.
# For coding simplicity we:
# - only keep points that are with 3 metres of the previous kept point.
# - only keep the first 100 points that meet the above criteria.
num_points = len(messages)
keep_point_distance=3 #metres
kept_messages = []
kept_messages.append(messages[0]) #Keep the first message
pt1num=0
pt2num=1
while True:
#Keep the last point. Only record 99 points.
if pt2num==num_points-1 or len(kept_messages)==99:
kept_messages.append(messages[pt2num])
break
pt1 = LocationGlobalRelative(messages[pt1num].lat/1.0e7,messages[pt1num].lon/1.0e7,0)
pt2 = LocationGlobalRelative(messages[pt2num].lat/1.0e7,messages[pt2num].lon/1.0e7,0)
distance_between_points = get_distance_metres(pt1,pt2)
if distance_between_points > keep_point_distance:
kept_messages.append(messages[pt2num])
pt1num=pt2num
pt2num=pt2num+1
return kept_messages
def arm_and_takeoff(aTargetAltitude):
"""
Arms vehicle and fly to aTargetAltitude.
"""
# Don't try to arm until autopilot is ready
while not vehicle.is_armable:
print(" Waiting for vehicle to initialise...")
time.sleep(1)
# Set mode to GUIDED for arming and takeoff:
while (vehicle.mode.name != "GUIDED"):
vehicle.mode = VehicleMode("GUIDED")
time.sleep(0.1)
# Confirm vehicle armed before attempting to take off
while not vehicle.armed:
vehicle.armed = True
print(" Waiting for arming...")
time.sleep(1)
print(" Taking off!")
vehicle.simple_takeoff(aTargetAltitude) # Take off to target altitude
# Wait until the vehicle reaches a safe height
# before allowing next command to process.
while True:
requiredAlt = aTargetAltitude*0.95
#Break and return from function just below target altitude.
if vehicle.location.global_relative_frame.alt>=requiredAlt:
print(" Reached target altitude of ~%f" % (aTargetAltitude))
break
print(" Altitude: %f < %f" % (vehicle.location.global_relative_frame.alt,
requiredAlt))
time.sleep(1)
print("Generating waypoints from tlog...")
messages = position_messages_from_tlog(args.tlog)
print(" Generated %d waypoints from tlog" % len(messages))
if len(messages) == 0:
print("No position messages found in log")
exit(0)
#Start SITL if no connection string specified
if args.connect:
connection_string = args.connect
sitl = None
else:
start_lat = messages[0].lat/1.0e7
start_lon = messages[0].lon/1.0e7
import dronekit_sitl
sitl = dronekit_sitl.start_default(lat=start_lat,lon=start_lon)
connection_string = sitl.connection_string()
# Connect to the Vehicle
print('Connecting to vehicle on: %s' % connection_string)
vehicle = connect(connection_string, wait_ready=True)
# Now download the vehicle waypoints
cmds = vehicle.commands
cmds.wait_ready()
cmds = vehicle.commands
cmds.clear()
for pt in messages:
#print "Point: %d %d" % (pt.lat, pt.lon,)
lat = pt.lat
lon = pt.lon
# To prevent accidents we don't trust the altitude in the original flight, instead
# we just put in a conservative cruising altitude.
altitude = 30.0
cmd = Command( 0,
0,
0,
mavutil.mavlink.MAV_FRAME_GLOBAL_RELATIVE_ALT,
mavutil.mavlink.MAV_CMD_NAV_WAYPOINT,
0, 0, 0, 0, 0, 0,
lat/1.0e7, lon/1.0e7, altitude)
cmds.add(cmd)
#Upload clear message and command messages to vehicle.
print("Uploading %d waypoints to vehicle..." % len(messages))
cmds.upload()
print("Arm and Takeoff")
arm_and_takeoff(30)
print("Starting mission")
# Reset mission set to first (0) waypoint
vehicle.commands.next=0
# Set mode to AUTO to start mission:
while (vehicle.mode.name != "AUTO"):
vehicle.mode = VehicleMode("AUTO")
time.sleep(0.1)
# Monitor mission for 60 seconds then RTL and quit:
time_start = time.time()
while time.time() - time_start < 60:
nextwaypoint=vehicle.commands.next
print('Distance to waypoint (%s): %s' % (nextwaypoint, distance_to_current_waypoint()))
if nextwaypoint==len(messages):
print("Exit 'standard' mission when start heading to final waypoint")
break;
time.sleep(1)
print('Return to launch')
while (vehicle.mode.name != "RTL"):
vehicle.mode = VehicleMode("RTL")
time.sleep(0.1)
#Close vehicle object before exiting script
print("Close vehicle object")
vehicle.close()
# Shut down simulator if it was started.
if sitl is not None:
sitl.stop()
print("Completed...")
Example: Channels and Channel Overrides
This example shows how to get channel information and to get/set channel-override information.
Warning
Channel overrides (a.k.a. “RC overrides”) are highly dis-commended (they are primarily intended for simulating user input and when implementing certain types of joystick control).
Instead use the appropriate MAVLink commands like DO_SET_SERVO/DO_SET_RELAY, or more generally set the desired position or direction/speed.
If you have no choice but to use a channel-override please explain why in a Github issue and we will attempt to find a better alternative.
Running the example
The example can be run as described in Running the Examples (which in turn assumes that the vehicle and DroneKit have been set up as described in Installing DroneKit).
In summary, after cloning the repository:
Navigate to the example folder as shown:
cd dronekit-python/examples/channel_overrides/You can run the example against a simulator (DroneKit-SITL) by specifying the Python script without any arguments. The example will download SITL binaries (if needed), start the simulator, and then connect to it:
python channel_overrides.py
On the command prompt you should see (something like):
Starting copter simulator (SITL) SITL already Downloaded. Connecting to vehicle on: tcp:127.0.0.1:5760 >>> APM:Copter V3.3 (d6053245) >>> Frame: QUAD >>> Calibrating barometer >>> Initialising APM... >>> barometer calibration complete >>> GROUND START Channel values from RC Tx: {'1': 1500, '3': 1000, '2': 1500, '5': 1800, '4': 1500, '7': 1000, '6': 1000, '8': 1800} Read channels individually: Ch1: 1500 Ch2: 1500 Ch3: 1000 Ch4: 1500 Ch5: 1800 Ch6: 1000 Ch7: 1000 Ch8: 1800 Number of channels: 8 Channel overrides: {} Set Ch2 override to 200 (indexing syntax) Channel overrides: {'2': 200} Ch2 override: 200 Set Ch3 override to 300 (dictionary syntax) Channel overrides: {'3': 300} Set Ch1-Ch8 overrides to 110-810 respectively Channel overrides: {'1': 110, '3': 310, '2': 210, '5': 510, '4': 4100, '7': 710, '6': 610, '8': 810} Cancel Ch2 override (indexing syntax) Channel overrides: {'1': 110, '3': 310, '5': 510, '4': 4100, '7': 710, '6': 610, '8': 810} Clear Ch3 override (del syntax) Channel overrides: {'1': 110, '5': 510, '4': 4100, '7': 710, '6': 610, '8': 810} Clear Ch5, Ch6 override and set channel 3 to 500 (dictionary syntax) Channel overrides: {'3': 500} Clear all overrides Channel overrides: {} Close vehicle object Completed
You can run the example against a specific connection (simulated or otherwise) by passing the connection string for your vehicle in the
--connectparameter.For example, to connect to SITL running on UDP port 14550 on your local computer:
python channel_overrides.py --connect 127.0.0.1:14550
How does it work?
The RC transmitter channels are connected to the autopilot and control the vehicle.
The values of the first four channels map to the main flight controls: 1=Roll, 2=Pitch, 3=Throttle, 4=Yaw (the mapping is defined in RCMAP_ parameters in
Plane,
Copter ,
Rover).
The remaining channel values are configurable, and their purpose can be determined using the
RCn_FUNCTION parameters.
In general a value of 0 set for a specific RCn_FUNCTION indicates that the channel can be
mission controlled (i.e. it will not directly be
controlled by normal autopilot code).
You can read the values of the channels using the Vehicle.channels attribute. The values are regularly updated,
from the UAV, based on the RC inputs from the transmitter. These can be read either as a set or individually:
# Get all channel values from RC transmitter
print "Channel values from RC Tx:", vehicle.channels
# Access channels individually
print "Read channels individually:"
print " Ch1: %s" % vehicle.channels['1']
print " Ch2: %s" % vehicle.channels['2']
You can override the values sent to the vehicle by the autopilot using Vehicle.channels.overrides.
The overrides can be written individually using an indexing syntax or as a set using a dictionary syntax.
# Set Ch2 override to 200 using indexing syntax
vehicle.channels.overrides['2'] = 200
# Set Ch3, Ch4 override to 300,400 using dictionary syntax"
vehicle.channels.overrides = {'3':300, '4':400}
To clear all overrides, set the attribute to an empty dictionary.
To clear an individual override you can set its value to None (or call del on it):
# Clear override by setting channels to None
# Clear using index syntax
vehicle.channels.overrides['2'] = None
# Clear using 'del' syntax
del vehicle.channels.overrides['3']
# Clear using dictionary syntax (and set override at same time!)
vehicle.channels.overrides = {'5':None, '6':None,'3':500}
# Clear all overrides by setting an empty dictionary
vehicle.channels.overrides = {}
Read the channel overrides either as a dictionary or by index.
# Get all channel overrides
print " Channel overrides: %s" % vehicle.channels.overrides
# Print just one channel override
print " Ch2 override: %s" % vehicle.channels.overrides['2']
Note
You’ll get a KeyError exception if you read a channel override that has
not been set.
Source code
The full source code at documentation build-time is listed below (current version on github):
#!/usr/bin/env python
# -*- coding: utf-8 -*-
"""
© Copyright 2015-2016, 3D Robotics.
channel_overrides.py:
Demonstrates how set and clear channel-override information.
# NOTE:
Channel overrides (a.k.a "RC overrides") are highly discommended (they are primarily implemented
for simulating user input and when implementing certain types of joystick control).
They are provided for development purposes. Please raise an issue explaining why you need them
and we will try to find a better alternative: https://github.com/dronekit/dronekit-python/issues
Full documentation is provided at http://python.dronekit.io/examples/channel_overrides.html
"""
from __future__ import print_function
from dronekit import connect
#Set up option parsing to get connection string
import argparse
parser = argparse.ArgumentParser(description='Example showing how to set and clear vehicle channel-override information.')
parser.add_argument('--connect',
help="vehicle connection target string. If not specified, SITL automatically started and used.")
args = parser.parse_args()
connection_string = args.connect
sitl = None
#Start SITL if no connection string specified
if not connection_string:
import dronekit_sitl
sitl = dronekit_sitl.start_default()
connection_string = sitl.connection_string()
# Connect to the Vehicle
print('Connecting to vehicle on: %s' % connection_string)
vehicle = connect(connection_string, wait_ready=True)
# Get all original channel values (before override)
print("Channel values from RC Tx:", vehicle.channels)
# Access channels individually
print("Read channels individually:")
print(" Ch1: %s" % vehicle.channels['1'])
print(" Ch2: %s" % vehicle.channels['2'])
print(" Ch3: %s" % vehicle.channels['3'])
print(" Ch4: %s" % vehicle.channels['4'])
print(" Ch5: %s" % vehicle.channels['5'])
print(" Ch6: %s" % vehicle.channels['6'])
print(" Ch7: %s" % vehicle.channels['7'])
print(" Ch8: %s" % vehicle.channels['8'])
print("Number of channels: %s" % len(vehicle.channels))
# Override channels
print("\nChannel overrides: %s" % vehicle.channels.overrides)
print("Set Ch2 override to 200 (indexing syntax)")
vehicle.channels.overrides['2'] = 200
print(" Channel overrides: %s" % vehicle.channels.overrides)
print(" Ch2 override: %s" % vehicle.channels.overrides['2'])
print("Set Ch3 override to 300 (dictionary syntax)")
vehicle.channels.overrides = {'3':300}
print(" Channel overrides: %s" % vehicle.channels.overrides)
print("Set Ch1-Ch8 overrides to 110-810 respectively")
vehicle.channels.overrides = {'1': 110, '2': 210,'3': 310,'4':4100, '5':510,'6':610,'7':710,'8':810}
print(" Channel overrides: %s" % vehicle.channels.overrides)
# Clear override by setting channels to None
print("\nCancel Ch2 override (indexing syntax)")
vehicle.channels.overrides['2'] = None
print(" Channel overrides: %s" % vehicle.channels.overrides)
print("Clear Ch3 override (del syntax)")
del vehicle.channels.overrides['3']
print(" Channel overrides: %s" % vehicle.channels.overrides)
print("Clear Ch5, Ch6 override and set channel 3 to 500 (dictionary syntax)")
vehicle.channels.overrides = {'5':None, '6':None,'3':500}
print(" Channel overrides: %s" % vehicle.channels.overrides)
print("Clear all overrides")
vehicle.channels.overrides = {}
print(" Channel overrides: %s" % vehicle.channels.overrides)
#Close vehicle object before exiting script
print("\nClose vehicle object")
vehicle.close()
# Shut down simulator if it was started.
if sitl is not None:
sitl.stop()
print("Completed")
Contributing
DroneKit is an open-source project. We welcome any contribution that will improve the API and make it easier to use.
The articles below explain some of the opportunities for working on the project, how to contribute to the API or the documentation, and how to set up a development environment on Linux or Windows.
How you can Contribute
One of the best ways you can contribute is to simply use the API and share your bug reports and enhancement suggestions on Github. These can cover anything: from APIs that don’t work properly through to needed features or documentation.
If you want to take a more active role, then a good place to start is with the project’s open issues on Github. In particular, documentation issues can be resolved without a deep knowledge of the code, and will help you learn more about the project.
If there is a feature that you want to add, then please do so! Before you start we highly recommend that you first create an issue in Github so it can be tracked and discussed!
Contributing to the API
This article provides a high level overview of how to contribute changes to the DroneKit-Python source code.
Tip
We highly recommend that changes and ideas are discussed with the project team before starting work!
Submitting changes
Contributors should fork the main dronekit/dronekit-python/ repository and contribute changes back to the project master branch using pull requests
- Changes should be tested locally before submission.
- Changes to the public API should be documented (we will provide subediting support!)
- Pull requests should be as small and focussed as possible to make them easier to review.
- Pull requests should be rebased against the main project before submission to make integration easier.
Test code
There are three test suites in DroneKit-Python:
- Unit tests (
tests/unit) — verify all code paths of the API. - Integration tests (
tests/sitl) — verify real-world code, examples, and documentation as they would perform in a real environment.
Test code should be used to verify new and changed functionality. New tests should:
- Verify all code paths that code can take.
- Be concise and straightforward.
- Be documented.
Setting up local testing
Follow the links below to set up a development environment on your Linux or Windows computer.
The tests require additional pip modules, including nose, a Python library and tool for writing and running test scripts. These can be installed separately using either of the commands below:
# Install just the additional requirements for tests
pip install requests nose mock
# (or) Install all requirements for dronekit, tests, and building documentation
pip install -r requirements.txt
For several tests, you may be required to set an environment variable. In your command line, you can set the name of a variable to equal a value using the following invocation, depending on your OS:
export NAME=VALUE # works on OS X and Linux
set NAME=VALUE # works on Windows cmd.exe
$env:NAME = "VALUE" # works on Windows Powershell
Unit tests
All new features should be created with accompanying unit tests.
DroneKit-Python unit tests are based on the nose test framework, and use mock to simulate objects and APIs and ensure correct results.
To run the tests and display a summary of the results (on any OS), navigate to the dronekit-python folder and enter the following command on a terminal/prompt:
nosetests dronekit.test.unit
Writing a new unit test
Create any file named test_XXX.py in the tests/unit folder to add it as a test.
Feel free to copy from existing tests to get started. When nosetests is run, it will add your new test to its summary.
Tests names should be named based on their associated Github issue (for example,
test_12.py for issue #12)
or describe the functionality covered (for example, test_waypoints.py
for a unit test for the waypoints API).
Use assertions to test your code is consistent. You can use the built-in Python assert macro as well as assert_equals and assert_not_equals
from the notestools module:
Note
Avoiding printing any data from your test!
from nose.tools import assert_equals, assert_not_equals
def test_this(the_number_two):
assert the_number_two > 0, '2 should be greater than zero!'
assert_equals(the_number_two, 2, '2 should equal two!')
assert_not_equals(the_number_two, 1, '2 should equal one!')
Please add documentation to each test function describing what behavior it verifies.
Integration tests
Integrated tests use a custom test runner that is similar to nosetests. On any OS, enter the following command on a terminal/prompt to run all the integrated tests (and display summary results):
cd dronekit-python
nosetests dronekit.test.sitl
You can choose to run a specific tests. The example below shows how to run dronekit-pythondronekittestsitltest_12.py.
nosetests dronekit.test.sitl.test_12
Configuring the test environment
Integrated tests use the SITL environment to run DroneKit tests against a simulated Copter. Because these tests emulate Copter in real-time, you can set several environment variables to tweak the environment that code is run in:
TEST_SPEEDUP- Speedup factor to SITL. Default isTEST_SPEEDUP=1. You can increase this factor to speed up how long your tests take to run.TEST_RATE- Sets framerate. Default isTEST_RATE=200for copter, 50 for rover, 50 for plane.TEST_RETRY- Retry failed tests. Default isTEST_RETRY=1. This is useful if your testing environment generates inconsistent success rates because of timing.
Writing a new integration test
Integration tests should be written or improved whenever:
- New functionality has been added to encapsulate or abstract older methods of interacting with the API.
- Example code or documentation has been added.
- A feature could not be tested by unit tests alone (e.g. timing issues, mode changing, etc.)
You can write a new integrated test by adding (or copying) a file with the naming scheme test_XXX.py to the tests/sitl directory.
Tests names should be named based on their associated Github issue (for example,
test_12.py for issue #12)
or describe the functionality covered (for example, test_waypoints.py
for an integration test for the waypoints API).
Tests should minimally use the imports shown below and decorate test functions with @with_sitl
(this sets up the test and passes in a connection string for SITL).
from dronekit import connect
from dronekit.test import with_sitl
from nose.tools import assert_equals, assert_not_equals
@with_sitl
def test_something(connpath):
vehicle = connect(connpath)
# Test using assert, assert_equals and assert_not_equals
...
vehicle.close()
Use assertions to test your code is consistent. You can use the built-in Python assert macro as well as assert_equals and assert_not_equals
from the testlib module:
Note
Avoiding printing any data from your test!
from testlib import assert_equals
def test_this(the_number_two):
assert the_number_two > 0, '2 should be greater than zero!'
assert_equals(the_number_two, 2, '2 should equal two!'
Please add documentation to each test function describing what behavior it verifies.
Contributing to the Documentation
One of the best ways that you can help is by improving this documentation. Here we explain the documentation system, how to build the documents locally, and how to submit your changes.
Documentation system overview
The documentation source files are stored in Github.
The content is written in plain-text files (file-extension .rst) using
reStructuredText markup, and is compiled into HTML using the
Sphinx Documentation Generator.
Submitting changes
The process and requirements for submitting changes to the documentation are the same as when contributing to the source code.
As when submitting source code you should fork the main project Github repository and contribute changes back to the project using pull requests. The changes should be tested locally (by building the docs) before being submitted.
See Contributing to the API for more information.
Building the docs
We’ve made it very easy to get started by providing a Vagrant based setup for Sphinx. Using Vagrant you can work with source files on your host machine using a familiar git client and text editor, and then invoke Sphinx in the Vagrant VM to compile the source to HTML.
The instructions below explain how to get the documentation source, and build it using our Vagrant VM:
Install the Vagrant pre-conditions:
- Download and install VirtualBox.
- Download and install Vagrant for your platform (Windows, OS-X and Linux are supported).
Clone your fork of the Github repository anywhere on the host PC:
git clone https://github.com/YOUR-REPOSITORY/dronekit-python.git
Navigate to the root of dronekit-python and start the Vagrant VM:
cd /your-path-to-clone/dronekit-python/ vagrant up
Note
This may take a long time to complete the first time it is run — Vagrant needs to download the virtual machine and then set up Sphinx.
When the VM is running, you can build the source by entering the following command in the prompt:
vagrant ssh -c "cd /vagrant/docs && make html"
The files will be built by Sphinx, and will appear on the host system in
<clone-path>/dronekit-python/docs/_build/html/. To preview, simply open them in a Web browser.Note
The
vagrant ssh -c "cd /vagrant/docs && make html"command starts (and closes) an SSH session with the VM. If you plan on building the source a number of times it is much faster to keep the session open:vagrant ssh # Open an SSH session with the Vagrant VM cd /vagrant/docs # Navigate to the docs root (contains Sphinx configuration files) make html # Build the HTML ... # Repeat "make html" as many time as needed make html exit # Close the SSH session.
When you are finished you can suspend the VM. Next time you need to build more HTML simply restart it (this is a fast operation):
vagrant suspend #Suspend the VM vagrant resume #Restart the VM vagrant ssh -c "cd /vagrant/docs && make html" #Build files when needed.
Style guide
Tip
This guide is evolving. The most important guidance we can give is to copy the existing style of reference, guide and example material!
- Use US English for spelling.
- Use emphasis sparingly (italic, bold, underline).
- Use Sphinx semantic markup to mark up types of text (key-presses, file names etc.)
- Use double backticks (``) around
inline codeitems.
Building DroneKit-Python on Windows
This article shows how to set up an environment for developing DroneKit-Python on Windows.
Install DroneKit using WinPython command line
First set up a command line DroneKit-Python installation. We recommend WinPython or ActivePython, as discussed in Installing DroneKit.
Fetch and build DroneKit source
Fork the dronekit-python project on Github.
Open the WinPython Command Prompt. Run the following commands to clone and build DroneKit (in the directory of your choice):
git clone https://github.com/<your_fork_of_dronekit>/dronekit-python.git cd dronekit-python python setup.py build python setup.py install
Updating DroneKit
Navigate to your local git fork, pull the latest version, and rebuild/install:
cd <path-to-your-dronekit-fork>/dronekit-python
git pull
python setup.py build
python setup.py install
Building DroneKit-Python on Linux
The setup for developing DroneKit-Python on Linux is almost the same as for using DroneKit-Python. We therefore recommend that you start by following the instructions in Installing DroneKit.
When you’ve got DroneKit and a vehicle (simulated or real) communicating, you can then build and install your own fork of DroneKit, as discussed below.
Fetch and build DroneKit source
Fork the dronekit-python project on Github.
Run the following commands to clone and build DroneKit (in the directory of your choice):
git clone https://github.com/<your_fork_of_dronekit>/dronekit-python.git cd ./dronekit-python sudo python setup.py build sudo python setup.py install
Updating DroneKit
Navigate to your local git fork, pull the latest version, and rebuild/install:
cd ./<path-to-your-dronekit-fork>/dronekit-python
git pull
sudo python setup.py build
sudo python setup.py install
DroneKit-Python API Reference
This is the API Reference for the DroneKit-Python API.
The main API is the Vehicle class.
The code snippet below shows how to use connect() to obtain an instance of a connected vehicle:
from dronekit import connect
# Connect to the Vehicle using "connection string" (in this case an address on network)
vehicle = connect('127.0.0.1:14550', wait_ready=True)
Vehicle provides access to vehicle state through python attributes
(e.g. Vehicle.mode)
and to settings/parameters though the Vehicle.parameters attribute.
Asynchronous notification on vehicle attribute changes is available by registering listeners/observers.
Vehicle movement is primarily controlled using the Vehicle.armed attribute and
Vehicle.simple_takeoff() and Vehicle.simple_goto in GUIDED mode.
Velocity-based movement and control over other vehicle features can be achieved using custom MAVLink messages
(Vehicle.send_mavlink(), Vehicle.message_factory()).
It is also possible to work with vehicle “missions” using the Vehicle.commands attribute, and run them in AUTO mode.
All the logging is handled through the builtin Python logging module.
A number of other useful classes and methods are listed below.
-
exception
dronekit.APIException¶ Base class for DroneKit related exceptions.
Parameters: message (String) – Message string describing the exception -
with_traceback()¶ Exception.with_traceback(tb) – set self.__traceback__ to tb and return self.
-
-
class
dronekit.Attitude(pitch, yaw, roll)¶ Attitude information.
An object of this type is returned by
Vehicle.attitude.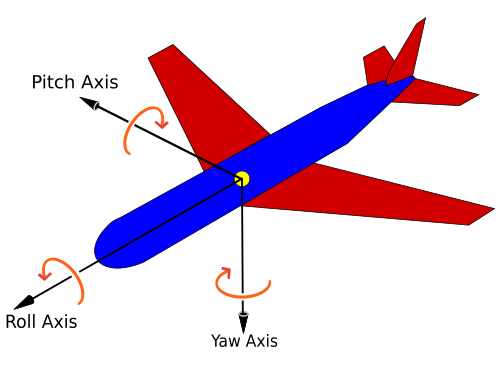
Diagram showing Pitch, Roll, Yaw (Creative Commons)
Parameters: - pitch – Pitch in radians
- yaw – Yaw in radians
- roll – Roll in radians

-
class
dronekit.Battery(voltage, current, level)¶ System battery information.
An object of this type is returned by
Vehicle.battery.Parameters: - voltage – Battery voltage in millivolts.
- current – Battery current, in 10 * milliamperes.
Noneif the autopilot does not support current measurement. - level – Remaining battery energy.
Noneif the autopilot cannot estimate the remaining battery.
-
class
dronekit.Capabilities(capabilities)¶ Autopilot capabilities (supported message types and functionality).
An object of this type is returned by
Vehicle.capabilities.See the enum MAV_PROTOCOL_CAPABILITY.
New in version 2.0.3.
-
mission_float¶ Autopilot supports MISSION float message type (Boolean).
-
param_float¶ Autopilot supports the PARAM float message type (Boolean).
-
mission_int¶ Autopilot supports MISSION_INT scaled integer message type (Boolean).
-
command_int¶ Autopilot supports COMMAND_INT scaled integer message type (Boolean).
-
param_union¶ Autopilot supports the PARAM_UNION message type (Boolean).
-
ftp¶ Autopilot supports ftp for file transfers (Boolean).
-
set_attitude_target¶ Autopilot supports commanding attitude offboard (Boolean).
-
set_attitude_target_local_ned¶ Autopilot supports commanding position and velocity targets in local NED frame (Boolean).
-
set_altitude_target_global_int¶ Autopilot supports commanding position and velocity targets in global scaled integers (Boolean).
-
terrain¶ Autopilot supports terrain protocol / data handling (Boolean).
-
set_actuator_target¶ Autopilot supports direct actuator control (Boolean).
-
flight_termination¶ Autopilot supports the flight termination command (Boolean).
-
compass_calibration¶ Autopilot supports onboard compass calibration (Boolean).
-
-
class
dronekit.Channels(vehicle, count)¶ A dictionary class for managing RC channel information associated with a
Vehicle.An object of this type is accessed through
Vehicle.channels. This object also stores the current vehicle channel overrides through itsoverridesattribute.For more information and examples see Example: Channels and Channel Overrides.
-
clear() → None. Remove all items from D.
-
copy() → a shallow copy of D
-
count¶ The number of channels defined in the dictionary (currently 8).
-
fromkeys()¶ Create a new dictionary with keys from iterable and values set to value.
-
get()¶ Return the value for key if key is in the dictionary, else default.
-
items() → a set-like object providing a view on D's items
-
keys() → a set-like object providing a view on D's keys
-
overrides¶ Attribute to read, set and clear channel overrides (also known as “rc overrides”) associated with a
Vehicle(viaVehicle.channels). This is an object of typeChannelsOverride.For more information and examples see Example: Channels and Channel Overrides.
To set channel overrides:
# Set and clear overrids using dictionary syntax (clear by setting override to none) vehicle.channels.overrides = {'5':None, '6':None,'3':500} # You can also set and clear overrides using indexing syntax vehicle.channels.overrides['2'] = 200 vehicle.channels.overrides['2'] = None # Clear using 'del' del vehicle.channels.overrides['3'] # Clear all overrides by setting an empty dictionary vehicle.channels.overrides = {}
Read the channel overrides either as a dictionary or by index. Note that you’ll get a
KeyErrorexception if you read a channel override that has not been set.# Get all channel overrides print " Channel overrides: %s" % vehicle.channels.overrides # Print just one channel override print " Ch2 override: %s" % vehicle.channels.overrides['2']
-
pop(k[, d]) → v, remove specified key and return the corresponding value.¶ If key is not found, d is returned if given, otherwise KeyError is raised
-
popitem() → (k, v), remove and return some (key, value) pair as a¶ 2-tuple; but raise KeyError if D is empty.
-
setdefault()¶ Insert key with a value of default if key is not in the dictionary.
Return the value for key if key is in the dictionary, else default.
-
update([E, ]**F) → None. Update D from dict/iterable E and F.¶ If E is present and has a .keys() method, then does: for k in E: D[k] = E[k] If E is present and lacks a .keys() method, then does: for k, v in E: D[k] = v In either case, this is followed by: for k in F: D[k] = F[k]
-
values() → an object providing a view on D's values
-
-
class
dronekit.ChannelsOverride(vehicle)¶ A dictionary class for managing Vehicle channel overrides.
Channels can be read, written, or cleared by index or using a dictionary syntax. To clear a value, set it to
Noneor usedelon the item.An object of this type is returned by
Vehicle.channels.overrides.For more information and examples see Example: Channels and Channel Overrides.
-
clear() → None. Remove all items from D.
-
copy() → a shallow copy of D
-
fromkeys()¶ Create a new dictionary with keys from iterable and values set to value.
-
get()¶ Return the value for key if key is in the dictionary, else default.
-
items() → a set-like object providing a view on D's items
-
keys() → a set-like object providing a view on D's keys
-
pop(k[, d]) → v, remove specified key and return the corresponding value.¶ If key is not found, d is returned if given, otherwise KeyError is raised
-
popitem() → (k, v), remove and return some (key, value) pair as a¶ 2-tuple; but raise KeyError if D is empty.
-
setdefault()¶ Insert key with a value of default if key is not in the dictionary.
Return the value for key if key is in the dictionary, else default.
-
update([E, ]**F) → None. Update D from dict/iterable E and F.¶ If E is present and has a .keys() method, then does: for k in E: D[k] = E[k] If E is present and lacks a .keys() method, then does: for k, v in E: D[k] = v In either case, this is followed by: for k in F: D[k] = F[k]
-
values() → an object providing a view on D's values
-
-
class
dronekit.Command(target_system, target_component, seq, frame, command, current, autocontinue, param1, param2, param3, param4, x, y, z)¶ A waypoint object.
This object encodes a single mission item command. The set of commands that are supported by ArduPilot in Copter, Plane and Rover (along with their parameters) are listed in the wiki article MAVLink Mission Command Messages (MAV_CMD).
For example, to create a NAV_WAYPOINT command:
cmd = Command(0,0,0, mavutil.mavlink.MAV_FRAME_GLOBAL_RELATIVE_ALT, mavutil.mavlink.MAV_CMD_NAV_WAYPOINT, 0, 0, 0, 0, 0, 0,-34.364114, 149.166022, 30)
Parameters: - target_system – This can be set to any value (DroneKit changes the value to the MAVLink ID of the connected vehicle before the command is sent).
- target_component – The component id if the message is intended for a particular component within the target system (for example, the camera). Set to zero (broadcast) in most cases.
- seq – The sequence number within the mission (the autopilot will reject messages sent out of sequence). This should be set to zero as the API will automatically set the correct value when uploading a mission.
- frame – The frame of reference used for the location parameters (x, y, z). In most cases this will be
mavutil.mavlink.MAV_FRAME_GLOBAL_RELATIVE_ALT, which uses the WGS84 global coordinate system for latitude and longitude, but sets altitude as relative to the home position in metres (home altitude = 0). For more information see the wiki here. - command – The specific mission command (e.g.
mavutil.mavlink.MAV_CMD_NAV_WAYPOINT). The supported commands (and command parameters are listed on the wiki. - current – Set to zero (not supported).
- autocontinue – Set to zero (not supported).
- param1 – Command specific parameter (depends on specific Mission Command (MAV_CMD)).
- param2 – Command specific parameter.
- param3 – Command specific parameter.
- param4 – Command specific parameter.
- x – (param5) Command specific parameter used for latitude (if relevant to command).
- y – (param6) Command specific parameter used for longitude (if relevant to command).
- z – (param7) Command specific parameter used for altitude (if relevant). The reference frame for altitude depends on the
frame.
-
format_attr(field)¶ override field getter
-
class
dronekit.CommandSequence(vehicle)¶ A sequence of vehicle waypoints (a “mission”).
Operations include ‘array style’ indexed access to the various contained waypoints.
The current commands/mission for a vehicle are accessed using the
Vehicle.commandsattribute. Waypoints are not downloaded from vehicle untildownload()is called. The download is asynchronous; usewait_ready()to block your thread until the download is complete. The code to download the commands from a vehicle is shown below:#Connect to a vehicle object (for example, on com14) vehicle = connect('com14', wait_ready=True) # Download the vehicle waypoints (commands). Wait until download is complete. cmds = vehicle.commands cmds.download() cmds.wait_ready()
The set of commands can be changed and uploaded to the client. The changes are not guaranteed to be complete until
upload()is called.cmds = vehicle.commands cmds.clear() lat = -34.364114, lon = 149.166022 altitude = 30.0 cmd = Command(0,0,0, mavutil.mavlink.MAV_FRAME_GLOBAL_RELATIVE_ALT, mavutil.mavlink.MAV_CMD_NAV_WAYPOINT, 0, 0, 0, 0, 0, 0, lat, lon, altitude) cmds.add(cmd) cmds.upload()
-
add(cmd)¶ Add a new command (waypoint) at the end of the command list.
Note
Commands are sent to the vehicle only after you call :
upload().Parameters: cmd (Command) – The command to be added.
-
clear()¶ Clear the command list.
This command will be sent to the vehicle only after you call
upload().
-
count¶ Return number of waypoints.
Returns: The number of waypoints in the sequence.
-
download()¶ Download all waypoints from the vehicle. The download is asynchronous. Use
wait_ready()to block your thread until the download is complete.
-
next¶ Get the currently active waypoint number.
-
upload(timeout=None)¶ Call
upload()afteraddingorclearingmission commands.After the return from
upload()any writes are guaranteed to have completed (or thrown an exception) and future reads will see their effects.Parameters: timeout (int) – The timeout for uploading the mission. No timeout if not provided or set to None.
-
wait_ready(**kwargs)¶ Block the calling thread until waypoints have been downloaded.
This can be called after
download()to block the thread until the asynchronous download is complete.
-
-
class
dronekit.GPSInfo(eph, epv, fix_type, satellites_visible)¶ Standard information about GPS.
If there is no GPS lock the parameters are set to
None.Parameters: - eph (Int) – GPS horizontal dilution of position (HDOP).
- epv (Int) – GPS vertical dilution of position (VDOP).
- fix_type (Int) – 0-1: no fix, 2: 2D fix, 3: 3D fix
- satellites_visible (Int) – Number of satellites visible.
-
class
dronekit.Gimbal(vehicle)¶ Gimbal status and control.
An object of this type is returned by
Vehicle.gimbal. The gimbal orientation can be obtained from itsroll,pitchandyawattributes.The gimbal orientation can be set explicitly using
rotate()or you can set the gimbal (and vehicle) to track a specific “region of interest” usingtarget_location().Note
- The orientation attributes are created with values of
None. If a gimbal is present, the attributes are populated shortly after initialisation by messages from the autopilot. - The attribute values reflect the last gimbal setting-values rather than actual measured values. This means that the values won’t change if you manually move the gimbal, and that the value will change when you set it, even if the specified orientation is not supported.
- A gimbal may not support all axes of rotation. For example, the Solo gimbal will set pitch values from 0 to -90 (straight ahead to straight down), it will rotate the vehicle to follow specified yaw values, and will ignore roll commands (not supported).
-
pitch¶ Gimbal pitch in degrees relative to the vehicle (see diagram for attitude). A value of 0 represents a camera pointed straight ahead relative to the front of the vehicle, while -90 points the camera straight down.
Note
This is the last pitch value sent to the gimbal (not the actual/measured pitch).
-
release()¶ Release control of the gimbal to the user (RC Control).
This should be called once you’ve finished controlling the mount with either
rotate()ortarget_location(). Control will automatically be released if you change vehicle mode.
-
roll¶ Gimbal roll in degrees relative to the vehicle (see diagram for attitude).
Note
This is the last roll value sent to the gimbal (not the actual/measured roll).
-
rotate(pitch, roll, yaw)¶ Rotate the gimbal to a specific vector.
#Point the gimbal straight down vehicle.gimbal.rotate(-90, 0, 0)
Parameters: - pitch – Gimbal pitch in degrees relative to the vehicle (see diagram for attitude). A value of 0 represents a camera pointed straight ahead relative to the front of the vehicle, while -90 points the camera straight down.
- roll – Gimbal roll in degrees relative to the vehicle (see diagram for attitude).
- yaw – Gimbal yaw in degrees relative to global frame (0 is North, 90 is West, 180 is South etc.)
-
target_location(roi)¶ Point the gimbal at a specific region of interest (ROI).
#Set the camera to track the current home location. vehicle.gimbal.target_location(vehicle.home_location)
The target position must be defined in a
LocationGlobalRelativeorLocationGlobal.This function can be called in AUTO or GUIDED mode.
In order to clear an ROI you can send a location with all zeros (e.g.
LocationGlobalRelative(0,0,0)).Parameters: roi – Target location in global relative frame.
-
yaw¶ Gimbal yaw in degrees relative to global frame (0 is North, 90 is West, 180 is South etc).
Note
This is the last yaw value sent to the gimbal (not the actual/measured yaw).
- The orientation attributes are created with values of
-
class
dronekit.LocationGlobal(lat, lon, alt=None)¶ A global location object.
The latitude and longitude are relative to the WGS84 coordinate system. The altitude is relative to mean sea-level (MSL).
For example, a global location object with altitude 30 metres above sea level might be defined as:
LocationGlobal(-34.364114, 149.166022, 30)
An object of this type is owned by
Vehicle.location. See that class for information on reading and observing location in the global frame.Parameters: - lat – Latitude.
- lon – Longitude.
- alt – Altitude in meters relative to mean sea-level (MSL).
-
class
dronekit.LocationGlobalRelative(lat, lon, alt=None)¶ A global location object, with attitude relative to home location altitude.
The latitude and longitude are relative to the WGS84 coordinate system. The altitude is relative to the home position.
For example, a
LocationGlobalRelativeobject with an altitude of 30 metres above the home location might be defined as:LocationGlobalRelative(-34.364114, 149.166022, 30)
An object of this type is owned by
Vehicle.location. See that class for information on reading and observing location in the global-relative frame.Parameters: - lat – Latitude.
- lon – Longitude.
- alt – Altitude in meters (relative to the home location).
-
class
dronekit.LocationLocal(north, east, down)¶ A local location object.
The north, east and down are relative to the EKF origin. This is most likely the location where the vehicle was turned on.
An object of this type is owned by
Vehicle.location. See that class for information on reading and observing location in the local frame.Parameters: - north – Position north of the EKF origin in meters.
- east – Position east of the EKF origin in meters.
- down – Position down from the EKF origin in meters. (i.e. negative altitude in meters)
-
distance_home()¶ Distance away from home, in meters. Returns 3D distance if down is known, otherwise 2D distance.
-
class
dronekit.Locations(vehicle)¶ An object for holding location information in global, global relative and local frames.
Vehicleowns an object of this type. SeeVehicle.locationfor information on reading and observing location in the different frames.The different frames are accessed through the members, which are created with this object. They can be read, and are observable.
-
add_attribute_listener(attr_name, observer)¶ Add an attribute listener callback.
The callback function (
observer) is invoked differently depending on the type of attribute. Attributes that represent sensor values or which are used to monitor connection status are updated whenever a message is received from the vehicle. Attributes which reflect vehicle “state” are only updated when their values change (for exampleVehicle.system_status,Vehicle.armed, andVehicle.mode).The callback can be removed using
remove_attribute_listener().Note
The
on_attribute()decorator performs the same operation as this method, but with a more elegant syntax. Useadd_attribute_listenerby preference if you will need to remove the observer.The argument list for the callback is
observer(object, attr_name, attribute_value):self- the associatedVehicle. This may be compared to a global vehicle handle to implement vehicle-specific callback handling (if needed).attr_name- the attribute name. This can be used to infer which attribute has triggered if the same callback is used for watching several attributes.value- the attribute value (so you don’t need to re-query the vehicle object).
The example below shows how to get callbacks for (global) location changes:
#Callback to print the location in global frame def location_callback(self, attr_name, msg): print "Location (Global): ", msg #Add observer for the vehicle's current location vehicle.add_attribute_listener('global_frame', location_callback)
See Observing attribute changes for more information.
Parameters: - attr_name (String) – The name of the attribute to watch (or ‘*’ to watch all attributes).
- observer – The callback to invoke when a change in the attribute is detected.
-
global_frame¶ Location in global frame (a
LocationGlobal).The latitude and longitude are relative to the WGS84 coordinate system. The altitude is relative to mean sea-level (MSL).
This is accessed through the
Vehicle.locationattribute:print "Global Location: %s" % vehicle.location.global_frame print "Sea level altitude is: %s" % vehicle.location.global_frame.alt
Its
latandlonattributes are populated shortly after GPS becomes available. Thealtcan take several seconds longer to populate (from the barometer). Listeners are not notified of changes to this attribute until it has fully populated.To watch for changes you can use
Vehicle.on_attribute()decorator oradd_attribute_listener()(decorator approach shown below):@vehicle.on_attribute('location.global_frame') def listener(self, attr_name, value): print " Global: %s" % value #Alternatively, use decorator: ``@vehicle.location.on_attribute('global_frame')``.
-
global_relative_frame¶ Location in global frame, with altitude relative to the home location (a
LocationGlobalRelative).The latitude and longitude are relative to the WGS84 coordinate system. The altitude is relative to
home location.This is accessed through the
Vehicle.locationattribute:print "Global Location (relative altitude): %s" % vehicle.location.global_relative_frame print "Altitude relative to home_location: %s" % vehicle.location.global_relative_frame.alt
-
local_frame¶ Location in local NED frame (a
LocationGlobalRelative).This is accessed through the
Vehicle.locationattribute:print "Local Location: %s" % vehicle.location.local_frame
This location will not start to update until the vehicle is armed.
-
notify_attribute_listeners(attr_name, value, cache=False)¶ This method is used to update attribute observers when the named attribute is updated.
You should call it in your message listeners after updating an attribute with information from a vehicle message.
By default the value of
cacheisFalseand every update from the vehicle is sent to listeners (whether or not the attribute has changed). This is appropriate for attributes which represent sensor or heartbeat-type monitoring.Set
cache=Trueto update listeners only when the value actually changes (cache the previous attribute value). This should be used where clients will only ever need to know the value when it has changed. For example, this setting has been used for notifyingmodechanges.See Example: Create Attribute in App for more information.
Parameters: - attr_name (String) – The name of the attribute that has been updated.
- value – The current value of the attribute that has been updated.
- cache (Boolean) – Set
Trueto only notify observers when the attribute value changes.
-
on_attribute(name)¶ Decorator for attribute listeners.
The decorated function (
observer) is invoked differently depending on the type of attribute. Attributes that represent sensor values or which are used to monitor connection status are updated whenever a message is received from the vehicle. Attributes which reflect vehicle “state” are only updated when their values change (for exampleVehicle.system_status(),Vehicle.armed, andVehicle.mode).The argument list for the callback is
observer(object, attr_name, attribute_value)self- the associatedVehicle. This may be compared to a global vehicle handle to implement vehicle-specific callback handling (if needed).attr_name- the attribute name. This can be used to infer which attribute has triggered if the same callback is used for watching several attributes.msg- the attribute value (so you don’t need to re-query the vehicle object).
Note
There is no way to remove an attribute listener added with this decorator. Use
add_attribute_listener()if you need to be able to remove theattribute listener.The code fragment below shows how you can create a listener for the attitude attribute.
@vehicle.on_attribute('attitude') def attitude_listener(self, name, msg): print '%s attribute is: %s' % (name, msg)
See Observing attribute changes for more information.
Parameters: - name (String) – The name of the attribute to watch (or ‘*’ to watch all attributes).
- observer – The callback to invoke when a change in the attribute is detected.
-
remove_attribute_listener(attr_name, observer)¶ Remove an attribute listener (observer) that was previously added using
add_attribute_listener().For example, the following line would remove a previously added vehicle ‘global_frame’ observer called
location_callback:vehicle.remove_attribute_listener('global_frame', location_callback)
See Observing attribute changes for more information.
Parameters: - attr_name (String) – The attribute name that is to have an observer removed (or ‘*’ to remove an ‘all attribute’ observer).
- observer – The callback function to remove.
-
-
class
dronekit.Parameters(vehicle)¶ This object is used to get and set the values of named parameters for a vehicle. See the following links for information about the supported parameters for each platform: Copter Parameters, Plane Parameters, Rover Parameters.
The code fragment below shows how to get and set the value of a parameter.
# Print the value of the THR_MIN parameter. print "Param: %s" % vehicle.parameters['THR_MIN'] # Change the parameter value to something different. vehicle.parameters['THR_MIN']=100
It is also possible to observe parameters and to iterate the
Vehicle.parameters.For more information see the guide.
-
add_attribute_listener(attr_name, *args, **kwargs)¶ Add a listener callback on a particular parameter.
The callback can be removed using
remove_attribute_listener().Note
The
on_attribute()decorator performs the same operation as this method, but with a more elegant syntax. Useadd_attribute_listeneronly if you will need to remove the observer.The callback function is invoked only when the parameter changes.
The callback arguments are:
self- the associatedParameters.attr_name- the parameter name. This can be used to infer which parameter has triggered if the same callback is used for watching multiple parameters.msg- the new parameter value (so you don’t need to re-query the vehicle object).
The example below shows how to get callbacks for the
THR_MINparameter:#Callback function for the THR_MIN parameter def thr_min_callback(self, attr_name, value): print " PARAMETER CALLBACK: %s changed to: %s" % (attr_name, value) #Add observer for the vehicle's THR_MIN parameter vehicle.parameters.add_attribute_listener('THR_MIN', thr_min_callback)
See Observing parameter changes for more information.
Parameters: - attr_name (String) – The name of the parameter to watch (or ‘*’ to watch all parameters).
- args – The callback to invoke when a change in the parameter is detected.
-
clear() → None. Remove all items from D.
-
get(k[, d]) → D[k] if k in D, else d. d defaults to None.
-
items() → a set-like object providing a view on D's items
-
keys() → a set-like object providing a view on D's keys
-
notify_attribute_listeners(attr_name, *args, **kwargs)¶ This method is used to update attribute observers when the named attribute is updated.
You should call it in your message listeners after updating an attribute with information from a vehicle message.
By default the value of
cacheisFalseand every update from the vehicle is sent to listeners (whether or not the attribute has changed). This is appropriate for attributes which represent sensor or heartbeat-type monitoring.Set
cache=Trueto update listeners only when the value actually changes (cache the previous attribute value). This should be used where clients will only ever need to know the value when it has changed. For example, this setting has been used for notifyingmodechanges.See Example: Create Attribute in App for more information.
Parameters: - attr_name (String) – The name of the attribute that has been updated.
- value – The current value of the attribute that has been updated.
- cache (Boolean) – Set
Trueto only notify observers when the attribute value changes.
-
on_attribute(attr_name, *args, **kwargs)¶ Decorator for parameter listeners.
Note
There is no way to remove a listener added with this decorator. Use
add_attribute_listener()if you need to be able to remove thelistener.The callback function is invoked only when the parameter changes.
The callback arguments are:
self- the associatedParameters.attr_name- the parameter name. This can be used to infer which parameter has triggered if the same callback is used for watching multiple parameters.msg- the new parameter value (so you don’t need to re-query the vehicle object).
The code fragment below shows how to get callbacks for the
THR_MINparameter:@vehicle.parameters.on_attribute('THR_MIN') def decorated_thr_min_callback(self, attr_name, value): print " PARAMETER CALLBACK: %s changed to: %s" % (attr_name, value)
See Observing parameter changes for more information.
Parameters: - attr_name (String) – The name of the parameter to watch (or ‘*’ to watch all parameters).
- args – The callback to invoke when a change in the parameter is detected.
-
pop(k[, d]) → v, remove specified key and return the corresponding value.¶ If key is not found, d is returned if given, otherwise KeyError is raised.
-
popitem() → (k, v), remove and return some (key, value) pair¶ as a 2-tuple; but raise KeyError if D is empty.
-
remove_attribute_listener(attr_name, *args, **kwargs)¶ Remove a paremeter listener that was previously added using
add_attribute_listener().For example to remove the
thr_min_callback()callback function:vehicle.parameters.remove_attribute_listener('thr_min', thr_min_callback)
See Observing parameter changes for more information.
Parameters: - attr_name (String) – The parameter name that is to have an observer removed (or ‘*’ to remove an ‘all attribute’ observer).
- args – The callback function to remove.
-
setdefault(k[, d]) → D.get(k,d), also set D[k]=d if k not in D
-
update([E, ]**F) → None. Update D from mapping/iterable E and F.¶ If E present and has a .keys() method, does: for k in E: D[k] = E[k] If E present and lacks .keys() method, does: for (k, v) in E: D[k] = v In either case, this is followed by: for k, v in F.items(): D[k] = v
-
values() → an object providing a view on D's values
-
wait_ready(**kwargs)¶ Block the calling thread until parameters have been downloaded
-
-
class
dronekit.Rangefinder(distance, voltage)¶ Rangefinder readings.
An object of this type is returned by
Vehicle.rangefinder.Parameters: - distance – Distance (metres).
Noneif the vehicle doesn’t have a rangefinder. - voltage – Voltage (volts).
Noneif the vehicle doesn’t have a rangefinder.
- distance – Distance (metres).
-
class
dronekit.SystemStatus(state)¶ This object is used to get and set the current “system status”.
An object of this type is returned by
Vehicle.system_status.-
state¶ The system state, as a
string.
-
-
exception
dronekit.TimeoutError¶ Raised by operations that have timeouts.
-
with_traceback()¶ Exception.with_traceback(tb) – set self.__traceback__ to tb and return self.
-
-
class
dronekit.Vehicle(handler)¶ The main vehicle API.
Vehicle state is exposed through ‘attributes’ (e.g.
heading). All attributes can be read, and some are also settable (mode,armedandhome_location).Attributes can also be asynchronously monitored for changes by registering listener callback functions.
Vehicle “settings” (parameters) are read/set using the
parametersattribute. Parameters can be iterated and are also individually observable.Vehicle movement is primarily controlled using the
armedattribute andsimple_takeoff()andsimple_goto()in GUIDED mode.It is also possible to work with vehicle “missions” using the
commandsattribute, and run them in AUTO mode.STATUSTEXT log messages from the autopilot are handled through a separate logger. It is possible to configure the log level, the formatting, etc. by accessing the logger, e.g.:
import logging autopilot_logger = logging.getLogger('autopilot') autopilot_logger.setLevel(logging.DEBUG)
The guide contains more detailed information on the different ways you can use the
Vehicleclass:Note
This class currently exposes just the attributes that are most commonly used by all vehicle types. if you need to add additional attributes then subclass
Vehicleas demonstrated in Example: Create Attribute in App.Please then contribute your additions back to the project!
-
add_attribute_listener(attr_name, observer)¶ Add an attribute listener callback.
The callback function (
observer) is invoked differently depending on the type of attribute. Attributes that represent sensor values or which are used to monitor connection status are updated whenever a message is received from the vehicle. Attributes which reflect vehicle “state” are only updated when their values change (for exampleVehicle.system_status,Vehicle.armed, andVehicle.mode).The callback can be removed using
remove_attribute_listener().Note
The
on_attribute()decorator performs the same operation as this method, but with a more elegant syntax. Useadd_attribute_listenerby preference if you will need to remove the observer.The argument list for the callback is
observer(object, attr_name, attribute_value):self- the associatedVehicle. This may be compared to a global vehicle handle to implement vehicle-specific callback handling (if needed).attr_name- the attribute name. This can be used to infer which attribute has triggered if the same callback is used for watching several attributes.value- the attribute value (so you don’t need to re-query the vehicle object).
The example below shows how to get callbacks for (global) location changes:
#Callback to print the location in global frame def location_callback(self, attr_name, msg): print "Location (Global): ", msg #Add observer for the vehicle's current location vehicle.add_attribute_listener('global_frame', location_callback)
See Observing attribute changes for more information.
Parameters: - attr_name (String) – The name of the attribute to watch (or ‘*’ to watch all attributes).
- observer – The callback to invoke when a change in the attribute is detected.
-
add_message_listener(name, fn)¶ Adds a message listener function that will be called every time the specified message is received.
Tip
We recommend you use
on_message()instead of this method as it has a more elegant syntax. This method is only preferred if you need to be able toremove the listener.The callback function must have three arguments:
self- the current vehicle.name- the name of the message that was intercepted.message- the actual message (a pymavlink class).
For example, in the fragment below
my_methodwill be called for every heartbeat message:#Callback method for new messages def my_method(self, name, msg): pass vehicle.add_message_listener('HEARTBEAT',my_method)
See MAVLink Messages for more information.
Parameters: - name (String) – The name of the message to be intercepted by the listener function (or ‘*’ to get all messages).
- fn – The listener function that will be called if a message is received.
-
airspeed¶ Current airspeed in metres/second (
double).This attribute is settable. The set value is the default target airspeed when moving the vehicle using
simple_goto()(or other position-based movement commands).
-
arm(wait=True, timeout=None)¶ Arm the vehicle.
If wait is True, wait for arm operation to complete before returning. If timeout is nonzero, raise a TimeouTerror if the vehicle has not armed after timeout seconds.
-
armed¶ This attribute can be used to get and set the
armedstate of the vehicle (boolean).The code below shows how to read the state, and to arm/disarm the vehicle:
# Print the armed state for the vehicle print "Armed: %s" % vehicle.armed # Disarm the vehicle vehicle.armed = False # Arm the vehicle vehicle.armed = True
-
capabilities¶ The autopilot capabilities in a
Capabilitiesobject.New in version 2.0.3.
-
channels¶ The RC channel values from the RC Transmitter (
Channels).The attribute can also be used to set and read RC Override (channel override) values via
Vehicle.channels.override.For more information and examples see Example: Channels and Channel Overrides.
To read the channels from the RC transmitter:
# Get all channel values from RC transmitter print "Channel values from RC Tx:", vehicle.channels # Access channels individually print "Read channels individually:" print " Ch1: %s" % vehicle.channels['1'] print " Ch2: %s" % vehicle.channels['2']
-
commands¶ Gets the editable waypoints/current mission for this vehicle (
CommandSequence).This can be used to get, create, and modify a mission.
Returns: A CommandSequencecontaining the waypoints for this vehicle.
-
disarm(wait=True, timeout=None)¶ Disarm the vehicle.
If wait is True, wait for disarm operation to complete before returning. If timeout is nonzero, raise a TimeouTerror if the vehicle has not disarmed after timeout seconds.
-
ekf_ok¶ Trueif the EKF status is considered acceptable,Falseotherwise (boolean).
-
flush()¶ Call
flush()afteraddingorclearingmission commands.After the return from
flush()any writes are guaranteed to have completed (or thrown an exception) and future reads will see their effects.Warning
This method is deprecated. It has been replaced by
Vehicle.commands.upload().
-
gimbal¶ Gimbal object for controlling, viewing and observing gimbal status (
Gimbal).New in version 2.0.1.
-
groundspeed¶ Current groundspeed in metres/second (
double).This attribute is settable. The set value is the default target groundspeed when moving the vehicle using
simple_goto()(or other position-based movement commands).
-
heading¶ Current heading in degrees - 0..360, where North = 0 (
int).
-
home_location¶ The current home location (
LocationGlobal).To get the attribute you must first download the
Vehicle.commands(). The attribute has a value ofNoneuntilVehicle.commands()has been downloaded and the autopilot has set an initial home location (typically where the vehicle first gets GPS lock).#Connect to a vehicle object (for example, on com14) vehicle = connect('com14', wait_ready=True) # Download the vehicle waypoints (commands). Wait until download is complete. cmds = vehicle.commands cmds.download() cmds.wait_ready() # Get the home location home = vehicle.home_location
The
home_locationis not observable.The attribute can be written (in the same way as any other attribute) after it has successfully been populated from the vehicle. The value sent to the vehicle is cached in the attribute (and can potentially get out of date if you don’t re-download
Vehicle.commands):Warning
Setting the value will fail silently if the specified location is more than 50km from the EKF origin.
-
is_armable¶ Returns
Trueif the vehicle is ready to arm, false otherwise (Boolean).This attribute wraps a number of pre-arm checks, ensuring that the vehicle has booted, has a good GPS fix, and that the EKF pre-arm is complete.
-
last_heartbeat¶ Time since last MAVLink heartbeat was received (in seconds).
The attribute can be used to monitor link activity and implement script-specific timeout handling.
For example, to pause the script if no heartbeat is received for more than 1 second you might implement the following observer, and use
pause_scriptin a program loop to wait until the link is recovered:pause_script=False @vehicle.on_attribute('last_heartbeat') def listener(self, attr_name, value): global pause_script if value > 1 and not pause_script: print "Pausing script due to bad link" pause_script=True; if value < 1 and pause_script: pause_script=False; print "Un-pausing script"
The observer will be called at the period of the messaging loop (about every 0.01 seconds). Testing on SITL indicates that
last_heartbeataverages about .5 seconds, but will rarely exceed 1.5 seconds when connected. Whether heartbeat monitoring can be useful will very much depend on the application.Note
If you just want to change the heartbeat timeout you can modify the
heartbeat_timeoutparameter passed to theconnect()function.
-
location¶ The vehicle location in global, global relative and local frames (
Locations).The different frames are accessed through its members:
global_frame(LocationGlobal)global_relative_frame(LocationGlobalRelative)local_frame(LocationLocal)
For example, to print the location in each frame for a
vehicle:# Print location information for `vehicle` in all frames (default printer) print "Global Location: %s" % vehicle.location.global_frame print "Global Location (relative altitude): %s" % vehicle.location.global_relative_frame print "Local Location: %s" % vehicle.location.local_frame #NED # Print altitudes in the different frames (see class definitions for other available information) print "Altitude (global frame): %s" % vehicle.location.global_frame.alt print "Altitude (global relative frame): %s" % vehicle.location.global_relative_frame.alt print "Altitude (NED frame): %s" % vehicle.location.local_frame.down
Note
All the location “values” (e.g.
global_frame.lat) are initially created with valueNone. Theglobal_frame,global_relative_framelatitude and longitude values are populated shortly after initialisation butglobal_frame.altmay take a few seconds longer to be updated. Thelocal_framedoes not populate until the vehicle is armed.The attribute and its members are observable. To watch for changes in all frames using a listener created using a decorator (you can also define a listener and explicitly add it).
@vehicle.on_attribute('location') def listener(self, attr_name, value): # `self`: :py:class:`Vehicle` object that has been updated. # `attr_name`: name of the observed attribute - 'location' # `value` is the updated attribute value (a :py:class:`Locations`). This can be queried for the frame information print " Global: %s" % value.global_frame print " GlobalRelative: %s" % value.global_relative_frame print " Local: %s" % value.local_frame
To watch for changes in just one attribute (in this case
global_frame):@vehicle.on_attribute('location.global_frame') def listener(self, attr_name, value): # `self`: :py:class:`Locations` object that has been updated. # `attr_name`: name of the observed attribute - 'global_frame' # `value` is the updated attribute value. print " Global: %s" % value #Or watch using decorator: ``@vehicle.location.on_attribute('global_frame')``.
-
message_factory¶ Returns an object that can be used to create ‘raw’ MAVLink messages that are appropriate for this vehicle. The message can then be sent using
send_mavlink(message).Note
Vehicles support a subset of the messages defined in the MAVLink standard. For more information about the supported sets see wiki topics: Copter Commands in Guided Mode and Plane Commands in Guided Mode.
All message types are defined in the central MAVLink github repository. For example, a Pixhawk understands the following messages (from pixhawk.xml):
<message id="153" name="IMAGE_TRIGGER_CONTROL"> <field type="uint8_t" name="enable">0 to disable, 1 to enable</field> </message>
The name of the factory method will always be the lower case version of the message name with _encode appended. Each field in the XML message definition must be listed as arguments to this factory method. So for this example message, the call would be:
msg = vehicle.message_factory.image_trigger_control_encode(True) vehicle.send_mavlink(msg)
Some message types include “addressing information”. If present, there is no need to specify the
target_systemid (just set to zero) as DroneKit will automatically update messages with the correct ID for the connected vehicle before sending. Thetarget_componentshould be set to 0 (broadcast) unless the message is to specific component. CRC fields and sequence numbers (if defined in the message type) are automatically set by DroneKit and can also be ignored/set to zero.For more information see the guide topic: Sending messages/commands.
-
mode¶ This attribute is used to get and set the current flight mode. You can specify the value as a
VehicleMode, like this:vehicle.mode = VehicleMode('LOITER')
Or as a simple string:
vehicle.mode = 'LOITER'
If you are targeting ArduPilot you can also specify the flight mode using a numeric value (this will not work with PX4 autopilots):
# set mode to LOITER vehicle.mode = 5
-
mount_status¶ Warning
This method is deprecated. It has been replaced by
gimbal.Current status of the camera mount (gimbal) as a three element list:
[ pitch, yaw, roll ].The values in the list are set to
Noneif no mount is configured.
-
notify_attribute_listeners(attr_name, value, cache=False)¶ This method is used to update attribute observers when the named attribute is updated.
You should call it in your message listeners after updating an attribute with information from a vehicle message.
By default the value of
cacheisFalseand every update from the vehicle is sent to listeners (whether or not the attribute has changed). This is appropriate for attributes which represent sensor or heartbeat-type monitoring.Set
cache=Trueto update listeners only when the value actually changes (cache the previous attribute value). This should be used where clients will only ever need to know the value when it has changed. For example, this setting has been used for notifyingmodechanges.See Example: Create Attribute in App for more information.
Parameters: - attr_name (String) – The name of the attribute that has been updated.
- value – The current value of the attribute that has been updated.
- cache (Boolean) – Set
Trueto only notify observers when the attribute value changes.
-
on_attribute(name)¶ Decorator for attribute listeners.
The decorated function (
observer) is invoked differently depending on the type of attribute. Attributes that represent sensor values or which are used to monitor connection status are updated whenever a message is received from the vehicle. Attributes which reflect vehicle “state” are only updated when their values change (for exampleVehicle.system_status(),Vehicle.armed, andVehicle.mode).The argument list for the callback is
observer(object, attr_name, attribute_value)self- the associatedVehicle. This may be compared to a global vehicle handle to implement vehicle-specific callback handling (if needed).attr_name- the attribute name. This can be used to infer which attribute has triggered if the same callback is used for watching several attributes.msg- the attribute value (so you don’t need to re-query the vehicle object).
Note
There is no way to remove an attribute listener added with this decorator. Use
add_attribute_listener()if you need to be able to remove theattribute listener.The code fragment below shows how you can create a listener for the attitude attribute.
@vehicle.on_attribute('attitude') def attitude_listener(self, name, msg): print '%s attribute is: %s' % (name, msg)
See Observing attribute changes for more information.
Parameters: - name (String) – The name of the attribute to watch (or ‘*’ to watch all attributes).
- observer – The callback to invoke when a change in the attribute is detected.
-
on_message(name)¶ Decorator for message listener callback functions.
Tip
This is the most elegant way to define message listener callback functions. Use
add_message_listener()only if you need to be able toremove the listenerlater.A decorated message listener function is called with three arguments every time the specified message is received:
self- the current vehicle.name- the name of the message that was intercepted.message- the actual message (a pymavlink class).
For example, in the fragment below
my_methodwill be called for every heartbeat message:@vehicle.on_message('HEARTBEAT') def my_method(self, name, msg): pass
See MAVLink Messages for more information.
Parameters: name (String) – The name of the message to be intercepted by the decorated listener function (or ‘*’ to get all messages).
-
parameters¶ The (editable) parameters for this vehicle (
Parameters).
-
play_tune(tune)¶ Play a tune on the vehicle
-
rangefinder¶ Rangefinder distance and voltage values (
Rangefinder).
-
reboot()¶ Requests an autopilot reboot by sending a
MAV_CMD_PREFLIGHT_REBOOT_SHUTDOWNcommand.
-
remove_attribute_listener(attr_name, observer)¶ Remove an attribute listener (observer) that was previously added using
add_attribute_listener().For example, the following line would remove a previously added vehicle ‘global_frame’ observer called
location_callback:vehicle.remove_attribute_listener('global_frame', location_callback)
See Observing attribute changes for more information.
Parameters: - attr_name (String) – The attribute name that is to have an observer removed (or ‘*’ to remove an ‘all attribute’ observer).
- observer – The callback function to remove.
-
remove_message_listener(name, fn)¶ Removes a message listener (that was previously added using
add_message_listener()).See MAVLink Messages for more information.
Parameters: - name (String) – The name of the message for which the listener is to be removed (or ‘*’ to remove an ‘all messages’ observer).
- fn – The listener callback function to remove.
-
send_calibrate_accelerometer(simple=False)¶ Request accelerometer calibration.
Parameters: simple – if True, perform simple accelerometer calibration
-
send_calibrate_barometer()¶ Request barometer calibration.
-
send_calibrate_gyro()¶ Request gyroscope calibration.
-
send_calibrate_magnetometer()¶ Request magnetometer calibration.
-
send_calibrate_vehicle_level()¶ Request vehicle level (accelerometer trim) calibration.
-
send_capabilities_request(vehicle, name, m)¶ Request an AUTOPILOT_VERSION packet
-
send_capabilties_request(vehicle, name, m)¶ An alias for send_capabilities_request.
The word “capabilities” was misspelled in previous versions of this code. This is simply an alias to send_capabilities_request using the legacy name.
-
send_mavlink(message)¶ This method is used to send raw MAVLink “custom messages” to the vehicle.
The function can send arbitrary messages/commands to the connected vehicle at any time and in any vehicle mode. It is particularly useful for controlling vehicles outside of missions (for example, in GUIDED mode).
The
message_factoryis used to create messages in the appropriate format.For more information see the guide topic: Sending messages/commands.
Parameters: message – A MAVLink_messageinstance, created usingmessage_factory. There is need to specify the system id, component id or sequence number of messages as the API will set these appropriately.
-
simple_goto(location, airspeed=None, groundspeed=None)¶ Go to a specified global location (
LocationGlobalorLocationGlobalRelative).There is no mechanism for notification when the target location is reached, and if another command arrives before that point that will be executed immediately.
You can optionally set the desired airspeed or groundspeed (this is identical to setting
airspeedorgroundspeed). The vehicle will determine what speed to use if the values are not set or if they are both set.The method will change the
VehicleModetoGUIDEDif necessary.# Set mode to guided - this is optional as the simple_goto method will change the mode if needed. vehicle.mode = VehicleMode("GUIDED") # Set the LocationGlobal to head towards a_location = LocationGlobal(-34.364114, 149.166022, 30) vehicle.simple_goto(a_location)
Parameters: - location – The target location (
LocationGlobalorLocationGlobalRelative). - airspeed – Target airspeed in m/s (optional).
- groundspeed – Target groundspeed in m/s (optional).
- location – The target location (
-
simple_takeoff(alt=None)¶ Take off and fly the vehicle to the specified altitude (in metres) and then wait for another command.
Note
This function should only be used on Copter vehicles.
The vehicle must be in GUIDED mode and armed before this is called.
There is no mechanism for notification when the correct altitude is reached, and if another command arrives before that point (e.g.
simple_goto()) it will be run instead.Warning
Apps should code to ensure that the vehicle will reach a safe altitude before other commands are executed. A good example is provided in the guide topic Taking Off.
Parameters: alt – Target height, in metres.
-
system_status¶ System status (
SystemStatus).The status has a
stateproperty with one of the following values:UNINIT: Uninitialized system, state is unknown.BOOT: System is booting up.CALIBRATING: System is calibrating and not flight-ready.STANDBY: System is grounded and on standby. It can be launched any time.ACTIVE: System is active and might be already airborne. Motors are engaged.CRITICAL: System is in a non-normal flight mode. It can however still navigate.EMERGENCY: System is in a non-normal flight mode. It lost control over parts or over the whole airframe. It is in mayday and going down.POWEROFF: System just initialized its power-down sequence, will shut down now.
-
velocity¶ Current velocity as a three element list
[ vx, vy, vz ](in meter/sec).
-
wait_for(condition, timeout=None, interval=0.1, errmsg=None)¶ Wait for a condition to be True.
Wait for condition, a callable, to return True. If timeout is nonzero, raise a TimeoutError(errmsg) if the condition is not True after timeout seconds. Check the condition everal interval seconds.
-
wait_for_alt(alt, epsilon=0.1, rel=True, timeout=None)¶ Wait for the vehicle to reach the specified altitude.
Wait for the vehicle to get within epsilon meters of the given altitude. If rel is True (the default), use the global_relative_frame. If rel is False, use the global_frame. If timeout is nonzero, raise a TimeoutError if the specified altitude has not been reached after timeout seconds.
-
wait_for_armable(timeout=None)¶ Wait for the vehicle to become armable.
If timeout is nonzero, raise a TimeoutError if the vehicle is not armable after timeout seconds.
-
wait_for_mode(mode, timeout=None)¶ Set the flight mode.
If wait is True, wait for the mode to change before returning. If timeout is nonzero, raise a TimeoutError if the flight mode hasn’t changed after timeout seconds.
-
wait_ready(*types, **kwargs)¶ Waits for specified attributes to be populated from the vehicle (values are initially
None).This is typically called “behind the scenes” to ensure that
connect()does not return until attributes have populated (via thewait_readyparameter). You can also use it after connecting to wait on a specific value(s).There are two ways to call the method:
#Wait on default attributes to populate vehicle.wait_ready(True) #Wait on specified attributes (or array of attributes) to populate vehicle.wait_ready('mode','airspeed')
Using the
wait_ready(True)waits onparameters,gps_0,armed,mode, andattitude. In practice this usually means that all supported attributes will be populated.By default, the method will timeout after 30 seconds and raise an exception if the attributes were not populated.
Parameters: - types –
Trueto wait on the default set of attributes, or a comma-separated list of the specific attributes to wait on. - timeout (int) – Timeout in seconds after which the method will raise an exception
(the default) or return
False. The default timeout is 30 seconds. - raise_exception (Boolean) – If
Truethe method will raise an exception on timeout, otherwise the method will returnFalse. The default isTrue(raise exception).
- types –
-
-
class
dronekit.VehicleMode(name)¶ This object is used to get and set the current “flight mode”.
The flight mode determines the behaviour of the vehicle and what commands it can obey. The recommended flight modes for DroneKit-Python apps depend on the vehicle type:
- Copter apps should use
AUTOmode for “normal” waypoint missions andGUIDEDmode otherwise. - Plane and Rover apps should use the
AUTOmode in all cases, re-writing the mission commands if “dynamic” behaviour is required (they support only a limited subset of commands inGUIDEDmode). - Some modes like
RETURN_TO_LAUNCHcan be used on all platforms. Care should be taken when using manual modes as these may require remote control input from the user.
The available set of supported flight modes is vehicle-specific (see Copter Modes, Plane Modes, Rover Modes). If an unsupported mode is set the script will raise a
KeyErrorexception.The
Vehicle.modeattribute can be queried for the current mode. The code snippet below shows how to observe changes to the mode and then read the value:#Callback definition for mode observer def mode_callback(self, attr_name): print "Vehicle Mode", self.mode #Add observer callback for attribute `mode` vehicle.add_attribute_listener('mode', mode_callback)
The code snippet below shows how to change the vehicle mode to AUTO:
# Set the vehicle into auto mode vehicle.mode = VehicleMode("AUTO")
For more information on getting/setting/observing the
Vehicle.mode(and other attributes) see the attributes guide.-
name¶ The mode name, as a
string.
- Copter apps should use
-
class
dronekit.Version(raw_version, autopilot_type, vehicle_type)¶ Autopilot version and type.
An object of this type is returned by
Vehicle.version.The version number can be read in a few different formats. To get it in a human-readable format, just print vehicle.version. This might print something like “APM:Copter-3.3.2-rc4”.
New in version 2.0.3.
-
major¶ Major version number (integer).
-
patch¶ Patch version number (integer).
-
release¶ Release type (integer). See the enum FIRMWARE_VERSION_TYPE.
This is a composite of the product release cycle stage (rc, beta etc) and the version in that cycle - e.g. 23.
-
is_stable()¶ Returns True if the autopilot reports that the current firmware is a stable release (not a pre-release or development version).
-
release_type()¶ Returns text describing the release type e.g. “alpha”, “stable” etc.
-
release_version()¶ Returns the version within the release type (an integer). This method returns “23” for Copter-3.3rc23.
-
-
dronekit.connect(ip, _initialize=True, wait_ready=None, timeout=30, still_waiting_callback=<function default_still_waiting_callback>, still_waiting_interval=1, status_printer=None, vehicle_class=None, rate=4, baud=115200, heartbeat_timeout=30, source_system=255, source_component=0, use_native=False)¶ Returns a
Vehicleobject connected to the address specified by string parameterip. Connection string parameters (ip) for different targets are listed in the getting started guide.The method is usually called with
wait_ready=Trueto ensure that vehicle parameters and (most) attributes are available whenconnect()returns.from dronekit import connect # Connect to the Vehicle using "connection string" (in this case an address on network) vehicle = connect('127.0.0.1:14550', wait_ready=True)
Parameters: - ip (String) – Connection string for target address - e.g. 127.0.0.1:14550.
- wait_ready (Bool/Array) –
If
Truewait until all default attributes have downloaded before the method returns (default isNone). The default attributes to wait on are:parameters,gps_0,armed,mode, andattitude.You can also specify a named set of parameters to wait on (e.g.
wait_ready=['system_status','mode']).For more information see
Vehicle.wait_ready. - status_printer – (deprecated) method of signature
def status_printer(txt)that prints STATUS_TEXT messages from the Vehicle and other diagnostic information. By default the status information is handled by theautopilotlogger. - vehicle_class (Vehicle) – The class that will be instantiated by the
connect()method. This can be any sub-class ofVehicle(and defaults toVehicle). - rate (int) – Data stream refresh rate. The default is 4Hz (4 updates per second).
- baud (int) – The baud rate for the connection. The default is 115200.
- heartbeat_timeout (int) – Connection timeout value in seconds (default is 30s). If a heartbeat is not detected within this time an exception will be raised.
- source_system (int) – The MAVLink ID of the
Vehicleobject returned by this method (by default 255). - source_component (int) – The MAVLink Component ID fo the
Vehicleobject returned by this method (by default 0). - use_native (bool) –
Use precompiled MAVLink parser.
Note
The returned
Vehicleobject acts as a ground control station from the perspective of the connected “real” vehicle. It will process/receive messages from the real vehicle if they are addressed to thissource_systemid. Messages sent to the real vehicle are automatically updated to use the vehicle’starget_systemid.It is good practice to assign a unique id for every system on the MAVLink network. It is possible to configure the autopilot to only respond to guided-mode commands from a specified GCS ID.
The
status_printerargument is deprecated. To redirect the logging from the library and from the autopilot, configure thedronekitandautopilotloggers using the Pythonloggingmodule.
Returns: A connected vehicle of the type defined in
vehicle_class(a superclass ofVehicle).